
Last updated: April 15, 2024
Available with any of the following subscriptions, except where noted:
|
|
|
|
Please note:
- On March 5, 2024, HubSpot introduced a seats-based pricing model to all new Hubs and subscription tiers. Accounts created prior to March 5, 2024, that have not yet migrated will only have access to purchased Sales Hub or Service Hub paid seats, and should use the last section of this article for legacy Sales Hub and Service Hub Starter, Professional, and Enterprise accounts.
- If you're upgrading from HubSpot free tools to a Starter subscription, your 5 free seats will be removed once you upgrade. You will need to purchase the number of seats you require at checkout. Learn how to upgrade your HubSpot subscription or add additional paid seats.
A seat is the manner and level of access your users have to your subscription services. HubSpot offers different types of seats based on which subscription services you purchase. The following are brief descriptions of each seat type:
- Core Seat: provides your user with access to the features and tools in the subscription services you purchased.
- Sales Hub Seat: provides your user with access to Sales Hub, and access to use features for Sales Hub Professional and Sales Hub Enterprise.
- Service Hub Seat: provides your user with access to Service Hub and access to use advanced features for Professional and Enterprise subscription editions.
- View-Only Seat: allows your user to view your subscription services without making any changes to your account.
- Partner Seat: a free seat that gives eligible HubSpot Solutions Partner and provider employees access to all features in a client's account.
To understand the full scope of what each seat includes, learn more in HubSpot's Products & Services catalog.
Before you get started
To add and assign paid seats, you must do the following:
- Purchase a HubSpot subscription.
- Set up your HubSpot account.
Add or remove paid seats
Users with Modify billing permissions can add or remove paid seats to change the number of available seats that can be assigned to users.
Please note:
- Once a paid seat is removed, your billing will be adjusted after your renewal date at the start of your next subscription term. Learn more about the billing and payment implications when you add or remove seats. For further information, contact the HubSpot sales team.
- Seats that are currently assigned to users can't be removed from your account. Learn how to unassign paid seats.
- In your HubSpot account, click the settings icon in the top navigation bar.
- In the left sidebar menu, navigate to Users & Teams.
- At the top, click the Seats tab. Here you can view seat assignments, invite statuses, and last active dates for your users in your account. Use the search bar and filters at the top of the table to view specific users.
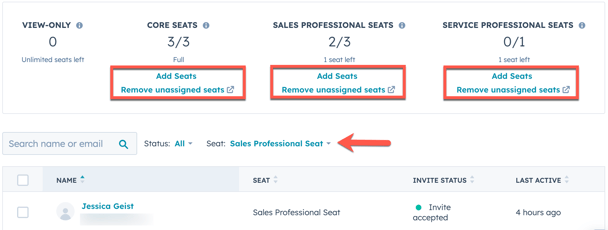
- To add additional seats:
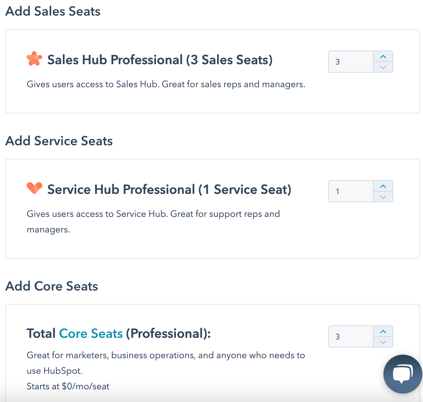
- Click Add Seats below the type of seat you wanted to purchase.
- On the Seats purchasing page, click the up arrows to increate the number of seats, then click Buy Now.
- To remove unassigned seats:
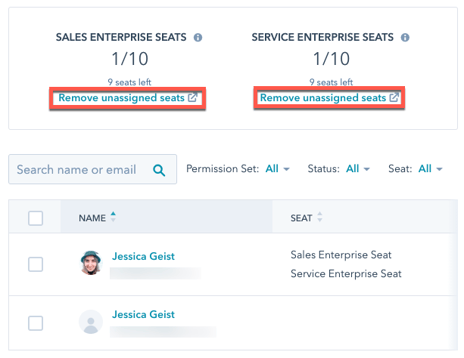
- Click Remove unassigned seats to be taken to the Subscriptions tab of the Account & Billing screen.
- Click Remove unassigned seats next to the subscription name or seat type.

-
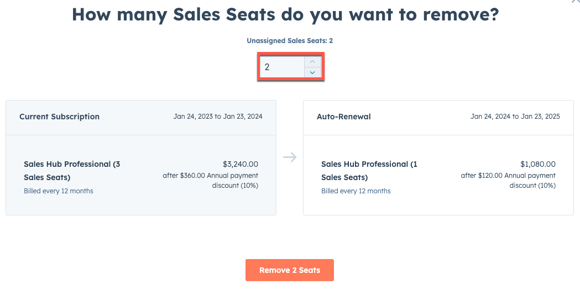
- In the dialog box, use the arrows to indicate how many unassigned paid seats you want to remove. The Current Subscription box will show the number you currently have, and the Auto-Renewal box will reflect the billing adjustment that will be effective at the start of your next subscription term.
-
- To confirm the change, click Remove [#] Seats.
- A confirmation will appear showing the change. Click Close to close the dialog box.
- After scheduling the removal of seats, a confirmation will appear next to the subscription. To cancel the seat removal, click Cancel this removal. Confirm the cancellation of this removal by clicking Cancel this removal.
Please note: reassigning canceled paid seats before the downgrade effective date will cancel the downgrade.
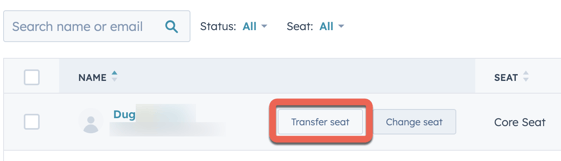
- To transfer a core seat if you only have one in your account:
- In your HubSpot account, click the settings icon in the top navigation bar.
- In the left sidebar menu, navigate to Users & Teams.
- At the top, click the Seats tab.
- In the user table, hover over the user, and click Transfer seat.
- In the dialog box, click the Choose a user dropdown menu, and select the user to transfer the seat to. Click Transfer seat, then on the confirmation screen, click Transfer seat.
Assign, add, or remove Sales Hub or Service Hub seats (Legacy Sales Hub and Service Hub Starter, Professional, and Enterprise accounts)
Please note: on March 5, 2024, HubSpot introduced a seats-based pricing model to all new Hubs and subscription tiers. Accounts created prior to March 5, 2024, should use this section to learn how to assign, add, or remove paid seats.
- In your HubSpot account, click the settings icon in the top navigation bar.
- In the left sidebar menu, navigate to Users & Teams.
- In the top menu, click the Seats tab.
- To assign a paid seat:
- Hover over the user and click Change seat.

-
- In the Change seat panel, use the dropdown menus to select users and seats.
- Click Save
- To add additional seats:
- Hover over the user and click Change seat.
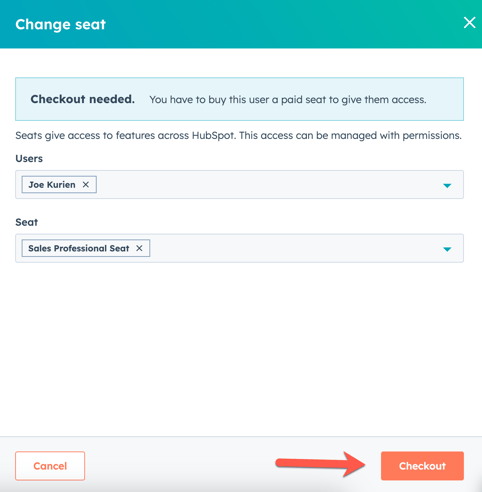
- In the Change seat dialog box, use the dropdown menus to select users and seats.
- Click Checkout.
-
- In the Purchase Users panel, review the details of your purchase, then click Complete purchase.
- To remove seats:
-
- At the top, click Remove unassigned seats to be taken to the Account & Billing screen to review your subscription options.
-
- Return to the Seats tab to see the updated number of seats.
Please note:
- You can only unassign a user's paid seat if their account is active. If the user account is deactivated, you can reactivate the user to unassign their paid seat, then deactivate the user again.
- To remove users with a seat from your account, you must first remove any Sales Hub and/or Service Hub access they have.
- Removing a user's paid Sales Hub or Service Hub seat does not delete the seat. Instead, the seat will remain in your HubSpot account as an unassigned seat. You will continue to pay for the seat until your next contract renewal date, even if it remains unassigned.
