Last updated: June 28, 2023
Available with any of the following subscriptions, except where noted:
|
|
When you connect your ad accounts to HubSpot and you want to sync leads from your lead ads, you can choose whether to sync historical leads, configure custom field mappings between your lead generation forms and the associated HubSpot properties, and review form submissions for each of your lead ad campaigns.
To connect and configure your lead syncing settings:
- In your HubSpot account, click the settings icon in the top navigation bar.
- In the left sidebar menu, navigate to Marketing > Ads.
- Click the Lead syncing tab.
- In the upper right, click Connect.
- In the dialog box, select an ad network.
- Select the checkbox next to the page you want to connect to HubSpot.
- Click the Sync timeframe dropdown menu and select a timeframe:
- All leads: HubSpot will sync all leads from the last 90 days, as well as any new leads after you connect the page.
- New leads: HubSpot will only sync new leads.
- If you have a Marketing Hub Starter, Professional, or Enterprise account, toggle the Marketing Contacts switch on/off to set your leads as marketing or non-marketing.
- Click Save.
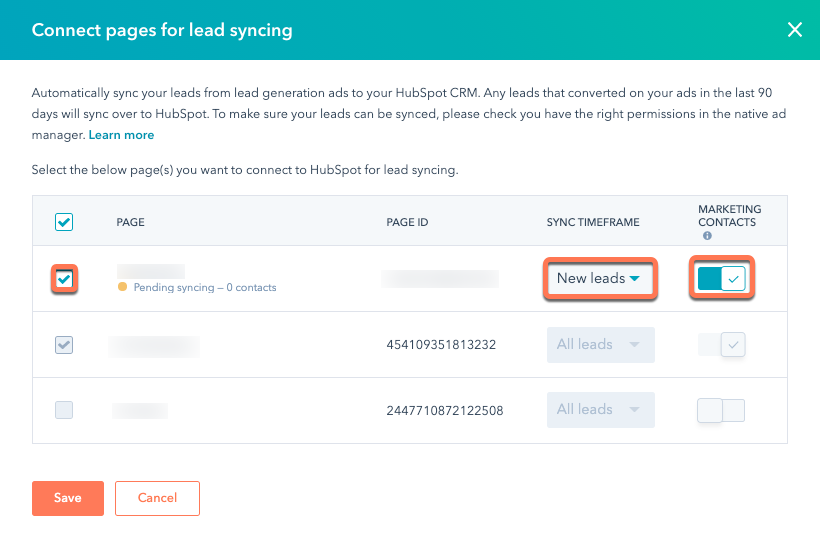
Please note: the Sync timeframe option cannot be changed once you connect the page. If you need to update your timeframe preference after you connected the page, you'll need to disconnect and reconnect the page.
Configure custom field mappings and review form submissions
You can review the connected page's forms and customize the mappings between any custom form field and the associated HubSpot property.
- In the Lead syncing tab, click the page name.
- In the right panel, under Forms, locate and click a form.
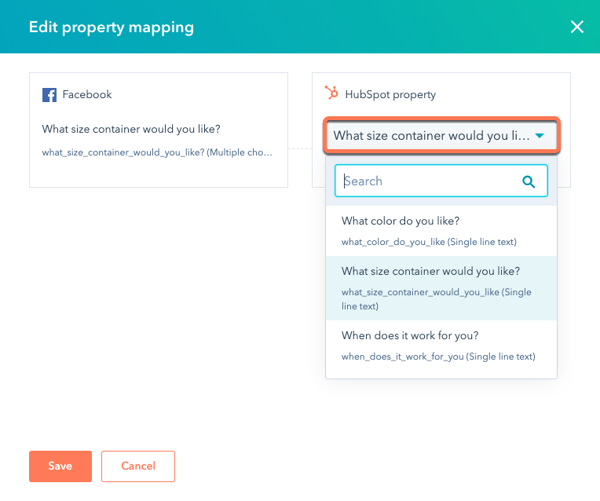
- To change a custom field mapping:
- Hover over the custom field and click Edit mapping.
- Click the HubSpot property dropdown menu, then select a new HubSpot property that you want to map your custom field to.
- Click Save.
Please note:
- Standard properties cannot be changed.
- Any changes to custom field mappings will only be reflected on new leads that are synced with HubSpot. Previously synced contacts will still have the old field mappings.
- To review form submissions, click View submissions. You'll be redirect to the Forms tool, where you can analyze your submission data.
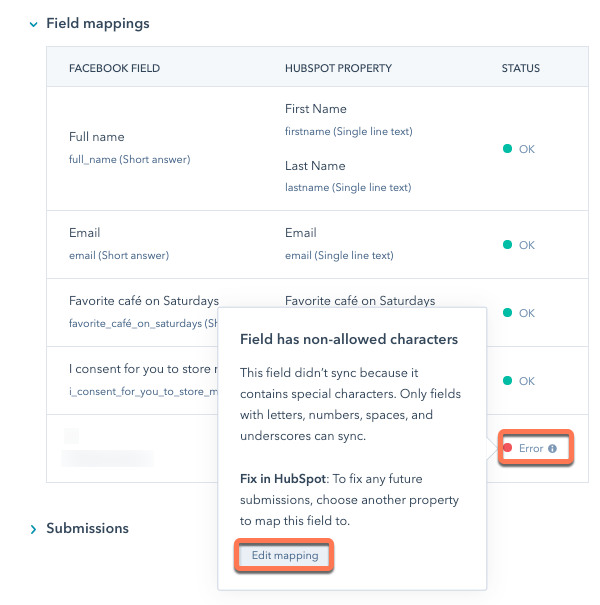
Fix lead syncing errors
If HubSpot detects issues with any of your connected pages or their associated forms, you'll see an alert on your Ads dashboard so you can resolve the problem and minimize potential disruptions to your lead syncing.
- In your HubSpot account, navigate to Marketing > Ads.
- If there are any problems with your lead ad forms, an alert will appear at the top of the page. Click View errors to navigate to your lead syncing settings.

- Locate the page that lists a form error, then click the page name.
- In the right panel, under Forms, click the form name of the form that needs to be fixed.
- Under the Status column of the Field mappings table, hover over the error to see details about the issue and how to resolve it.
- If the error is due to an issue with a field mapping, click Edit mapping to update the custom field mapping and resolve the issue.