
Last updated: April 15, 2024
Available with any of the following subscriptions, except where noted:
|
|
Use forms to gather important information about your visitors and contacts. In HubSpot, you can easily create forms to add to your HubSpot pages or external site.
Create a form
To create a new form:
- In your HubSpot account, navigate to Marketing > Forms.
- In the upper right, click Create form.
- To associate the form with a business unit(Business units add-on only):
- Click the Select a business unit dropdown menu.
- Select the business unit you want to associate this form with.
- Select your form type.
- In the upper right, click Next.
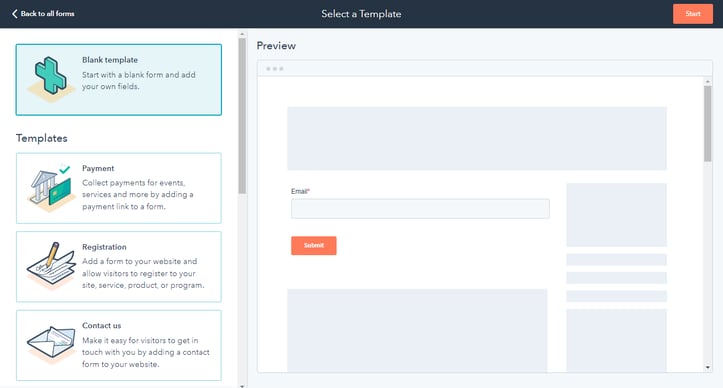
- In the left panel, select Blank template to start with a blank form or a pre-made template to start with a form with pre-selected fields for a specific use case.
- The form preview for a selected template will appear in the right panel.
- If you want to use a Support template, you'll need Account Access permissions.
- In the upper right, click Start.
- At the top of the form editor, click the pencil icon to edit the form name.
Add and edit form fields
Add form fields to collect information from your website visitors and contacts. You can also add rich text areas between form fields to add customizable text, create headers, or add spacing to your form.
If you're using a multiple checkbox, radio select, dropdown select, date, file upload, phone number, or blog subscription field, learn more about the additional customization options available with these field types.
Please note:
- By default, the Email field is required for form submissions to create contacts. HubSpot will check whether an email address is valid before allowing a user to submit the form. Learn more about allowing form submissions without email addresses to create contacts.
- Score, calculation, and rich text properties cannot be used in a form.
To add a form field:
- In the left panel, use the search bar to search for an existing field, or browse through your property groups. The object type of the field added can determine whether the form submission appears on the activity timeline of associated records.
- To create a new property and use it as a field on your form, click the Create new tab.
- Select the form field type.
- In the right panel, set up your form field:
- Object type: select an object type. You can add Contact, Company, and Custom object fields. Ticket properties can be added if Automatic ticket creation is toggled on.
- Group: select a property group.
- Label: enter text to name the property.
- Description: enter text to describe the property. This is optional and can be left blank.
- Click Next.
- Review your property options and click Create.
- Click and drag fields onto the form preview on the right to include them on your form. Fields can be placed above, below, or next to other fields.
- If you've set up the payments tool in HubSpot, learn how to collect payments with forms. When the Payment option is turned on, you cannot create tickets from the same form.
- To create a ticket from each form submission, toggle on the Automatic ticket creation switch in the Ticket Properties section. This will connect the form to your conversations inbox where your team can respond to customers' inquiries. When the Automatic ticket creation option is turned on, you cannot collect payments from the same form.
Please note: users must be a super admin or have Account Access permissions to toggle the Automatic ticket creation switch.

Manage your form field's options
To edit a field's options:- In the right panel, click the field in the form preview
- In the left panel, edit the field's options as needed. The options here may vary depending on the field's property type, learn more about the additional field customization options available.
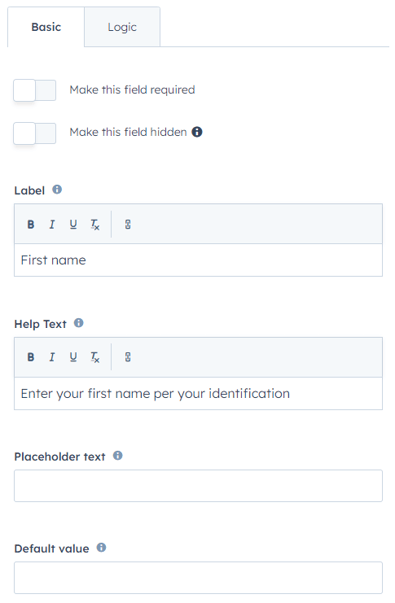
- In the Basic tab:
- Label: the name of the field that will appear on the form.
- Help text: informational text below the field's label to help the visitor complete the field.
- Placeholder text: text that appears in the input box for the field. The text will disappear when the visitor enters a value in the field, and will not come through in the submission, even if the field is left empty.
- Default value: a value that will be submitted for the field by default unless changed by the visitor.
- In the Basic tab:
-
-
- Make this field required: when the checkbox is selected, the field must be completed to submit the form. If a form field has been set as required, it cannot be set as hidden.
- Make this field hidden: when the checkbox is selected, the field will not appear on the form but can be used to pass values to contact properties for all submissions.
-
-
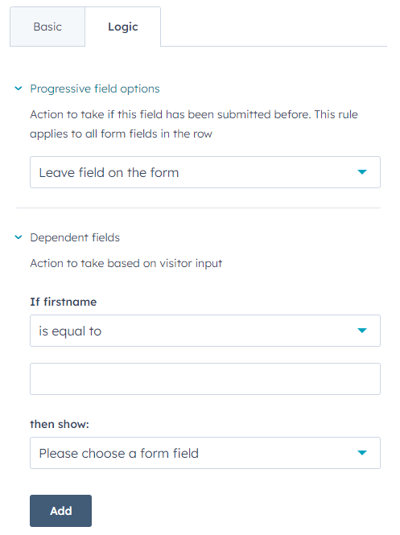
- In the Logic tab:
- Progressive fields: select the action to take if the field has been previously submitted. Learn more about progressive fields in forms.
- Dependent fields: display additional fields based on visitors' responses to a previous field. Learn more about dependent fields in forms.
- In the Logic tab:
Customize your form options
From the Options tab, configure what happens after a form is submitted. You can configure submission settings, user notifications, the language for form and error messages, and more. Some options may not be displayed, depending on your HubSpot subscription.
- What should happen after a visitor submits this form: select what displays after a form submission. This sets the action for forms embedded on non-HubSpot pages or shared as standalone pages only; it will not set or change the action for forms added to HubSpot pages.
- Display a thank you message: configure a thank you message to appear after the form is submitted.
- HubSpot page or External URL: redirect visitors to a different page after the form is submitted. You can select a published HubSpot page or use an external URL.
- Scheduling page: if you have a Sales or Service Hub Enterprise subscription, you can redirect visitors to a specified meeting scheduling page to book a meeting, any submitted form fields will automatically be populated.
- Conditionally redirect to a scheduling page, HubSpot page or external URL: if you have a Sales or Service Hub Enterprise subscription, you can redirect visitors to a specified meeting scheduling page, HubSpot page, or external URL. If you are redirecting users to a meeting scheduling page, any submitted form fields will automatically be populated. Learn about conditionally redirecting a form to a meeting scheduling page, HubSpot page, or external URL
- Set a lifecycle stage when a contact or company is created: click the Set lifecycle state to dropdown menu and select a lifecycle stage. When visitors submit the form, any new or existing records will be set to the selected lifecycle stage.
- You cannot move a record's lifecycle stage backward. If an existing contact or company with a later lifecycle stage submits a form, the lifecycle stage will not be updated.
- The lifecycle stage set in a form will overwrite the default lifecycle stage configured in your HubSpot settings.
-
Follow-up options: select the Send submission email notifications to the contact's owner checkbox to automatically send a notification to the contact's owner. If a contact has no owner, no notifications will be sent. Learn more about object ownership in HubSpot.
-
Send submission email notifications to: click the dropdown menu to select the default teams or individuals to send submission email notifications to, regardless of contact ownership. Recipients set here will be overwritten by recipients set in the form options on HubSpot pages.
- Form and error message language: select the language for default field labels and errors displayed to visitors when the form is filled out incorrectly.
- Campaign: if you have a Marketing Hub Professional or Enterprise subscription, you can associate the form with a campaign:
- To associate your form with an existing campaign, click the Campaign dropdown menu and select a campaign.
- To associate your form with a new campaign, click the Campaign dropdown menu and click Create campaign. Then, continue setting up your campaign.
-
- If you've never created a campaign before, click Create a campaign. Then, continue setting up your campaign.
- Always create contact for new email address: select this option to create a new contact record for every submission with a unique email address. If the email address submitted matches an existing contact record in your database, the details on the existing record will be updated.
- If this option is turned off, HubSpot will first attempt to associate the submission with an existing contact with the submitted email address. If no contact exists at that email address, HubSpot will recognize and update your contacts based on the cookies in their browsers. This may result in contacts being overwritten if the same form is submitted multiple times from the same device.
- If this option is turned on, when a contact submits the form using a different email on a browser where there is already a cookie, views will not be tracked for this contact. The Pre-populate contact fields with known values option will also be automatically disabled.
- Set contacts created as marketing contacts: if your HubSpot account has access to marketing contacts, you can automatically set any contacts who have submitted this form as marketing. This includes both new and existing contacts.
- Add link to reset the form: select this option to allow visitors to remove any pre-populated fields on the form and to create a new contact on submission. When enabled, visitors can click a Not you? Click here to reset link that resets the form. This will also disable cookie tracking in the form submission, preventing any cookie overwrites.
- Pre-populate fields with known values: if a contact previously visited your site and submitted a form, and HubSpot was able to store and track their cookies, any known field values can be pre-populated on the form. This option is enabled by default, learn more about pre-populated form fields.
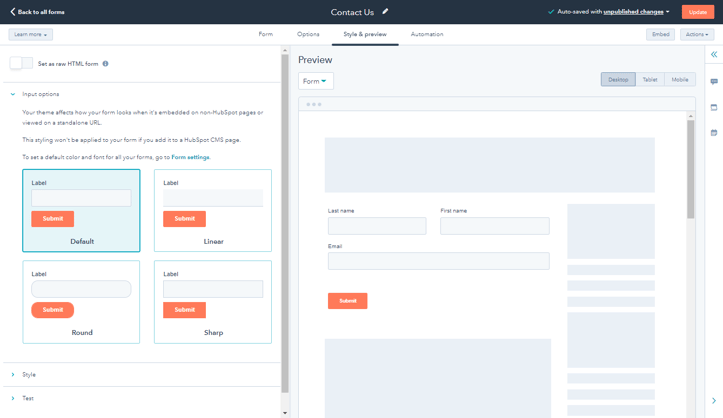
Style and preview your form
From the Style & preview tab, customize the styling of your form. A preview of the form will update in the right panel as you adjust the form's styles or test its features.
You can customize the following:
- Set as raw HTML form: if you have a Marketing Hub or CMS Hub Professional or Enterprise subscription, you can select this option to render the form as a raw HTML element rather than inside an iframe. Do note the following:
- Any HubSpot styling configured in the Style tab will be removed.
- The form should be styled with CSS in your external stylesheet.
- Input options: select one of four available themes for field and button styles.
- Style: customize the form's field width, fonts, and colors.
- Test: if you have progressive fields or dependent fields on this form, you can test how they'll appear to your visitors.
Use automations with forms
Use simple automation features such as sending a follow-up email to a contact or sending automatic internal email notifications with your forms. You can also use the form submission as a trigger in a simple workflow. Learn more about how to use automation with the forms tool.
- At the top, click the Automations tab. From the Automations tab, you can configure what happens after the form is submitted.
- In the Choose what happens after a form is submitted section, customize the settings for your form as needed.
- In the Create a simple workflow section, set up a simple workflow to automate follow-up actions such as sending an email or setting a contact property.
Publish your form
In the top right, click Publish to take your form live and make it available for use on HubSpot pages. You can also embed your form on an external website or share it as a standalone page.
Once a form has been published, it cannot be unpublished. If the form is embedded on an external page, you can manually remove the form embed code. However, the only way to disable the standalone form page is to delete the form.
After publishing your form, learn how to analyze your form submission data.
