Last updated: April 18, 2024
Available with any of the following subscriptions, except where noted:
|
|
To include relevant resources and provide helpful context, you can upload files and attach them to contact, company, deal, ticket, custom object records and their associated activities. You can also rename, filter, or remove existing attachments.
The permissions required to view attachments depend on how the attachments were added:
- When attachments are added on a record, users must have Notes view permissions to view them. Users with Notes view permissions set to Everything can view all of these attachments, users set to Team Only can view attachments uploaded by users on their team, and users set to Owned only can view only the attachments they've uploaded.
-
When you attach files to logged activities, they will be shown in the Attachments section in the right panel of associated records. The permissions required to view attachments depend on the activity the attachment was added to:
- When attachments are added via a logged note, users must have Notes view permissions to view these attachments. Users with Notes view permissions set to Everything can view all of these attachments, users set to Team Only can view attachments on notes created by users on their team, and users set to Owned only can view only the attachments on notes they've created.
- When attachments are attached via tasks, users must have Tasks view permissions to view these attachments. Users with Tasks view permissions set to Everything can view all of these attachments, users set to Team Only can view attachments on tasks created by users on their team, and users set to Owned only can view only the attachments on tasks they've created.
- When attachments are added via one-to-one emails, calls, meetings, or other activities, any user with access to the affected records can view the attachments.
Add an attachment on a record
To add an attachment on a record:
- Navigate to your records:
- Contacts: In your HubSpot account, navigate to CRM > Contacts.
- Companies: In your HubSpot account, navigate to CRM > Companies.
- Deals: In your HubSpot account, navigate to CRM > Deals.
- Tickets: In your HubSpot account, navigate to CRM > Tickets.
- Custom objects: In your HubSpot account, navigate to CRM, then select the custom object.
- Click the name of the record.
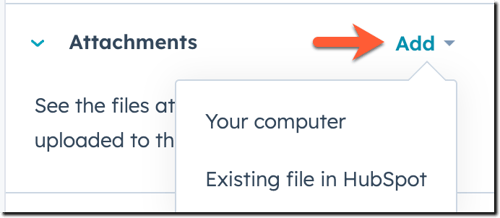
- In the right panel, scroll down to the Attachments section.
- To add an attachment, click Add, then select:
- Your computer: upload a new file from your computer.
- Existing file in HubSpot: select an existing file in your HubSpot account. In the right panel, click the name of the file you want to attach.
- To remove an attachment, click the X on the right of the attachment. In the dialog box, click Delete or Detached. Attachments uploaded on the record or on an activity will be permanently deleted. Attachments added to the record from the files tool will be removed from the record, but can still be accessed in the files tool.
Add an attachment on an activity
To add an attachment on an activity:
- Navigate to your records:
- Contacts: In your HubSpot account, navigate to CRM > Contacts.
- Companies: In your HubSpot account, navigate to CRM > Companies.
- Deals: In your HubSpot account, navigate to CRM > Deals.
- Tickets: In your HubSpot account, navigate to CRM > Tickets.
- Custom objects: In your HubSpot account, navigate to CRM, then select the custom object.
- Click the name of the record.
- To create a new activity and add an attachment:
- In the left panel, click the icon for the activity.
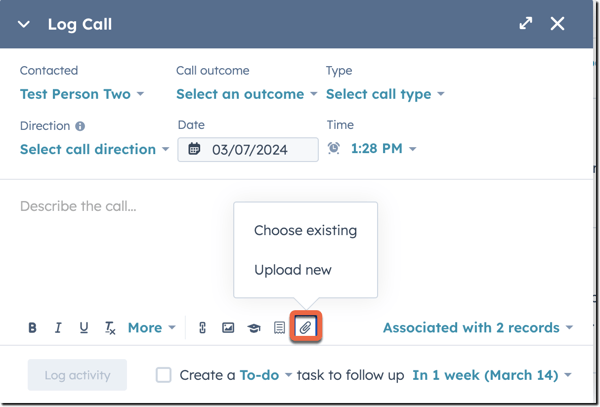
- In the activity editor, click the attach icon, then select Upload new to add a file from your computer, or Choose existing to select a file already added to HubSpot.
- Select the file, finish adding the activity's details, then click Log activity or Save note.
- To add an attachment to an existing activity:
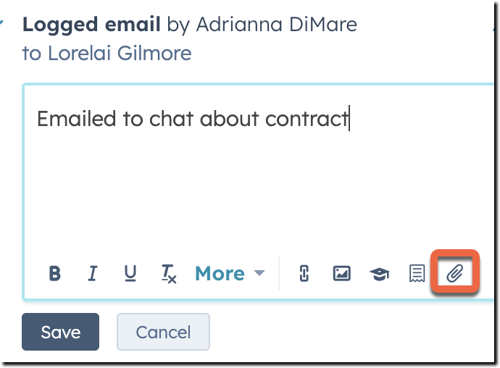
- On the activity, hover over and click the text box.
- In the text editor, click the attach icon, then select Upload new to add a file from your computer, or Choose existing to select a file already added to HubSpot.
- Select the file, then click Save.
Please note: when you send one-to-one emails in HubSpot or log an email using HubSpot Sales, any non-inline attached files will automatically be added to the Attachments section of the record.
Manage attachments
Once you've added attachments, you can view all attached files on each record, filter them to locate the attachments you need, and rename or remove them.
- Navigate to your records:
- Contacts: In your HubSpot account, navigate to CRM > Contacts.
- Companies: In your HubSpot account, navigate to CRM > Companies.
- Deals: In your HubSpot account, navigate to CRM > Deals.
- Tickets: In your HubSpot account, navigate to CRM > Tickets.
- Custom objects: In your HubSpot account, navigate to CRM, then select the custom object.
- Click the name of the record.
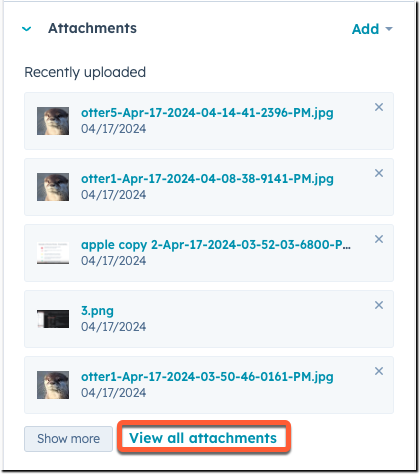
- In the right panel, scroll down to the Attachments section.
- If you have more than 5 attachments, click Show more to display 5 additional files.
- To view and manage the full list of attachments, View all attachments.
- To search for a file by name or type, enter text in the search bar.
- To filter by the type of attached file, click File type, then select the checkboxes of types of files you want to view.
- To filter by the source of the attachment, click Source, then select the checkboxes of sources you want to include. For example, select Calls to view attachments added via a call activity or Manual upload to view files added from the Attachments section.
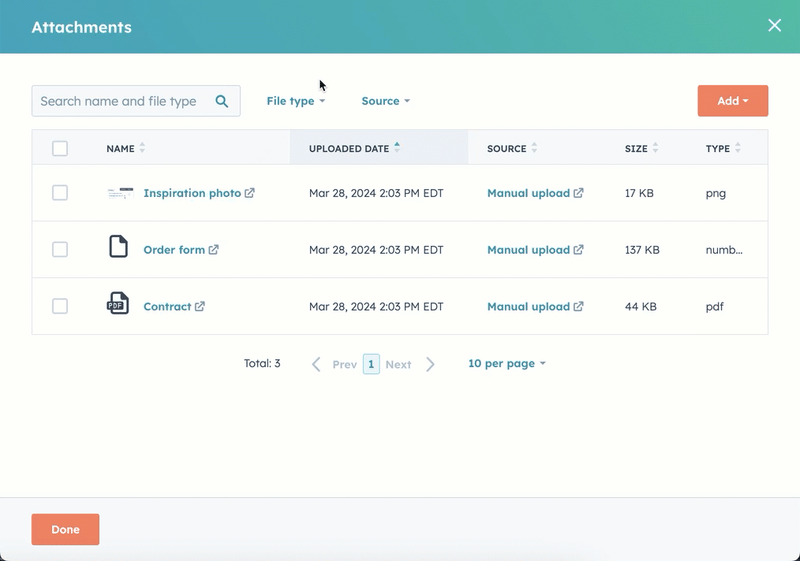
- To change the sort order of the attachments, click a column header. For example, click the Uploaded date column to sort by the oldest or newest attachment.
- To preview an attachment, click the name of the attachment. In the preview, you can do the following:
- To download the file, click Download. The file will be downloaded to your computer.
- To share an link to the file preview in HubSpot, click Share internal link. The link will be copied to your clipboard and can be shared with other users in your account.
-
- To share a link that expires after 24 hours, click Share 24-hour link. In the address bar, copy the link. This link to the file can be shared externally and will be accessible for up to 24 hours.
- To rename, download, view, or remove an individual attachment, hover over the file, click Actions, then select an option:
- Rename: in the dialog box, enter a new name, then click Rename to confirm.
- Download: the file will be downloaded to your computer.
- View: a preview of the file will be opened in a new tab.
- Remove: in the dialog box, confirm that you'd like to delete or remove the attachment.
- For attachments uploaded on the record or on an activity, click Delete to permanently delete the file.
- For attachments added to the record from the files tool, click Detach. The file will be removed from the record, but can still be accessed in the files tool.

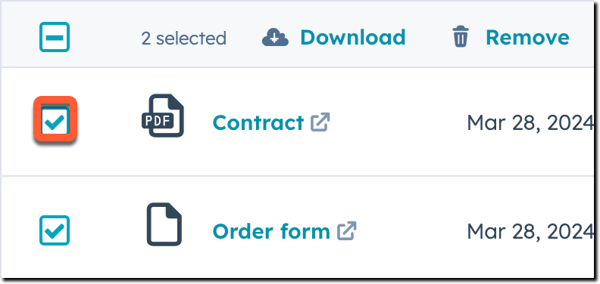
- To download multiple attachments, select the checkboxes next to the attachments, then click Download. The files will be downloaded to your computer.
- To remove multiple attachments, select the checkboxes next to the attachments, then click Remove. In the dialog box, confirm that you'd like to delete or remove the attachments:
- For attachments uploaded on the record or on an activity, click Delete to permanently delete the files.
- For attachments added to the record from the files tool, click Detach. The files will be removed from the record, but can still be accessed in the files tool.
- If both types of files are included, click Remove all. Files will be either deleted or removed based on how they were added.