Last updated: April 10, 2024
Available with any of the following subscriptions, except where noted:
|
|
- In your HubSpot account, navigate to CRM > Inbox.
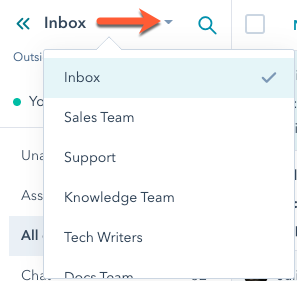
- If you have multiple inboxes in your account, click the dropdown menu in the top left and select another inbox to view.
- In the inbox, you can use the following features to manage your conversations.
Filters
You can both search and filter your conversations at the same time to quickly find a relevant thread. Click the search icon in the top left and enter a search term to lookup a conversation, and apply filters to narrow your search.
- Status: filter your conversations based on their open or closed status.
- Channel: sort conversations based on whether they were created from an email, live chat, Messenger conversation.
- Contact: filter conversations by the contact that is associated with the thread.
- Assignee: filter conversations by the specific team member assigned to the conversation.
- You can also filter conversations that are assigned to a bot chatflow by selecting the chatflow name in the dropdown menu.
- Select the Show deactivated/removed users checkbox to search for conversations assigned to removed or deactivated users in your account.
- Date: use the date picker to filter conversations that took place over a specific time frame.
- More options: select the Hide filtered checkbox to filter out conversations that are not relevant to your business, and/or select the Hide trash checkbox to filter out deleted conversations from your search results.
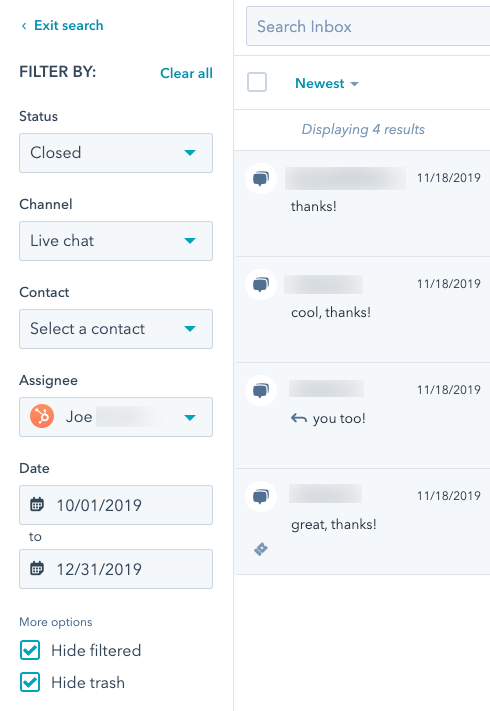
You can also sort your conversations from oldest to newest by clicking the dropdown menu above the list of conversations. To navigate back to your inbox, in the top right, click Exit search.
Views
All conversations are segmented in different inbox views. These views group conversations by assignee, channel, or filtered status. If you're a user in a Marketing Hub, Sales Hub, or Service Hub Professional or Enterprise account, learn how to organize your conversations into custom views in the inbox.
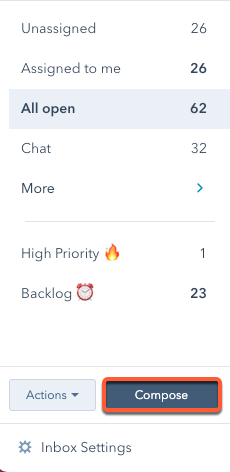
In the left sidebar, select a view:
- Unassigned: view all conversations that have not been assigned to an owner. If the owner of a conversation is later removed from your account, the conversation will automatically be unassigned and will appear in this view as well.
- Assigned to me: view all conversations with at least one reply that are routed or assigned to you.
- All open: view all your team's conversations in the inbox. Keep in mind that if you send an outgoing email to a contact from the inbox, that email will not appear in the All open view until the contact replies to the email.
- Chat: view all conversations that originated from a chat widget on your site.
- Bots: view all bot conversations that were never or have not yet been assigned to an owner.
- Email: view all conversations that originated from emails sent to your team email address.
- Messenger: view all conversations that originated on a Facebook Business Page with a connected Facebook Messenger account.
- Forms: view all submissions to a connected support form.
- All closed: view all conversations that have been closed.
- Sent: view all outgoing emails sent from the conversations inbox and from a record in the CRM. Keep in mind that when the recipient replies to the email, the conversation will move to the All open view and any other relevant views, such as the Assigned to me or Unassigned view.
- Spam: view all emails that are not relevant to your business conversations, such as promotional emails. Any emails received from a role-based email (marketing@, sales@, etc.) will be sent to the Spam view.
- Trash: view all deleted conversations. Open a deleted conversation to review the content. If you want to restore the deleted conversation, click Restore in the top menu. To permanently delete the message, click Delete forever . This will permanently delete the thread from the inbox and from the contact record where the conversation is logged. The associated ticket will also be deleted. You cannot access the threads in the inbox or on the associated records after deleting them from the trash view. These conversations will be automatically deleted after 30 days and cannot be restored.
The Unassigned, Assigned to me, All open, and Chat views will always appear. To access the other standard views, click More.
Compose
In the bottom left, click Compose to write an outgoing email directly from your conversations inbox. Learn more about sending and replying to emails from the conversations inbox.
List of conversations
In the left panel, view a list of all conversations in your selected view. The conversations are sorted based on the time the message was received, starting with the most recent message received. The message preview includes the following details:
- The name of the contact who started the conversation, as well as the number of participants included on the thread.
- A forward or a reply indicator to help identify the conversations that you still need to reply to.
- The email subject line, if applicable, and a preview of the message body.
- The time stamp of the last received message on the thread.
- An icon to indicate which channel the conversation is from.
- A preview of any comments included on the thread.

About and associated records
In the right sidebar, view contextual information about the associated contact, the associated ticket, and the contact's past conversations with your company. Click to expand each section and view the additional details.
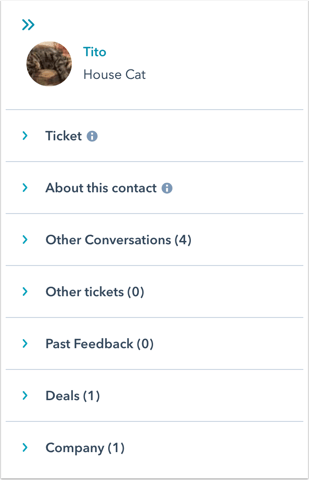
- Contact: to dissociate the contact from the thread, click the X next to the contact's name. To open the contact record in another browser tab, click the name of the contact. On the contact record, you can send a one-to-one email, make a call, add a note, create a task, or schedule a meeting with the contact.
- Ticket: to view additional ticket information, click View more on the ticket card. In the panel that opens on the right, click Edit the shown properties to customize the properties that display in the Ticket details panel. This will not update the properties that appear on the Ticket card in the inbox. If the conversation does not have an associated ticket, click Create ticket. You cannot dissociate a ticket from a conversation in the inbox. Learn more about managing tickets in the inbox.
Please note: accounts created after April 1st, 2024 do not have access to tickets in the inbox. Creating a ticket in the inbox will move both the ticket and conversation to help desk. Learn how to manage tickets in help desk.
- About this contact: the contact properties that appear here are the same as the properties on the About card on the contact record. To edit the contact properties that appear, hover over the information icon then click Edit properties.
- Other conversations: view previous conversations between the contact and your team.
- Other tickets: view the contact's additional associated tickets.
- Past feedback: view the contact's past feedback from a customer loyalty survey, customer support survey, or customer satisfaction survey.
- Deals: to create a deal record to track any revenue opportunities from this conversation, click Create a deal.
- Company: view the contact's associated company record.
- Custom objects (Enterprise only): if you're using custom objects, you can view the custom object record that is associated to the contact included on the thread. To appear in the inbox, the custom object record must be associated to the contact record.
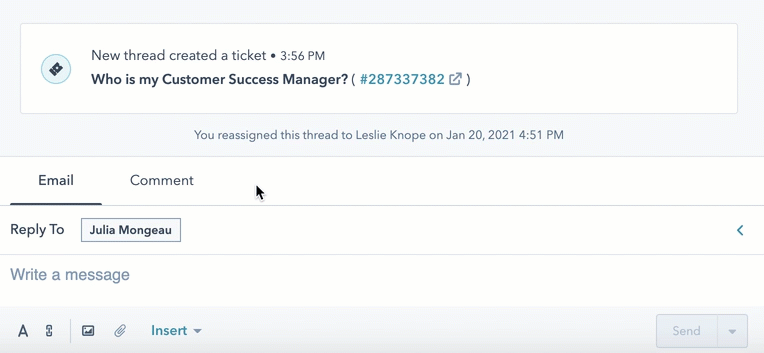
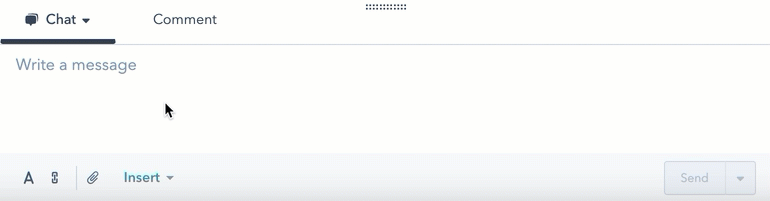
Reply and comment
Use the reply editor to respond to an incoming email or chat message, or use the Comment tab to notify another team member of the conversation. You can also make a call from the reply editor if you need to connect with a contact over the phone.
To expand the reply editor while typing your response, click and drag to reply editor.
- In the left sidebar, click a conversation to open a detailed view of the thread on the right.
- To select a user to assign the conversation to, click the Owner dropdown menu at the top left.
- If the conversation has an associated ticket, click the ticket name above the conversation to open the ticket record in another browser tab.
- To switch from live chat or Facebook Messenger to respond via email, click the channel dropdown menu in the reply editor and select Email. When the conversations ends, the conversation history will be sent to the visitor via email.
- To send a copy of the chat transcript, delete the conversation, block a sender, or mark the conversation as spam, click the More dropdown menu in the top right.
- When you block a sender, the conversation will move to your Filtered view in your inbox. You can choose to unblock a sender from your Spam view so future conversations are visible in your inbox.
- For chats, moving forward, the visitor will see the chat widget when they visit your site, but their new messages will not appear in your inbox.
- For emails, this will filter the thread and all incoming threads from this sender moving forward.
- The associated tickets will be permanently deleted.
- When you block a sender, the conversation will move to your Filtered view in your inbox. You can choose to unblock a sender from your Spam view so future conversations are visible in your inbox.
Please note: if you mark an email conversation as spam, this will filter the current thread only.
- To forward an email conversation to another team or organization outside of your company, at the top of the most recent email reply, click Forward.
- To mark the conversation as closed, click Close conversation. If there is a ticket associated with the conversation, the user can close the ticket and the conversation at the same time, or just close the conversation by clicking the More dropdown menu and selecting Close conversation.
- If you want more space to respond to the conversation, you can collapse the right or left panel by clicking the icon at the top of the panel, and expand the panel again by clicking the icon.
Please note: in bot conversations where the visitor has not reached the bot's Send to team member bot action, the conversation cannot be marked as closed until after 30 minutes of visitor inactivity.
- To delete or close your conversations in bulk:
- Hover over the conversations and select the checkboxes next to the threads you want to edit.
- At the top of the inbox, select Move to trash or Close conversation.
Link to a specific message in a conversation
You can link directly to a message in a conversation to share with a member of your team, which can facilitate efficient collaboration and avoid the need to search through other messages in the thread.
To generate and share a message link:
- In the left sidebar, click a conversation to open a detailed view of the thread on the right.
- Hover over a message in the thread, click the ellipses icon, then select Copy link.
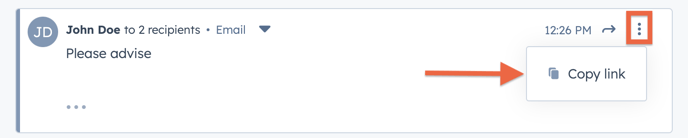
- The message link will be copied to the clipboard, which you can then share with another member of your team. Once they paste the URL into their browser URL bar, they'll be directed directly to that specific message.
Status
In the top-left corner, click to toggle the switch on or off to change your chat availability status. Learn how to customize your working hours to automatically set your availability status.
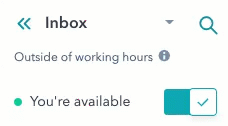
When you're away, you will still appear available for any open chats that are currently assigned to you, but you'll appear away to new incoming visitors.
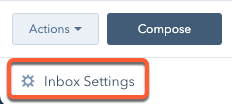
Inbox settings
In the lower-left corner of the inbox, you can quickly access your inbox settings to edit. You can edit inbox-level settings or settings specific to your email or chat channel. Learn more about editing your inbox.