
Last updated: April 12, 2024
Available with any of the following subscriptions, except where noted:
|
|
|
|
|
|
|
|
You can connect your email sending domain to HubSpot to ensure your marketing emails comply with the authentication standards and sending policies enforced by major email inbox providers.
HubSpot will guide you through this connection process by helping you set up three separate DNS record types in your DNS provider settings: DKIM, SPF, and DMARC.
To learn more about the DKIM, SPF, and DMARC authentication methods and why they're important to maintaining a healthy email sending reputation, review this overview of email authentication.
If you need help adding records in your DNS provider, check out this article on how to update DNS records using several popular DNS providers, such as GoDaddy.
Please note: starting February 2024, Google and Yahoo will be requiring email authentication for all bulk email senders. Emails that are not properly authenticated will be automatically blocked or directed to spam. Learn more in this HubSpot Community post.
Before you get started
- To connect your domain, you will need to update your DNS records. Ensure you have login details for your DNS provider and access to the associated DNS records.
- After you configure your DNS records, it may take between 15 to 80 minutes for HubSpot to verify that they're set up correctly. You'll be able to review the status of your DNS records in your domain settings after setting them up.
- All accounts may connect an unlimited number of email sending domains. You will need to own and have access to each domain.
- If you're using Cloudflare to configure your email sending domain, make sure that domain-wide CNAME flattening and proxy settings are turned off.
- You can connect a subdomain, like info.domain.com, as your email sending domain. The subdomain you connect should match the domain in the From email address you're using to send marketing emails in HubSpot.
Configure authentication for your email sending domain
To fully authenticate your email sending domain, you can navigate to your domain settings in HubSpot:-
In your HubSpot account, click the settings icon in the top navigation bar.
-
In the left sidebar menu, navigate to Content > Domains & URLs.
-
In the top right, click Connect a domain.
-
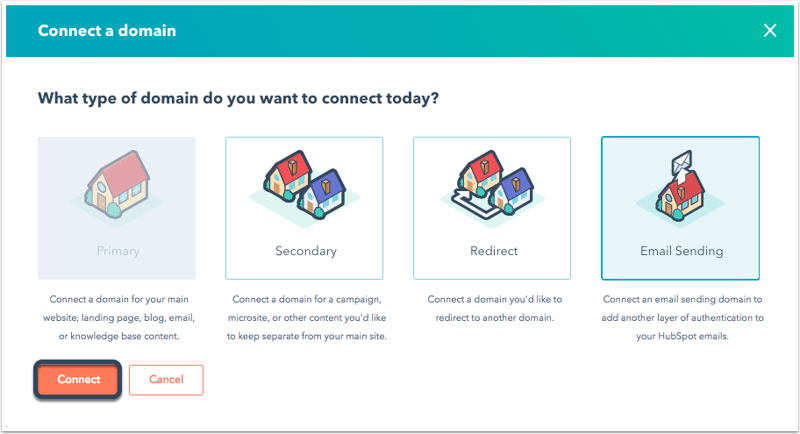
In the dialog box, select Email Sending, then click Connect.
- On the domain connection screen, enter an email address you use to send marketing emails, then click Next.
- Verify that the email sending domain is correct, then click Next.
- In a separate tab, log in to your DNS provider and locate your DNS record settings. Learn more about adding DNS records to specific providers.
For each of the three authentication methods, copy the values in the Host and Required Data columns then paste the values into the appropriate record fields in your DNS provider accounts. Review the sections below for more details on adding each record type.
Configure your DKIM records
Set up DKIM by adding two CNAME records in your DNS provider. Click Copy under the Host and Required Data columns then paste the values into the corresponding fields in your DNS provider.
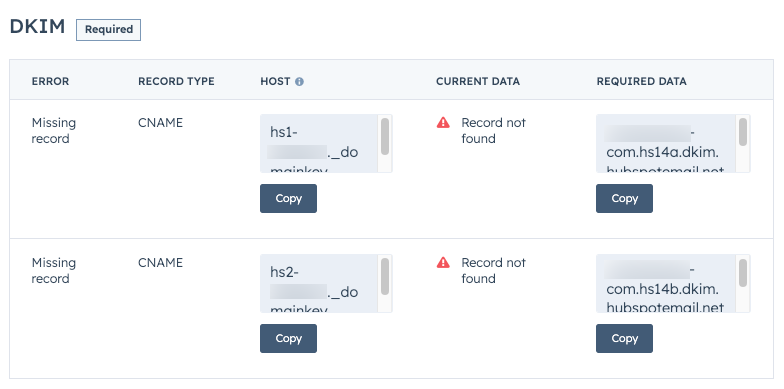
Learn more about how DKIM works in this article.
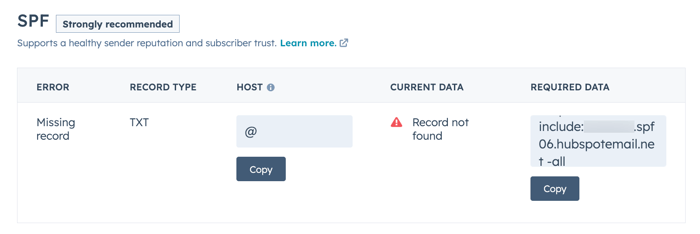
Configure your SPF record
You can add HubSpot's SPF record as a TXT record in your DNS provider. This record will provide a regularly updated list of IP addresses that HubSpot will use to send marketing emails from your domain.
Click Copy under the Host and Required Data columns then paste the values into the corresponding fields in your DNS provider.
Combining multiple SPF records
If you also send emails via another email provider besides HubSpot, you may already have an existing SPF record set up in your DNS provider. If this is the case, you can add HubSpot's SPF record after any existing include: statements to the same TXT record.
The following example demonstrates how a TXT record would be configured with multiple SPF entries using a provider like GoDaddy:
| Record type | Host | Required data |
| TXT | @ | v=spf1 include:anotherprovider.com include:123456.spf03.hubspotemail.net -all |
Keep the following in mind when combining SPF records:
- Each
include:statement should be separated by a space. - You can have up to 10
include:statements for any given domain or subdomain. - The SPF version (
v=spf1) only needs to be specified once, at the beginning of record. - The
-allflag only needs to be included once. This flag indicates that only the servers listed in the SPF record are authorized to send emails on behalf of the domain. Any email from a server not listed should be rejected.
Check with your IT administrator if you need help adding HubSpot's SPF record, or you can use a third-party consulting service.
Learn more about how an SPF policy works in this article.
Configure your DMARC record
Adding a DMARC record will give inbox providers a way to confirm how to process emails sent from your domain that do not pass SPF and DKIM checks, as well as reporting mechanisms to help you analyze authentication data.
Set up your DMARC record by adding a TXT record in your DNS provider. HubSpot provides the minimum recommended policy with no reporting, but you can customize your policy by including additional properties in the Value field of your DNS record.
Click Copy under the Host and Required Data columns then paste the values into the corresponding fields in your DNS provider.

Learn more about DMARC and the different properties you can use in this article.
Verify and troubleshoot your DNS records
As you configure each of the three DNS record types above, you can click Verify in the bottom right to confirm that your records were added correctly.
DNS records can take several hours to be fully verified. You can exit the domain setup and review the status of each authentication method in your domain settings.
Review authentication status
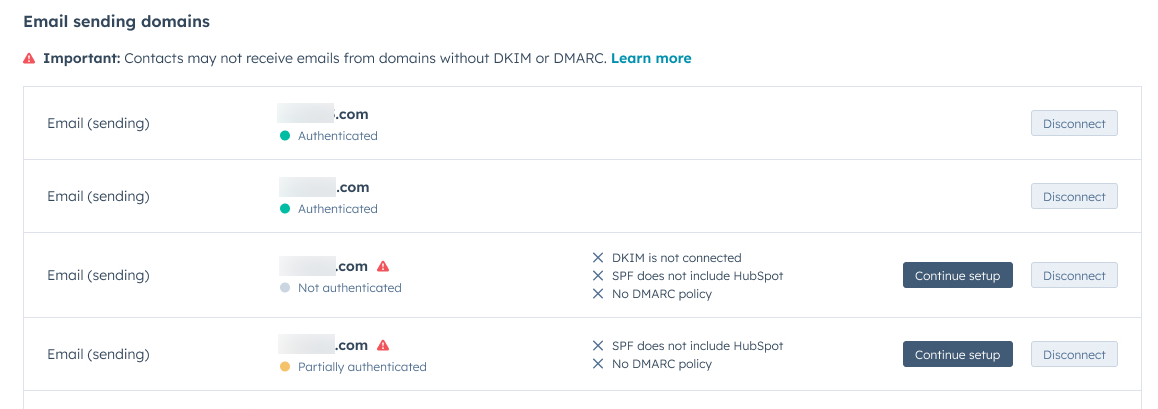
As you add each DNS record type in your DNS provider, you can check on the status of each authentication method to confirm whether it was set up correctly or whether further action is needed.
Each DNS record type will have one of the following statuses:
- Not authenticated: none of the three authentication methods have been fully set up or have yet to be verified.
- Partially authenticated: DKIM has been correctly set up and verified but SPF or DMARC still need to be fully verified.
- Authenticated: DKIM, SPF, and DMARC have all been fully set up and verified.
Please note: a subdomain will be considered authenticated if there's a DMARC record configured at the root domain level, due to DMARC policy inheritance.
If there's an issue with one of your DNS records, you can click Continue setup to review the associated DNS record value(s) that you need to add in your DNS provider.
Unauthenticated emails and email variable domains
All marketing emails and transactional emails sent via HubSpot that do not use a connected email sending domain are subject to a variable domain managed by HubSpot. This enables the automatic detection and removal of your unauthenticated domain without canceling the send. This process may negatively affect how your recipients engage with your emails.
For example, if you attempt to send an email from an unauthenticated domain, such as user@yourcompany.com, then HubSpot will modify the email address to use a HubSpot managed domain (e.g., hs-domain.com), so the resulting sending address will appear as: user=yourcompany.com@hs-domain.com.
