
Last updated: April 16, 2024
Available with any of the following subscriptions, except where noted:
|
|
After connecting your Google Ads account, you can create or update events to use Google's Enhanced Conversion for Leads to create ad conversion events to sync your CRM lifecycle stage changes from HubSpot. This will allow the ad network to optimize the delivery of your ads when a contact has been attributed in the HubSpot Ads tool.
You can also create new enhanced events or enhance your existing Google events with form submissions from HubSpot. This uses Google's enhanced conversions, which allows the ad network to optimize the delivery of your ads through accurate conversion measurement.
You can also create and sync ad conversion events with your LinkedIn Ads account or Facebook Ads account.
Before you get started
Before getting started with ad conversion events, do note the following:
- When creating a lifecycle stage ad conversion event:
- Only the lifecycle stage changes that occur after creating the conversion event in HubSpot will be counted and used to optimize the delivery of your ads.
- The lifecycle stage change must occur within 90 days after the ad interaction to sync with your Google Ads account.
- To sync contact lifecycle data from Google, the Included in account-level goals setting must be set to Yes for each ad event.
-
After you create a conversion event in HubSpot, lifecycle stage data from contacts who engage with your ads will be synced with your Google Ads account. The contact must have a value populated for the Google ad click id contact property, which represents their Google Click Identifier (GCLID).
-
After you create a conversion event in HubSpot, lifecycle stage data from contacts who engage with your ads will be synced with your Google Ads account. The contact must have at least one of the following:
-
A value populated for the Google ad click id contact property, which represents their Google Click Identifier (GCLID).
- Contact data must be shared with Google, such as email address, phone number, or address.
-
- If there are multiple events created in your account for different lifecycle stages, and a single contact moves through each stage, an event will sync for each lifecycle stage change. For example, if there are lifecycle stage change conversion events created for the lead and customer lifecycle stages, and a contact goes through both these stages, there will be a sync to each of the corresponding events.
- When creating a form submission ad conversion event:
- If you're using a Google Ads Manager account or My Client Centre (MCC), you cannot use Google's enhanced conversions to sync your form submission ad conversion events. While you will be able to create the event in HubSpot, the form data will not sync.
Create lifecycle stage ad conversion events
The number of lifecycle stage ad conversion events you can create depends on your HubSpot subscription. Please review HubSpot’s Product & Services Catalog for the most up-to-date pricing and packaging information.
- If you have a Marketing Hub Professional subscription, you can create up to 50 lifecycle stage ad conversion events.
- If you have a Marketing Hub Enterprise subscription, you can create up to 100 lifecycle stage ad conversion events.
To create a lifecycle stage ad conversion event usinge Google's Enhanced Conversion for Leads:
- In your HubSpot account, navigate to Marketing > Ads.
- In the top right, click Create. Then, select Event.
- In the right panel, customize the details for your event:
- Ad network: the ad network the event is for. Select Google to create an ad conversion event for your Google Ads account.
- Ad account: the Google Ads account you want to sync the event with.
- Event trigger: select the Lifecycle stage change radio button.
-
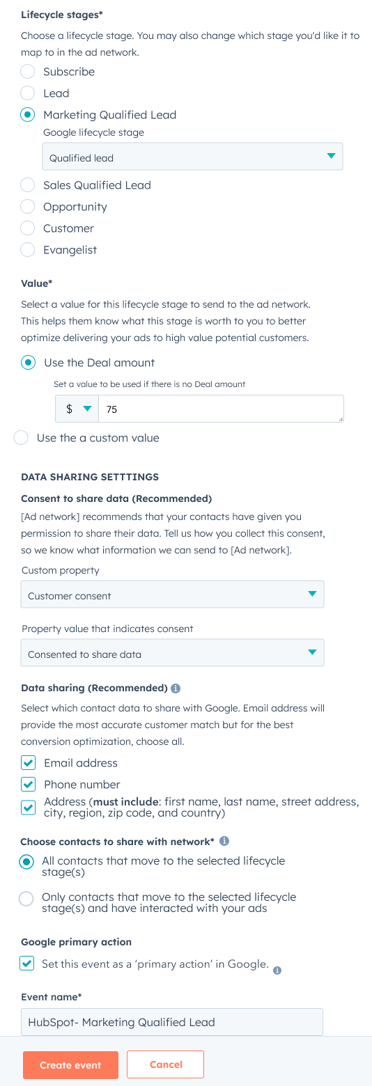
- Lifecycle stage: the HubSpot lifecycle stage specified for the event. If you want to associate the HubSpot lifecycle stage with a different lifecycle stage in your ad account:
- Click the dropdown menu below the HubSpot lifecycle stage.
- Then, select the corresponding ad network lifecycle stage.
- Value: specify a monetary value for your event.
- To set the event's value to the value of the associated deal, select Use the Deal amount. The weighted amount for the most recent associated deal will be used for this value. With this option, you'll still need to enter a default value. If the deal has no value attached or is invalid (closed-lost, has a non-positive value, etc), the default value will be used.
- To enter a custom value for the lifecycle event change, select Use a custom value, then enter a value.
- Consent to share data: Google recommends obtaining your contacts' consent to share data. Select a property and property value used to store and indicate a contact's consent to share data.
- Data sharing: select the checkboxes next to the HubSpot contact data that you would like to share with Google. HubSpot will use a secure one-way hashing algorithm called SHA256 to secure customer data before sending it to Google.
- To use enhanced conversions, at least one option must be selected.
- It is recommended to select at least the default Email property for a better identity match.
- Choose contacts to share with network: select which contacts to share with Google.
- All contacts that move to the selected lifecycle stage(s): sync all HubSpot contacts that have moved to the selected lifecycle stage. It is strongly recommended to use this option to provide the best ad optimization.
- All contacts that move to the selected lifecycle stage(s): sync only HubSpot contacts that have moved to the selected lifecycle stage and interacted with your Google Ads.
- Set the event as a 'primary action' in Google: select the checkbox to set the event as a primary event in your Google Ads account. Select this option to report on the event in the Conversions column of your Google reports and use the event for bidding.
- Event name: enter a name for your event.
- Lifecycle stage: the HubSpot lifecycle stage specified for the event. If you want to associate the HubSpot lifecycle stage with a different lifecycle stage in your ad account:
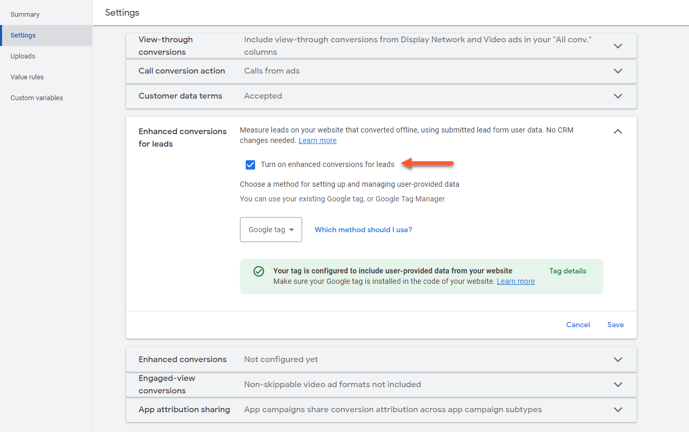
- If you're creating a Lifecycle stage change ad conversion event using Google's Enhanced Conversions for Leads for the first time, you will need to turn on the Enhanced conversions for leads settings in your Google ads account:
- Click Sign into Google Ads to sign in to your Google Ads account.
- Click Sign into Google Ads to sign in to your Google Ads account.
-
- In your Google Ads account settings, click to expand the Enhanced conversions for leads section.
- Click the Turn on enhanced conversions for leads checkbox.
- Click the Choose a method for setting up and managing user-provided data dropdown menu and select Google tag or Google tag manager.
- Click Save.
- After updating your Google Ads account settings, navigate back to your HubSpot account.
- Click Create event
Create form submission ad conversion events
To create a form submission ad conversion event:- In your HubSpot account, navigate to Marketing > Ads.
- In the top right, click Create. Then, select Event.
- In the right panel, customize the details for your event:
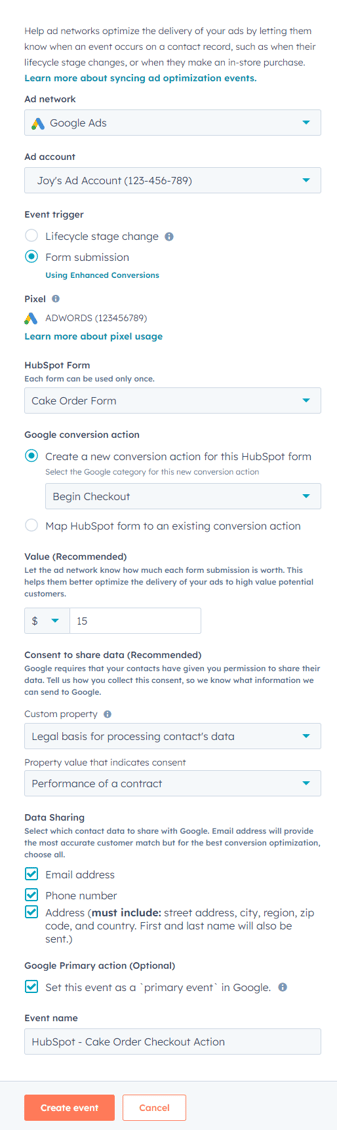
- Ad network: the ad network the event is for. Select Google to create an ad conversion event for your Google Ads account.
- Ad account: the Google Ads account you want to sync the event with.
- Event trigger: select the Form submission radio button.
-
- Pixel: if you have previously installed a Google pixel to your HubSpot account, the pixel will display. If there is not, click Add pixel to install a new Google pixel.
- HubSpot form: select a form to use as the event trigger. Each HubSpot form can only be used as an event trigger once.
-
- Accept Google's customer data terms: this is required the first time you create a form submission ad conversion event using Google's enhanced conversions for web. Click the link to your Google settings to read and accept the terms.
-
- Google conversion action: select whether to create a new event or map the form submission to enhance an existing Google conversion event.
- Create a new conversion action for this HubSpot form: select a conversion action the event should be mapped to in your Google Ads account.
- Map HubSpot form to an existing conversion action: search and select an action from a list of existing Google conversion actions in your Google Ads account. If you've selected this option, it is recommended to set a value for the form submission.
- Consent to share data: Google recommends obtaining your contacts' consent to share data. Select a property and property value used to store and indicate a contact's consent to share data.
- Data sharing: select the checkboxes next to the HubSpot contact data that you would like to share with Google. HubSpot will use a secure one-way hashing algorithm called SHA256 to secure customer data before sending it to Google.
- To use enhanced conversions, at least one option must be selected.
- It is recommended to select at least the default Email property for a better identity match.
- Event name: enter a name for your event.
- Google conversion action: select whether to create a new event or map the form submission to enhance an existing Google conversion event.
- After setting up your Lifecycle stage or Form submission conversion event, click Create event.
Manage events in HubSpot
To review and manage your conversion events:
- In your HubSpot account, navigate to Marketing > Ads.
- Click the Events tab. You can review all conversion events.
- To disable syncing data from your HubSpot account, click to toggle the switch off next to the name of the corresponding event.
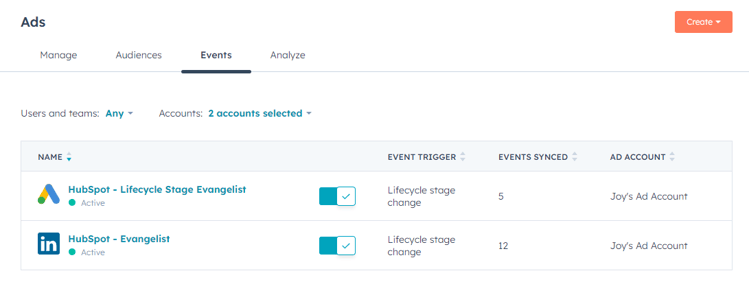
- To view more details on each event, click the name of the event. In the right panel, review additional details for your conversion event.
- To delete an event in your HubSpot account, click the name of the event. Then, in the right panel, click Delete.
- When an event is deleted in HubSpot it will not automatically delete the corresponding event in Google Ads. The event must be deleted manually from your Google Ads account.
- If an event is created with the same details as a previously deleted event, and the name conversion action in the Google Ads was not edited, the new HubSpot event will send offline conversions to the same Google Ads conversion action as before.
Update existing lifecycle stage change ad conversion events to use Google's Enhanced Conversion for Leads
To review and update your conversion events:
- In your HubSpot account, navigate to Marketing > Ads.
- Click the Events tab. You can review all conversion events.
- To update an existing event, click Update to EC. If you do not see the option to replace an existing event, this means that the event is already using Google's Enhanced Conversions for leads. Your ad conversion event should continue to sync without issue.
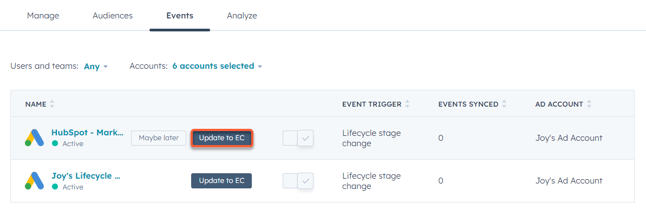
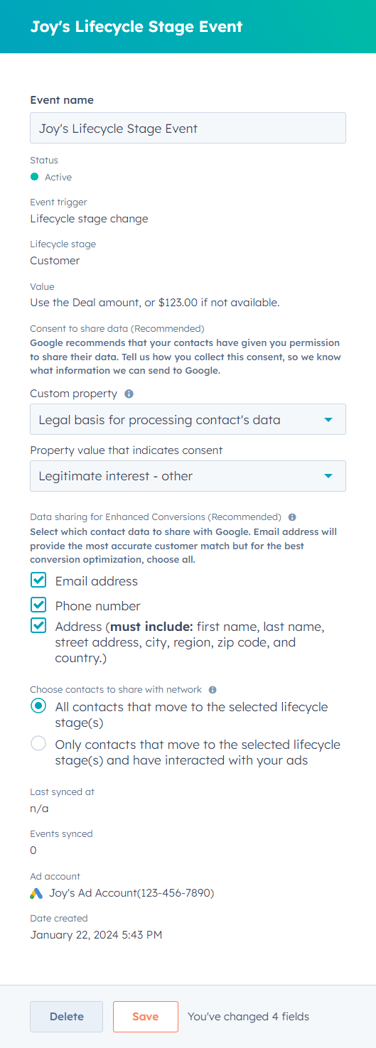
- In the right panel, update the following details:
- Event name: by default, the existing event name will appear. You can update the event name.
-
- Consent to share data: Google recommends obtaining your contacts' consent to share data. Select a property and property value used to store and indicate a contact's consent to share data.
- Custom property: select a property used to collect a contact's consent to share data.
- Property value that indicates consent: select a property value from the above property that indicates the contact's consent.
- Consent to share data: Google recommends obtaining your contacts' consent to share data. Select a property and property value used to store and indicate a contact's consent to share data.
-
- Data sharing: select the checkboxes next to the HubSpot contact data that you would like to share with Google. HubSpot will use a secure one-way hashing algorithm called SHA256 to secure customer data before sending it to Google.
-
-
- To use enhanced conversions, at least one option must be selected.
- It is recommended to select at least the default Email property for a better identity match.
- Choose contacts to share with network: select which contacts to share with Google.
- All contacts that move to the selected lifecycle stage(s): sync all HubSpot contacts that have moved to the selected lifecycle stage. It is strongly recommended to use this option to provide the best ad optimization.
- All contacts that move to the selected lifecycle stage(s): sync only HubSpot contacts that have moved to the selected lifecycle stage and interacted with your Google Ads.
- After updating your lifecycle stage change ad event, click Save.
-
- If you do not want to update the event, hover over the event and click Maybe later. This will dismiss the Update to EC button. Your ad conversion event should continue to sync without issue.
- To disable syncing data from your HubSpot account, click to toggle the switch off next to the name of the event.
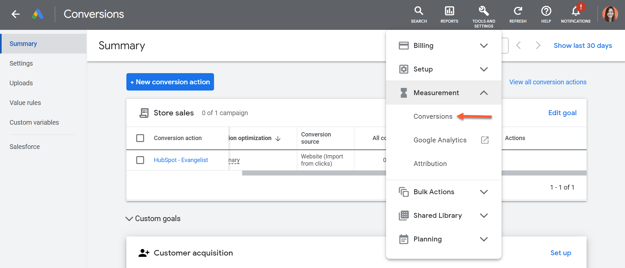
Reviewing ad conversion events in Google
In Google Ads, ad conversion events are referred to as conversion actions. Each conversion action will have an All Conversions column displaying the total count of conversions for that conversion action.
The All Conversions column will only display the attributed conversions according to your conversion action settings in Google Ads.
Enhanced Conversion events synced from HubSpot will be included in the All Conversions column only if that conversion can also be attributed to a Google Ads campaign.
Please note: the All conversions total in Google Ads is not expected to match the data in HubSpot due to Google's requirements for how each metric is calculated. Learn more about All Conversions and conversion actions in Google's documentation here.
View and use lifecycle stage change events in your Google Ads account
Google will use the CRM lifecycle data from your HubSpot account to optimize the delivery of your ads. You'll also be able to report on the value of your CRM lifecycle event changes from within your Google Ads account.
The CRM lifecycle event changes will sync to your Google Ads account as Conversion Actions. Google will use this data to optimize the bidding strategy for your ads.
- To view the events you created in HubSpot in your Google Ads account:
- Sign in to your Google Ads account.
- In the upper right, click Tools & Settings.
- In the dropdown menu, under Measurement, click Conversions.
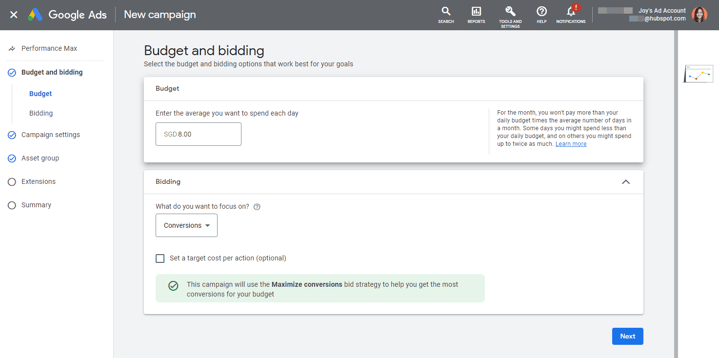
- To use your events when creating a Google ad campaign:
- In the left sidebar, click Budget and bidding.
- Click the What do you want to focus on? dropdown menu, then select Conversions.
How your form submission data will sync with Google
After creating a form submission conversion event in HubSpot, contact data from contacts who submit HubSpot forms on your site will be synced with your Google ad account. Data such as email addresses, phone numbers, first names, last names, and street addresses will be hashed using the SHA-256 algorithm before being uploaded.
The Turn on enhanced conversions option in your Google conversions settings will also be automatically selected within 48 hours of the first event sync from HubSpot. You do not need to manually turn on this option to sync new or existing conversion events for form submissions.
HubSpot adheres to the following process when sending data for Google's enhanced conversions for web. This information will be configured by HubSpot, and users will not need to take any action. For reference, the process for sending data for enhanced conversions is similar to other Google conversion adjustments, keep the following key differences in mind when populating the ConversionAdjustment:
order_idis required.adjustment_typemust beENHANCEMENT.conversion_actionmust be theresource_nameof aConversionActionwith atypeofWEBPAGEand enhanced conversions enabled.user_identifiersmust contain between one and five identifiers. Enhancements support the following identifiers:hashed_emailers.google.com/google-ads/api/docs/conversions/upload-adjustmentshashed_phone_numberaddress_info
user_identifier_sourceof each identifier is optional.-
gclid_date_time_pairwithconversion_date_timeis optional but recommended. Set this to the date and time at which the conversion with the specifiedorder_idoccurred. Include the timezone offset, and use the formatyyyy-mm-dd HH:mm:ss+|-HH:mm, for example:2022-01-01 19:32:45-05:00(ignoring daylight saving time) .Setting the
gclidof thegclid_date_time_pairis optional. -
user_agentis optional but recommended. This should match the user agent of the request that sent the original conversion so the conversion and its enhancement are either both attributed as same-device or both attributed as cross-device. -
restatement_valuewithadjusted_valueandcurrency_codeare optional but recommended.
In addition, you must upload the enhancement adjustment within 24 hours of the original conversion for the order_id. To avoid errors due to differences in clock times, upload the adjustment no later than several minutes before the end of the 24-hour period.
Necessary disclosure: your use of our Google Ads integration is subject to the Google Ads Terms and Conditions and our Customer Terms of Service. By using our Google Enhanced Conversions feature, you authorize us to provide necessary data to Google in order to make this functionality available to you; you also agree to comply with Google's Customer data policies and Customer Data Terms. Please review Google’s Customer data policies carefully as they contain examples of where you can collect customer data, requirements, restrictions on measurements in sensitive categories, ramifications for violations of these policies, and user choice and control. Please note that your legal team is the best resource to give you advice on how to comply with these policies.
HubSpot will be able to view and manage your account, and will store your Google Ads account number. When you authorize the integration, HubSpot receives a user token with permissions on the connected ad accounts. HubSpot can view but does not store all the ad accounts you have permission for. Google will share settings details (e.g., name, budget, bid strategy, creative) and performance metrics (impressions, clicks, etc.) for all campaigns, ad groups, and ads in the ad accounts you connected.
