
Last updated: February 14, 2024
Available with any of the following subscriptions, except where noted:
|
|
In HubSpot, there are CRM objects: contacts, companies, deals, and tickets. If your account has an Enterprise subscription, you can also create custom objects. To keep track of the relationships within and between objects, you can associate their records together. Associations are always two-way (i.e., if record A is associated to record B, record B is also associated to record A) and can be viewed in each record in the right sidebar.
Examples of when you'd associate records include:
- When making a sale, you communicate via email to three individuals at the same company. In HubSpot, you associate the deal to the three contact records and their company record. You can also associate the contacts to each other as colleagues, or if you're in a Professional or Enterprise account, you can label one of the contacts as the others' manager.
- When handling a customer complaint, you communicate via email to two individuals. These individuals are also in the middle of a sale with your company. In HubSpot, you can associate the ticket record to the two contact records and the deal record.
- A contact is an advisor at one company and an employee at another company. In HubSpot, you can associate the contact with both companies. You can set the employer as their primary company, and if you're in a Professional or Enterprise account, you can label them as an advisor for the other company.
You can also associate the activities in a record's timeline to appear in another record. If the records are already associated together, some activities will automatically be associated to the associated records. If you're using a mobile device, learn how to manage associations in the HubSpot mobile app.
Associate records
Add associations to a record
To add associations on an individual record:
- Navigate to your records:
- Contacts: In your HubSpot account, navigate to CRM > Contacts.
- Companies: In your HubSpot account, navigate to CRM > Companies.
- Deals: In your HubSpot account, navigate to CRM > Deals.
- Tickets: In your HubSpot account, navigate to CRM > Tickets.
- Custom objects: In your HubSpot account, navigate to CRM, then select the custom object. Before you can associate custom object records, you need to define the association.
- Click the name of the record for which you want to add associations.
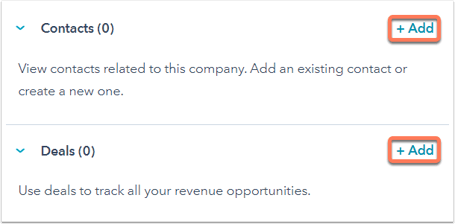
- In the right sidebar, click +Add [object] in that object's association card (e.g., the Contacts card to add contact associations. If the object's card isn't displayed, you can customize the right sidebar (Professional and Enterprise only).
- To create and associate a new record, in the right panel:
- Click the Create new tab.
- Enter property values for your new record. If you want to set an association label, you'll need to set the label after the record is created.
- Click Create, or to create and associate another record, click Create and add another.
- To associate existing records, in the right panel:
- Search for the records you want to associate, then select the checkboxes.
-
- If you're associating additional companies to a record, click Next, then you can do one of the following:
-
-
- To set the primary company, select Set as [record]'s primary company under the company you want to be primary. Learn more about how the primary company is set and used.
- To replace the existing primary company with a company you're associating, select the Replace [company] as [record]'s current primary checkbox. The previous primary company will still be associated with the record, but will no longer be labeled as primary.
-
-
- To label the association (Professional and Enterprise only), click Next. Click +Add association label to set labels that describe the relationship between the records.
- Once you're done, click Save.
Associate records in bulk
There are multiple ways to associate records in bulk:
- Associate records via an import, which includes the option to import association labels. The records in your import can be either new or existing records. Learn how HubSpot identifies and deduplicates existing records.
- Associate records via API.
- Turn on the setting to automatically associate contact and company records based on the company domain.
Primary company association
There is a default Primary label for [Object] > Company relationships. For example, you can set a primary company on a contact record, but you can't set a primary contact on a company record. If you're in a Professional or Enterprise account, you can create a custom primary label for other object relationships.
The primary company is set or used in the following ways:
- If you associate a company while creating a new record, that company is set to primary by default.
- For contact records, the first company you associate with a record is the primary company by default. If the contact has only one associated company, that association must be primary.
- The primary company appears in the [Object] → Company (Primary) and [Object] → Companies columns on other object home pages.
- Any activities on the record's timeline (e.g., logged emails, calls) will be automatically associated with only the primary company. You can still manually associate activities with the other companies.
- If you've turned on the options to sync company lifecycle stages with contacts or deals, the sync will only update the primary company's lifecycle stage.
- The primary association is referenced by lists, workflows, cross-object reports, and personalization tokens.
Edit or remove associations on a record
To update or remove an association:
- Navigate to your records:
- Contacts: In your HubSpot account, navigate to CRM > Contacts.
- Companies: In your HubSpot account, navigate to CRM > Companies.
- Deals: In your HubSpot account, navigate to CRM > Deals.
- Tickets: In your HubSpot account, navigate to CRM > Tickets.
- Custom objects: In your HubSpot account, navigate to CRM, then select the custom object.
- Click the name of the record for which you want to edit associations.
- In the right panel of the record, hover over the association card, then click More:

-
- Set as primary (Companies only): for associated companies, select to make the company association primary. In the dialog box, select the checkbox if you're replacing another company, then click Update.
- Remove as primary (Companies only): select to remove the company association as primary. To select a new primary company, in the dialog box, click the dropdown menu and select the company, then click Update. The original primary company will still be associated to the record, but will no longer be labeled as primary.
Please note: for contact records, a primary company association is required. On contacts with multiple associated companies, if you remove a company as primary, you must select another primary company. If a contact has only one associated company, that company is primary by default and you cannot remove the primary label.
-
- Edit association labels (Professional and Enterprise only): select to update the association label. In the dialog box, click the dropdown menu and select a new label or click x to remove a label. Click Update. You can also set association labels in bulk via import.
- Remove association: select to remove the association. In the dialog box, click Remove association. If the association you’re removing is a primary company, use the dropdown menu to choose a new primary company.
View record associations on a home page
You can view associated records in bulk on each object's home page in the associated object columns. You can display columns for each association type (e.g., Deal → Companies) and for a record's primary company (e.g., Contact → Company (Primary)).
- Navigate to your records:
- Contacts: In your HubSpot account, navigate to CRM > Contacts.
- Companies: In your HubSpot account, navigate to CRM > Companies.
- Deals: In your HubSpot account, navigate to CRM > Deals.
- Tickets: In your HubSpot account, navigate to CRM > Tickets.
- Custom objects: In your HubSpot account, navigate to CRM, then select the custom object.
- To display associated records as columns in the table:
- In the top right of the table, click Edit columns.
- In the dialog box, on the left, select the checkbox next to [Object] → [Objects] to display associations of that type. For example, if you're on the contacts home page, you could select Contact → Companies, Contact → Company (Primary), Contact → Deals, etc.
- Click Apply. Learn more about customizing the table.
- In the columns, click [x] records to view the record’s associations for that object relationship. In the pop-up box, click the name to view a specific associated record, or click View associated [Objects] to open a view of all associated records for that relationship.

View a record's association history
You can view the history of a contact, company, ticket, and deal record's associations, including all associated records and activities. You can also view when the records were originally associated and the source of the association.
- Navigate to your records:
- Contacts: In your HubSpot account, navigate to CRM > Contacts.
- Companies: In your HubSpot account, navigate to CRM > Companies.
- Deals: In your HubSpot account, navigate to CRM > Deals.
- Tickets: In your HubSpot account, navigate to CRM > Tickets.
- Click the name of a record.
- In the left panel, click Actions, then select View association history.

- In the Select an object dropdown menu, select an object or engagement to view which records or activities of that type have been associated with the record.
- In the table, you can view the name of each associated record or activity, its Record ID, how it was updated (either Created or Removed), and the date and time of the update. You can also view the source of the update, which will be one of the following:
- User: the association was manually updated by a user. The source will include the user's name, or if unknown, the user ID.
- Object deletion: the association was updated because the record or activity was deleted.
- Object merge: the association was updated as a result of merged records.
- Object restore: the association was updated as a result of a restored record.
- Import: the association was updated via an import.
- Auto association by domain: for contacts and companies, the association was updated automatically by HubSpot based on the company domain.
- API: the association was updated via API.
- Job: the association was updated via internal automation.
- Migration: the association was updated via a data migration.
- Unknown: the source of the association could not be determined.
- To copy a link to a record or engagement in the table, hover over the association, then click the copy icon.
- To view the entire history of a specific association, hover over the record or engagement, then click View history. In the right panel, view the details of each update to the association with your record, sorted from most recent to oldest.
