
Last updated: April 10, 2024
Available with any of the following subscriptions, except where noted:
|
|
In HubSpot, there are a few ways to export your reports:
- For individual reports:
- You can send an email containing a link to the report in HubSpot. Emails can be sent once or scheduled to be sent daily, weekly, or monthly.
- You can also export a report as a CSV or Excel file. Exports cannot be scheduled on a recurring basis.
- For dashboards, you can send an email containing a link to a dashboard in HubSpot. Emails can be sent once or scheduled to be sent daily, weekly, or monthly.
- With the Slack integration, you can share a report to a specific Slack channel.
Export a report
From the reports dashboard, you can export a report as a CSV or Excel file, or email the report to users in the account. You can also schedule recurring report emails on a daily, weekly, or monthly basis. You can set up multiple recurring emails for a single report.
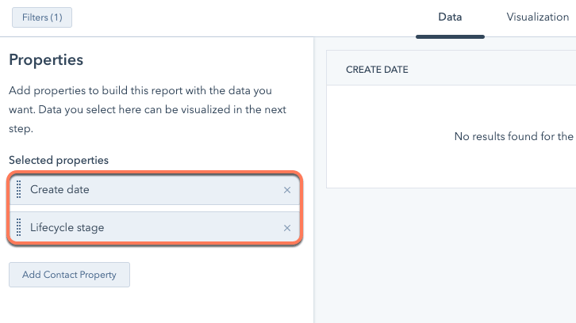
Exports will include fields that have been added to the report:
- Single object reports will export with properties that have been added to the Selected properties section of the Data tab of the report builder.
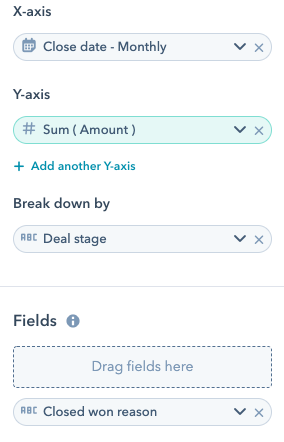
- Advanced custom reports will export with fields that have been added to the Configure tab of the report builder.
To export a report as a CSV or Excel file:
- In your HubSpot account, navigate to Reporting & Data > Reports.
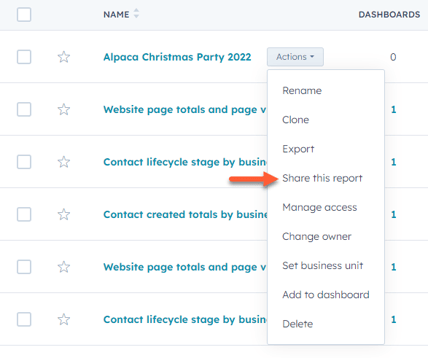
- Hover over the report you want to export, then click the Actions dropdown menu and select Export.
- In the dialog box, enter a Name for your report in the Name field, then click the File format dropdown menu to select the file format for the export.
- Click Export. Once the export is processed, you'll receive a download link through email and in your notification center.
- A funnel report displays objects that changed stages within the selected date range. However, when you export a funnel report, the export file will contain the objects created in that date range.
- When exporting an XLS or XLXS file, only the data in the Visualization tab will export, not the data in the Data tab.
To send and schedule emails for an individual report:
- In your HubSpot account, navigate to Reporting & Data > Reports.
- Hover over the report that you want to email, then click Actions > Share this report.
- In the right sidebar, set up your email details:
- To send the email only once:
- Under Is this a recurring email? ensure that No, this email will only be sent once is selected.
- To send the email only once:
-
-
- Click the Internal recipients dropdown menu, then select the users to send the email to.
- In the Email subject field, enter the email subject line that will appear in the recipient's inbox.
- In the Message field, enter the email body text.
- To preview the report that the recipients will receive in a new tab, click Preview .
- To send the email, click Send now.
-
-
- To send the email on a recurring schedule:
- Under Is this a recurring email? select Yes, this is a recurring email.
- In the Email nickname field, enter an internal name for the email.
- Click the Internal recipients dropdown menu, then select the users to send the email to.
- In the Email subject field, enter the email subject line that will appear in the recipient's inbox.
- In the Message field, enter the email body text.
- Click the Delivery frequency dropdown menu, then select Daily, Weekly, or Monthly.
- If you selected Weekly or Monthly, click the Delivery date dropdown menu, then select the days or dates when you want the email to be sent.
- Click the Time of day dropdown menu, then select the time that you want the email to send out.
- Report data will be captured two hours before this time.
- A summary of the email delivery dates will populate at the bottom of the panel.
- To preview the report that the recipients will receive in a new tab, click Preview .
- To send the email, click Schedule email.
- To send the email on a recurring schedule:
Manage recurring report emails
If you're a super admin or the owner of a report, you can modify and delete a recurring email.
- In your HubSpot account, navigate to Reporting & Data > Reports.
- Hover over the report that has a recurring email, then click Actions > Manage recurring shares.
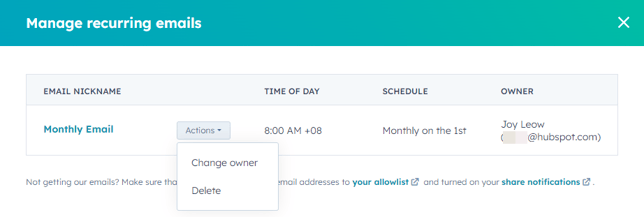
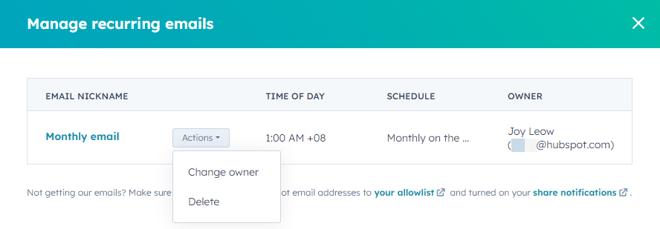
- In the dialog box, manage the recurring email:
- To edit the email details, click the email nickname.
- To change the recurring email owner:
- Hover over the email, then click Actions > Change owner.
-
-
- In the dialog box, click the Recurring email owner dropdown menu, then select a new user.
- Click Change owner.
-
-
- To delete the recurring email:
- Hover over the email, then click Actions > Delete.
- In the dialog box, click Delete recurring email.
- To delete the recurring email:
Please note: a recurring email must be deleted at least two hours before it is due to send. If it's deleted within 2 hours of its send time, the email will be sent to any scheduled recipients.
Export a dashboard
You can send an email with dashboard reports once and export your data, or set up recurring emails to be sent regularly to the users in your HubSpot account.
You can also send a dashboard to an email address that is not a user in your HubSpot account (Professional and Enterprise only).
Please note:
- The dashboard data sent out in recurring emails is based on the permissions of the user who set up the email. If you want individual users to receive only their own data, it's recommended for each user to set up their own recurring dashboard emails.
- When sending report data as an attachment to an email the following reports are not supported; web analytics, reports with email as the data type, annotations, Snowflake, reports with unified data type, and sales analytics widget reports.
Email a dashboard
Recurring dashboard emails can only be sent to HubSpot users. Non-recurring emails can be sent to both HubSpot users and non-HubSpot users. When sending a dashboard to a non-HubSpot user, the domain of the email address must be connected as an email sending domain.- In your HubSpot account, navigate to Reporting & Data > Dashboards.
- In the upper left, click the name of the current dashboard and select the dashboard you want to email or export.
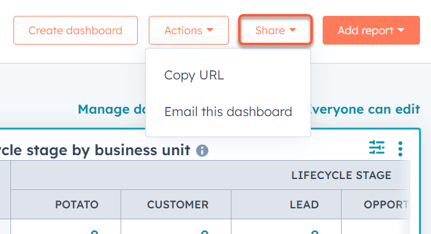
- In the upper right, click Share > Email this dashboard.
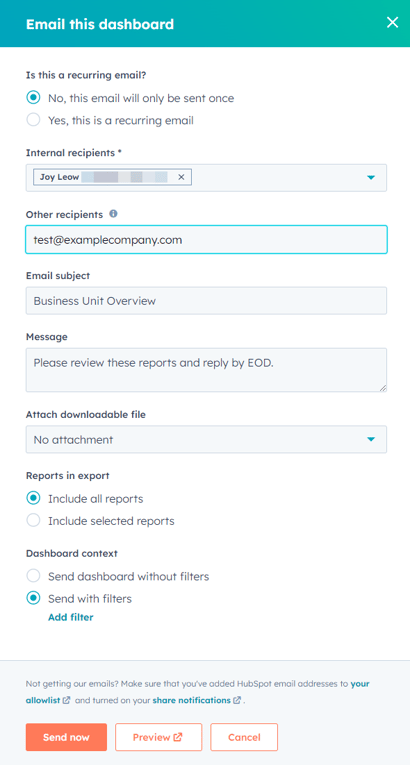
- To send an email once, set up the following details in the right sidebar:
- Under the Is this a recurring email? field ensure that No, this email will only be sent once is selected.
- Click the Internal recipients dropdown menu, then select the users to send the email to.
- If you have a Professional or Enterprise subscription, you can email a dashboard to non-HubSpot users. In the Other recipients fields, enter the recipient's email address.
- The domain of the email address entered must be connected as an email sending domain. If the email sending domain is not connected correctly, an error message will appear below the Other recipients field.
- For example, if you're sending the dashboard to
test@examplecompany.com,examplecompany.comshould be added as an email sending domain.
-
-
- You can send 100 emails per day to non-Hubspot users.
-
Please note: HubSpot and non-HubSpot users will receive the same email, please ensure that no personal or sensitive information will be shared before sending.
-
- The domain of the email address entered must be connected as an email sending domain.
- In the Email subject field, enter the subject line that will appear in the recipient's inbox.
- In the Message field, enter the email body text.
- To include a downloadable file of the data as an email attachment, click the Attach downloadable file dropdown menu, then select a file format. If No attachment is selected a visual of the dashboard will be emailed instead of a data file.
-
- By default, the email will include all reports on the dashboard. To include only specific reports, select Include selected reports, then select the checkboxes next to the reports you want to include.
- By default, the email will not include any dashboard filters. To send the email with specific dashboard filters, click Send with filters. Then, click Add filter and select a filter. Click Apply.
- To preview the report that the recipients will receive in a new tab, click Preview .
- To send the email, click Send now.
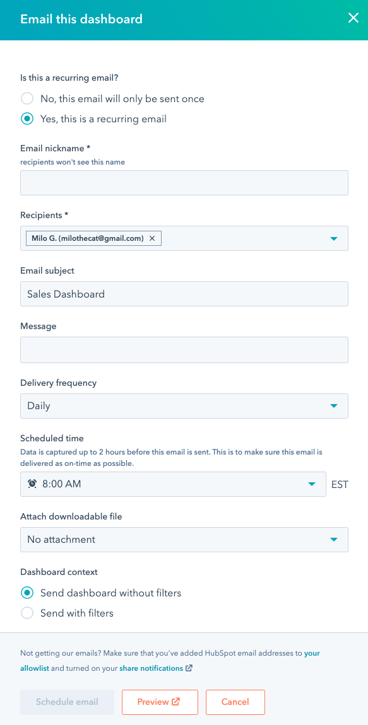
- To send a recurring email, set up the following details in the right sidebar:
- Under Is this a recurring email? select Yes, this is a recurring email.
-
- In the Email nickname field, enter a name for this recurring email. Recipients cannot see this nickname.
- Click the Recipients dropdown menu, then select the users that you want to send the email to.
- In the Email subject field, enter the subject line that will appear in the recipient's inbox.
- In the Message field, enter the email body text.
-
- Click the Delivery frequency dropdown menu, then select Daily, Weekly, or Monthly.
- If you selected Weekly or Monthly, click the Delivery date dropdown menu, then select the days or dates when you want the email to send out.
- Click the Time of day dropdown menu, then select the time that you want the email to send out. Report data will be captured two hours before this time.
- A summary of the email delivery dates will populate at the bottom of the panel.
-
- To include a downloadable file of the data as an email attachment, click the Attach downloadable file dropdown menu, then select a file format. If No attachment is selected a visual of the dashboard will be emailed instead of a data file.
- By default, the email will not include any dashboard filters. To send the email with specific dashboard filters, click Send with filters. Then, click Add filter and select a filter.
- To finish setting up the email, click Schedule email.
Please note: only Single object, Event-based, and Customer journey reports can be sent as CSV, XLS and XLSX by email.
Email a report from a dashboard
Send an individual report's data from a dashboard to multiple email addresses. Emails can be configured to send recurring.
To share an individual report's data with multiple recipients:
- In your HubSpot account, navigate to Reporting & Data > Dashboards.
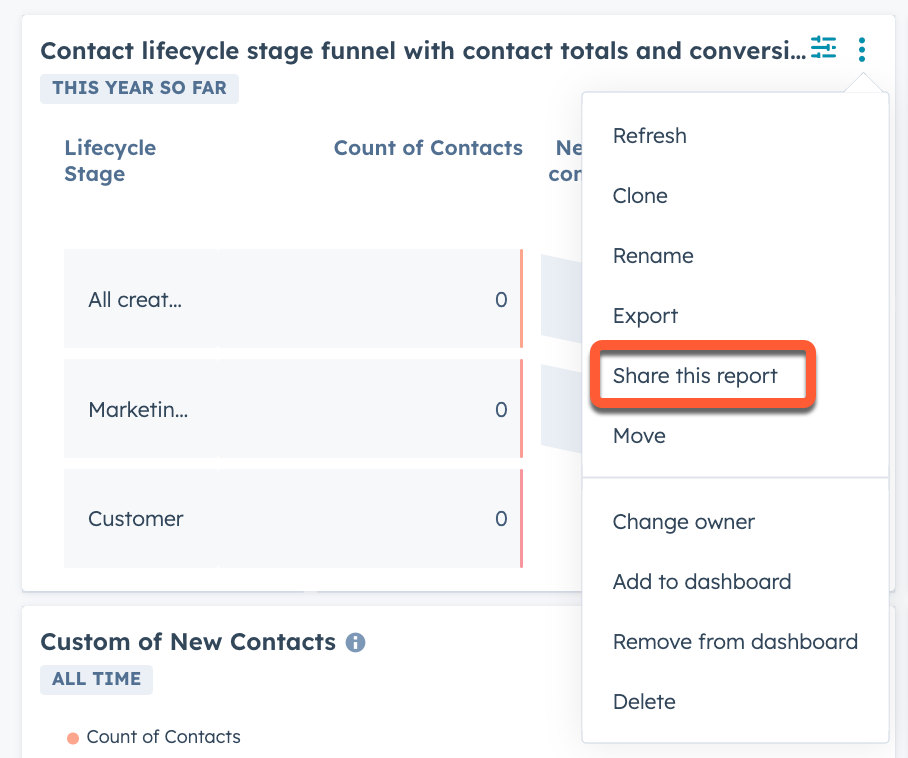
- In the top right of a report on your dashboard, click Then, select Share this report.
- In the right panel, select if the email will be recurring. If you select Yes:
- In the Email nickname field, enter a name for this recurring email. Recipients cannot see this nickname.
- Click the Schedule dropdown menu, then select Daily, Weekly, or Monthly.
- If you selected Weekly or Monthly, click the Day of [X] dropdown menu, then select the day or when you want the email to send.
- Click the Time of day dropdown menu, then select the time that you want the email to send. Report data will be captured two hours before this time.
- In the Email nickname field, enter a name for this recurring email. Recipients cannot see this nickname.
- Click the Recipients dropdown menu, then select the users that you want to send the email to.
- To include a data file of the report as an email attachment, click the Attach downloadable file dropdown menu, then select a file format. If No attachment is selected a visual of the report will be emailed instead of a data file.
- In the Email subject field, enter the subject line that will appear in the recipient's inbox.
- In the Message field, enter the email body text.
- To finish setting up the email, click Schedule email.
Please note: only Single object, Event-based, and Customer journey reports can be sent as CSV, XLS and XLSX by email.
Manage recurring dashboard emails
If you're a super admin or the owner of a dashboard, you can modify and delete a recurring email.
- In your HubSpot account, navigate to Reporting & Data > Dashboards.
- In the upper left, click the name of the current dashboard and select the dashboard you want to email or export.
- In the upper right, click Share > Manage recurring emails.
- In the dialog box, configure your recurring emails:
- To edit the email details, click the email nickname.
- To change the recurring email owner:
- Hover over the email, then click Actions > Change owner.
-
-
- In the dialog box, click the Recurring email owner dropdown menu, then select a new user.
- Click Change owner.
-
-
- To delete the recurring email:
- Hover over the email, then click Actions > Delete.
- In the dialog box, click Delete recurring email.
- To delete the recurring email:
Please note: a recurring email must be deleted at least two hours before it was due to send. If it's deleted within 2 hours of it's send time, the email will send to it's scheduled recipients.
Share reports through the Slack integration
If you've installed the Slack integration, you can share dashboard reports with the rest of your team in Slack. Reports can only be shared to public Slack channels and cannot be sent to shared channels.
To share a link to a dashboard's reports:
- In your HubSpot account, navigate to Reporting & Data > Dashboards.
- In the upper right, click Actions > Share to Slack.
- In the right panel, select the channel to send the reports to. You can optionally enter a message to accompany the Slack message.
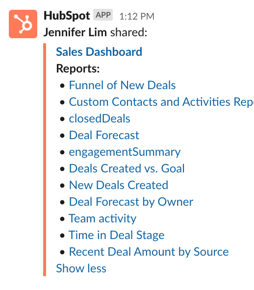
- Click Share to Slack.
- A preview of the reports will display in Slack. If the user has access to the report in HubSpot, they can click the link in Slack to go directly to the report.
To share an individual report:
- In your HubSpot account, navigate to Reporting & Data > Reports.
- Hover over the report you want to share and click Actions > Share this report.
- In the right panel, click Slack.
-
In the right panel, navigate to the Slack tab.
-
Under Is this a recurring slack? select No, this slack message will only be sent once.
-
Under Sharing to slack channel or user? Select to share with a user or a channel.
-
Click the Share to channel or user dropdown menu, then select the channel or user that you want to send the slack message to.
-
In the Message field, enter the slack message body text.
-
To preview the report that the recipient will receive in a new tab, click Preview.
-
To send the slack message, click Send now.


To share a recurring slack message:
- Under Is this a recurring slack? select Yes, this is a recurring slack message.
- In the Slack nickname field, enter an internal name for the slack message.
- Under Sharing to slack channel or user? Select to share with a user or a channel.
- Click the Share to channel or user dropdown menu, then select the channel or user that you want to send the slack message to.
- In the Message field, enter the slack message body text.
- Click the Delivery frequency dropdown menu, then select Daily, Weekly, or Monthly.
- If you selected Weekly or Monthly, click the Delivery date dropdown menu, then select the days or dates when you want the slack message to send.
- Click the Time of day dropdown menu, then select the time that you want the slack message to send. Report data will be captured two hours before this time.
- A summary of the slack message delivery dates will populate at the bottom of the panel.
- To preview the report that the recipients will receive in a new tab, click Preview.
- To send the slack message, click Schedule message.
Manage recurring Slack messages for reports
If you're a super admin or the owner of a dashboard, you can modify and delete a recurring email.
-
In your HubSpot account, navigate to Reports > Dashboards.
-
In the upper right of a report, click More.
-
In the dropdown menu, select Manage recurring shares.
-
In the dialog box, navigate to the Slack tab.
-
Manage the recurring Slack messages:
-
Hover over the name of the slack message, then click Actions > Change owner.
-
To edit the message details, click the Slack nickname.
-
-
To change the recurring Slack message owner:
-
-
In the dialog box, click the Recurring slack owner dropdown menu, then select a new user.
-
Click Change owner.
-
-
To delete the recurring Slack message:
-
Hover over the email, then click Actions and select Delete.
-
In the dialog box, click Delete recurring message.
-

Please note: a recurring email must be deleted at least two hours before it was due to send. If it's deleted within 2 hours of it's send time, the email will send to it's scheduled recipients.
