
Last updated: April 12, 2024
Available with any of the following subscriptions, except where noted:
|
|
|
|
| Legacy Marketing Hub Basic |
If you send a high volume of email and want more control over your email sending reputation, you can connect a dedicated IP address to send your emails.
After purchasing the dedicated IP address add-on or the transactional email add-on, you can follow the steps below to connect your new address.
Please note: if you're trialing the transactional email add-on, you do not need to connect a dedicated IP address during the trial.
Once the DNS setup process is complete, an automated warmup process is required for users with the dedicated IP address add-on. This warmup process is not applicable if you purchased the transactional email add-on, and your new IP address will be ready to use after you set up your DNS records.
Connect your dedicated IP address
To connect your dedicated IP address in your domain settings:
- In your HubSpot account, click the settings icon in the top navigation bar.
- In the left sidebar menu, navigate to Content > Domains & URLs.
- Click Connect a domain.
- In the dialog box, select Dedicated IP, then click Connect.
- Under Email address, enter an email address that you use to send marketing emails, then click Next.
- Review the two domains that you'll be setting up:
- Email sending domain: this domain will be shown in the From address field of your emails. This is the domain that your email recipients will see in their inbox.
- Dedicated IP sending domain: this subdomain will be used as the mailed-by or return-path domain in the email header for marketing and transactional sends. The subdomain is necessary for the delivery of your emails, but isn't usually visible to your email recipients.
- Next, edit your DNS records:
- In a separate tab, log in to your DNS provider.
- In HubSpot, select the I'm logged in checkbox.
- In your DNS provider, navigate to your DNS settings to add the new records for your new IP address. Learn more about editing your DNS settings, or partner with your IT team to make changes.
- In HubSpot, select the I'm there checkbox.
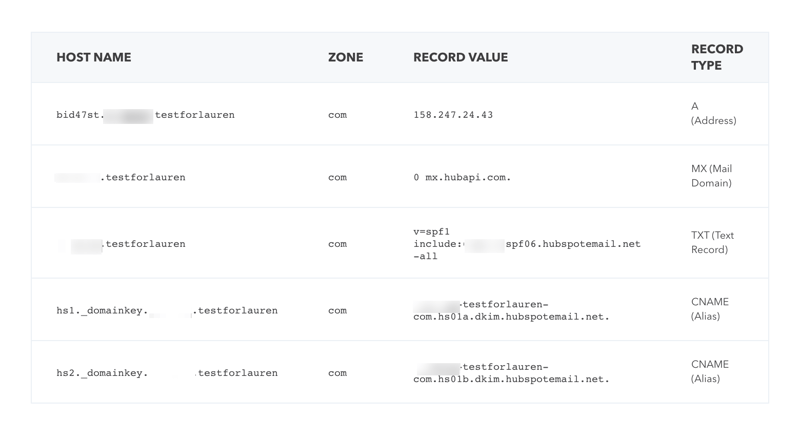
- In the Update your DNS records section, click Copy next to the value in the Host (Name) column and paste it into the corresponding field in your DNS provider account. Then click Copy next to the value in the Value column and paste it into the corresponding field:
- A record: associates your dedicated IP address with your domain.
- MX record: processes bounces, spam reports, and unsubscribes to ensure the associated analytics will display in your HubSpot account after you send an email. The MX record priority must be set to 0 in your DNS hosting provider. Some DNS providers have a separate numeric field for Priority and you may have to enter the record value and numeric fields separately.
- TXT record: sets up SPF authentication. A Sender Policy Framework (SPF) is used by your recipients' email servers to verify the identity of the sender.
- CNAME records: grant HubSpot permission to send emails on your behalf by connecting an email sending domain for DKIM (Domain Keys Identified Mail) email authentication.
Please note: some providers, such as Network Solutions or GoDaddy, will add your brand domain and top-level domain to the end of these DNS records automatically. For example, if you enter {hsdomainkey}.yourdomain.com, a provider may change that value to {hsdomainkey}.yourdomain.yourdomain.com, which will result in a DNS error. Instead, copy the value but remove the extra .yourdomain.com when pasting it into the corresponding field in your DNS provider account.
- In HubSpot, select the Done checkbox.

- After you finish setting up your DNS records, you may need to wait while your email sending domain is verified:
- If your DNS records are set up correctly, you'll see a Verified message. This can take up to 24 hours to take effect everywhere in the world. Once you see the Verified message, click Done.
- If your DNS records still need to be set up or are still processing, you'll see a Record invalid error displayed to the right of one or all of your records. Click check them again to see if the changes have propagated.
If you purchased the dedicated IP address add-on, an automatic warmup process will begin after your DNS setup is complete. This process will help build a reputation on the IP address by slowly moving traffic from the shared HubSpot IPs to the dedicated IP.
HubSpot will monitor the connectivity of your dedicated IP address, and if one of your DNS records is taken down or updated to an invalid value, you'll be contacted via email with details on how to fix your DNS configuration.
Please note: if you're using a DNS provider that doesn't support the records above, or you don't have access to your domain's DNS settings, you can set up your IP on a hubspotemail.net subdomain instead. You'll still be able to use your own email sending domain in the from address of your emails. To find out more, reach out to HubSpot Support.
Warmup process for the dedicated IP address add-on
If you purchased the dedicated IP add-on, HubSpot will initiate an automated warmup process after you finish setting up your DNS records and you send your first marketing email. The goal of this warmup process is to build sender reputation with mailbox providers and avoid bounces for your new dedicated IP address.
During this process, HubSpot incrementally shifts traffic from shared IP addresses over to your new dedicated IP. The process will take 40 days to complete. During this process, HubSpot will gradually shift your marketing email traffic from a shared address over to the dedicated IP address. By day 40, all your marketing emails will be sent from the dedicated address.
Please note:
- If you stop sending emails for a period of longer than 7 days, the warmup process will be paused until you resume sending. The warmup process will resume as soon as you start sending again.
- If you purchased the transactional email add-on, your IP address does not need to be warmed up. Once the DNS setup process is complete, your transactional IP address is ready to use.
