
Last updated: April 8, 2024
Available with any of the following subscriptions, except where noted:
|
|
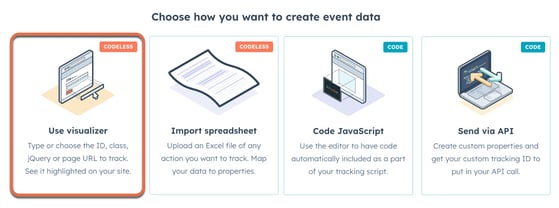
Custom events allow you to track information unique to your business. Clicked element and Visited URL events can be created without code.
A clicked element event tracks when an anonymous visitor or HubSpot contact clicks a specific element on your website. For example, track when a free demo CTA or PDF download link is clicked. Clicked element events can only be created and tracked on pages that have the HubSpot tracking code installed. Visited URL events record when an anonymous visitor or HubSpot contact visits a specific URL on your website.
A single Visited URL event can be set to track up to 30 different URLs, and a single Clicked Element event can be set up to track up to 30 different clicked elements.
Please note:
- The instructions in this article are for the new custom events tool, which replaces the previous events tool. Any events created in the legacy tool will continue to work, and you can still manage and analyze those events in the legacy tool.
- Legacy events cannot be migrated to the new events tool. Instead, it's recommended to recreate your legacy events in the new tool, as new custom events provide more flexibility with event properties. For example, with legacy events you'd need to create multiple events to track separate campaigns, but now a single custom event can track multiple campaigns.
Once you've created your events, learn how to analyze events in the analytics and reporting tools. You can also create and manually track custom events.
Create codeless events
- In your HubSpot account, navigate to Reporting > Data Management > Custom events.
- In the top right, click Create an event.
- Select Use visualizer.
- Click Next.
- Enter your website URL then, click Done.
- In the pop-up box, enter an Event name.
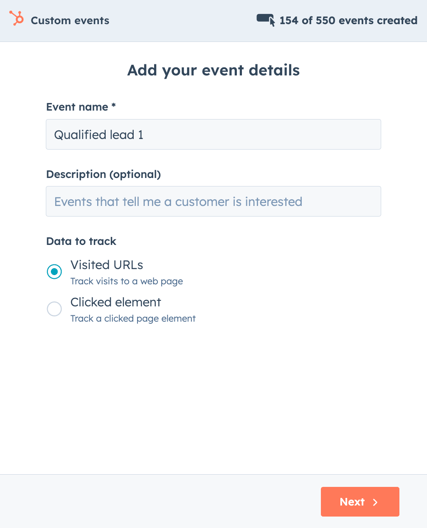
- Select what type of event you want to create:
- Visited URL: track visits to a web page.
- Clicked element: track a page element that receives clicks.
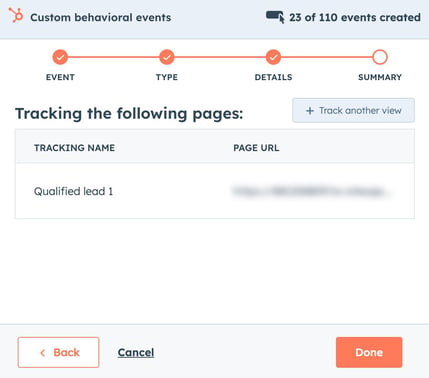
- If you selected Visited URL, enter a Tracking name, then click Next.
- Tracking for that page is now set up. Click +Track another view to track another URL or click Done.
- If you selected Clicked element:
- Click the target icon to choose a selector.
- In the I'd like to track this on section, select where to track the clicked element; All websites with the tracking script, This domain, or This page.
- Enter a Tracking name.
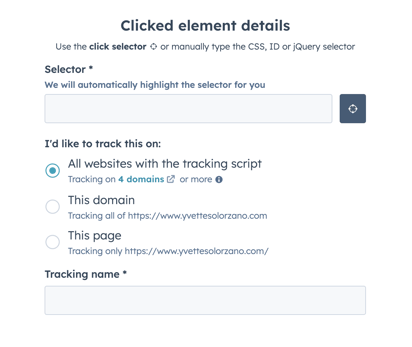
- Click Next.
- Tracking for that element is now set up. Click +Track another click to track another element or click Done.
HubSpot will then begin to track the element(s). Learn how to analyze the event in HubSpot.
