Last updated: November 7, 2023
Available with any of the following subscriptions, except where noted:
|
|
After creating a form and adding form fields, you can customize the form fields and form field options.
If you haven't added any form fields yet, learn how you can add existing form fields or create a new form field.
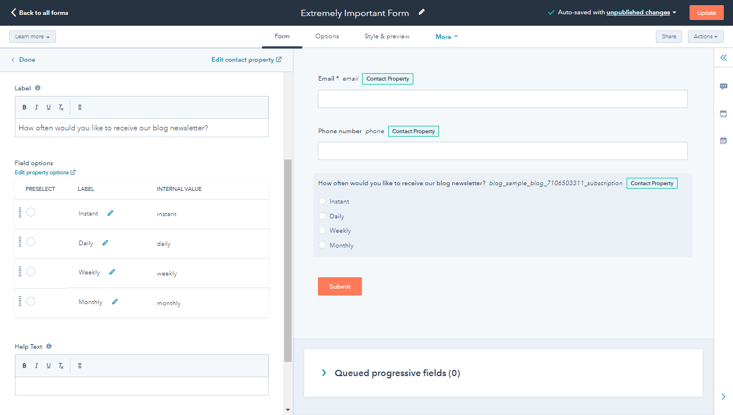
Customize form field options
By default, all values in a contact property are available as form field options. However, you can customize the available field options on an individual form basis.
- In your HubSpot account, navigate to Marketing > Lead Capture > Forms.
- Hover over the form name and click Actions, then select Edit. Or, create a new form.
- In the form editor, click a field to customize its options.
- In the left panel, in the Field options section:
- To remove current options, hover over the option and click Remove.
- To add unused options, click Add options at the bottom of the section. In the dialog box, select the options to add and click Add.
- In the top right, click Publish to update the live form.

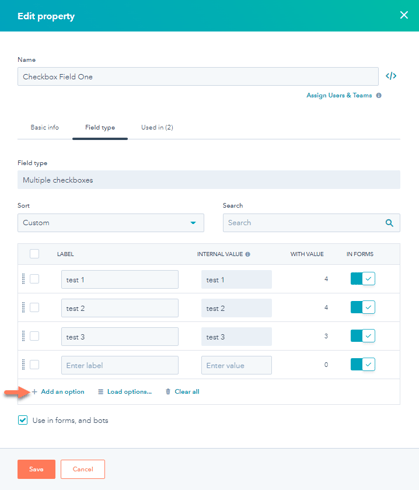
Add new options to a form field
In order to add new options to a multiple checkbox, radio select, or dropdown select form field, you must edit the original contact property. Doing this can update the field for all forms using this property.
- In your HubSpot account, click the settings icon in the main navigation bar.
- In the left sidebar menu, navigate to Properties.
- Locate and click the name of the property.
- Ensure that the In forms switch is toggled on for all the options you want to display in your forms.
- To add a new property option, click + Add an option.
- Enter a label for your new option.
- In the bottom left, click Save. You can repeat the above steps for any additional property options you want to add. Your new property options will appear in the form editor and on the live form.
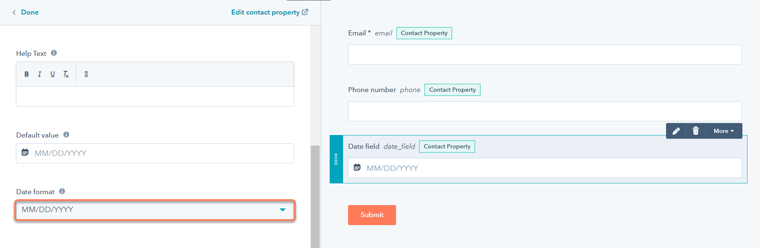
Customize your date field
After adding a date field to your form, you can choose the type of date format visitors will use in the form field. For example, DD/MM/YYYY or MM-DD-YYYY.
- In your HubSpot account, navigate to Marketing > Lead Capture > Forms.
- Hover over the form name and click Actions, then select Edit.
- Hover over the date field and click Edit.
- In the left panel, scroll down and click the Date format dropdown menu, then select your desired date format.
- In the top right, click Publish.
Customize your file upload field
After adding a file upload field to your form, you can allow visitors to upload one or more files with their form submissions. When a visitor uploads a file and submits your form, the file is stored in a hidden folder in your file manager.
A link to the file will appear in the contact's record in HubSpot. Any uploaded file links will be included in the form submission's data and in the form submission events on the individual contact's timeline.
To customize your file upload field:
- In your HubSpot account, navigate to Marketing > Lead Capture > Forms.
- Hover over the form name and click Actions, then select Edit.
- Hover over the file upload field and click Edit.
- In the left panel, scroll down and select the Allow multiple files checkbox.
- In the top right, click Publish.
Please note: the file size limit for a file upload field is 100MB for both single and multiple file upload fields. In multiple file upload fields, there is no limit to the number of files uploaded, as long as the total size of the files is 100MB or less.
- To upload multiple files, select all files when choosing from the file manager. After uploading the selected files, if the Choose file button is clicked again, and another file is selected, the original files will be overwritten. It is not possible to upload multiple files one at a time.
Set up a phone number form field
When setting up your phone number form field, do take note of the following:
- Phone number settings must be customized on an individual form basis.
- The default phone number field only accepts numbers and characters commonly found in phone numbers such as: + - ( ) . x.
- If you've selected the option to Show country code dropdown menu, do note the following:
- The country code will be included in any number length restrictions.
- It is not possible to configure the default country code. By default, the country code will correspond to the visitor's device IP address.
To set up your phone number form field:
- In your HubSpot account, navigate to Marketing > Lead Capture > Forms.
- Hover over the form name and click Actions, then select Edit.
- Hover over the Phone number field and click the Edit.
- In the left panel, input a Minimum and Maximum number length. If a visitor inputs a phone number that does not meet these length restrictions, they will not be able to submit the form.
- To prompt visitors to select their country from a dropdown menu and include a country code, click to toggle the Show country code dropdown menu switch on.
- In the upper right, click Publish.

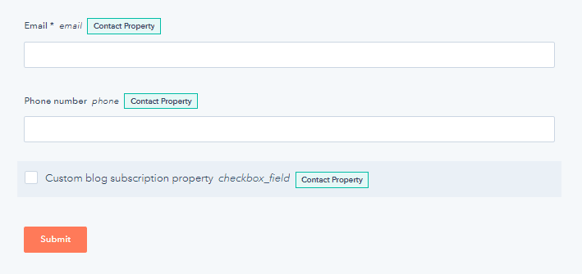
Add a blog subscription field in a form
It is recommended to set up and use the default blog subscription form for visitors to subscribe to your blog. If you have access to workflows, you can also create a custom checkbox field for your forms, then use a workflow to subscribe these contacts.
Add the default blog subscription field to your form
- In your HubSpot account, navigate to Marketing > Lead Capture > Forms.
- Click the name of the form.
- In the left pane, enter Subscription in the Search box. The results will show your blog subscription properties, which will be labeled [Blog name] Email Subscription.
- Click and drag your blog email subscription field to the desired location in the form.
- In the form editor, click the email subscription field to edit its display options.
- In the top right, click Publish to update the live form.
Add a custom blog subscription checkbox field to your form (Professional and Enterprise only)
You can create and add a custom checkbox property to your form, then use a workflow to update that property. Contacts who select the checkbox and submit the form will have their checkbox property value set as Yes . This will enroll them into the workflow and update their blog subscription property to your specified subscription frequency.- Create a single checkbox contact property:
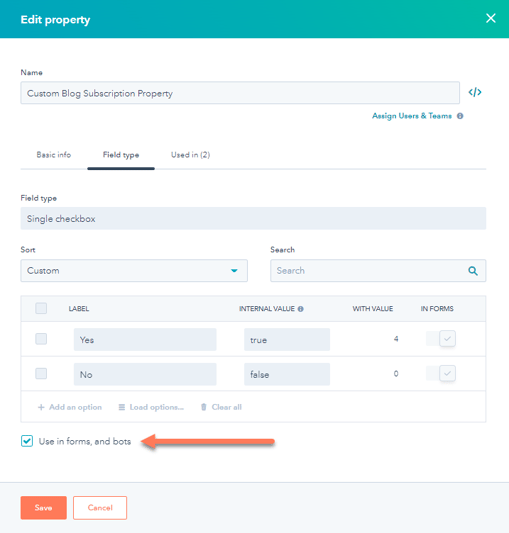
- Create a custom contact property and set the Field type to Single checkbox.
- Ensure that the Use in forms and bots option is selected.
- Set up a workflow to add contacts as blog subscribers:
- Create a contact-based workflow.
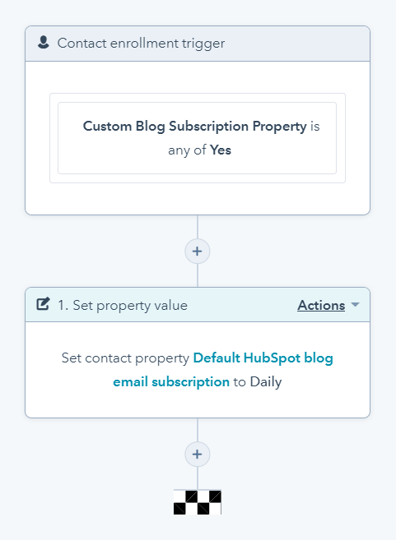
- Set your enrollment triggers to enroll contacts who selected the checkbox.
- In your workflow, click Set up triggers.
- In the right panel, select Contact properties.
- Search for and select the new subscription checkbox property.
- Select is any of, then click the dropdown menu and select Yes.
- Click the + icon to add a workflow action.
- In the right panel, select Set contact property value.
- Click the Choose a contact property dropdown menu and select [Blog name] Email Subscription property.
- Click the Choose property value dropdown menu and select the subscription frequency for the contact.
- In the upper right, click Review and publish.
- Review your workflow actions and settings. In the upper right, click Turn on.
- Add the checkbox field in your form:
- In your HubSpot account, navigate to Marketing > Lead Capture > Forms.
- Click the name of the form.
- In the left pane, search the name of the single checkbox contact property in the Search box.
- Click, drag and drop the property into the desired location in the form. In the form editor, click the field to edit its display options.
-
- In the top right, click Publish to update the live form.
- In the top right, click Publish to update the live form.