Last updated: December 18, 2025
Available with any of the following subscriptions, except where noted:
HubSpot's default Social sharing and Social follow modules include common social networks (e.g., Facebook or LinkedIn) icons. To replace the default social icons, you can clone and customize the module. Then add your custom social module on your pages or templates.
Clone the default social module
- In your HubSpot account, navigate to Content > Design Manager.
- In the finder, enter text to search for the Social sharing or Social follow module.
- Click the Social follow or Social sharing module.
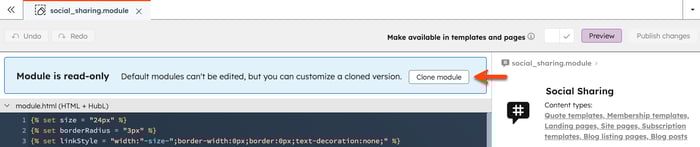
- In the module editor, click Clone module in the Module is read-only alert.
- In the dialog box, enter a name for your cloned module, then click Clone. You'll be directed to the module editor to continue customizing the social icons.
Replace the social icons
- In the inspector, locate the Linked files section. For the Other files field, take note of the social icon file names for each network (e.g., facebook-color.png or linkedin-color.png).
- Confirm that your custom social icon images are in PNG format.
- Confirm that your new social icon images have the same file names as the existing social icon files for each network in the module (e.g., facebook-color.png or linkedin-color.png).
- Click the X to remove the existing social icon file.
- Click Add next to the Other files field.
![]()
- In the right panel, locate your custom social icon in the file manager. To upload a file from your device, click Upload.
- Click the file name to add the icon to the module.
- To preview the social module, click Preview in the top right of the module editor.
- When finished, click Publish changes.
Add the module to your template
After the social module is published, you can add it to either a drag and drop template or a coded template.
Drag and drop templates
- In your HubSpot account, navigate to Content > Design Manager.
- In the finder, click the name of a template.
- In the inspector, click + Add.
- Click the new social module, then drag it into position on your template.
- When finished, click Publish changes in the top right.
Coded templates
- In your HubSpot account, navigate to Content > Design Manager.
- In the finder, click the new social module.
- Click the Actions dropdown menu and select Copy snippet.
- In the finder, click the coded template.
- In the code editor, paste the snippet where you want the module to appear.
- When finished, click Publish changes in the top right.
