- Knowledge Base
- Account & Setup
- Integrations
- Set up a test sync
Set up a test sync
Last updated: October 15, 2024
Available with any of the following subscriptions, except where noted:
If you’ve connected a data sync app to your HubSpot account, learn how to set up a test sync. This simulates the data sync process so you can verify and ensure the correct configuration of field mappings and filters.
Before you begin
To run a test sync, you must:
- Set up a new object sync between HubSpot and your third-party app.
- It must be a one-way sync from the third-party app into HubSpot.
Set up a test sync
- In your HubSpot account, click the settings settings icon in the top navigation bar. In the left sidebar menu, navigate to Integrations > Connected Apps.
- Click a data sync app.
- Click Set up your sync.
- On the Select the data you want to sync page, choose a one-way sync from your third-party app to HubSpot.
- Click Next.
- Continue setting up your field mappings, sync rules, and any associations.
- On the Review screen, on the upper-left, click Run test sync.
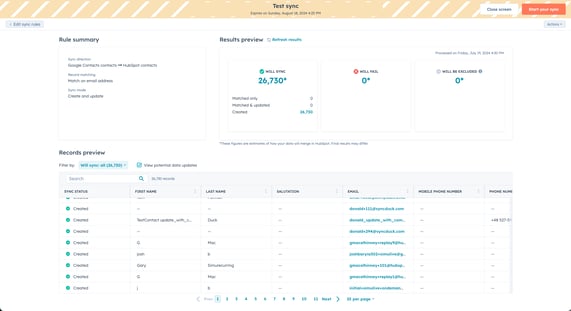
- On the test sync page, review the results:

-
- In the Rule summary section, review the sync rules you've chosen.
- In the Results preview section, review the number of records that will sync, will fail to sync, and will be excluded from the sync. You can click the number of records to view the specific records.
- In the Records preview section, view individual records that will sync. Click the Filter by dropdown menu to filter the records.
- On the upper-right, click Close screen to return to your settings page. Or, click Start your sync to start the sync.
- Click Actions > Delete test sync to delete the test sync.
Integrations
Thank you for your feedback, it means a lot to us.
This form is used for documentation feedback only. Learn how to get help with HubSpot.