- Knowledge Base
- Content
- Design Manager
- Build a custom coded template
Build a custom coded template
Last updated: November 19, 2025
Available with any of the following subscriptions, except where noted:
Developers can build blog, website page, landing page, and email templates from scratch using HTML + HubL. You can also clone a drag and drop template layout to HTML, then customize it as a coded template.
Learn more about designing custom assets in our developer documentation.
Before you get started
Before you begin working with this feature, make sure to fully understand what steps should be taken ahead of time, as well as the limitations of the feature and potential consequences of using it.
Understand requirements
- Verify that you have the Design tools permissions for creating and editing templates in the design manager.
- It’s recommended to also have Global content and theme settings and Website Settings permissions if you will need to edit global web assets and blog/website settings.
Understand limitations & considerations
- A Marketing Hub Professional or Enterprise subscription is required to build email templates. Content Hub accounts can create emails using the drag and drop email editor.
- Custom coded templates can use many predefined variables. Some of these variables are required to create emails and pages, while others are optional. Learn more about adding required email, website, and landing page HubL variables.
Create a new HTML + HubL file
- In your HubSpot account, navigate to Content > Design Manager.
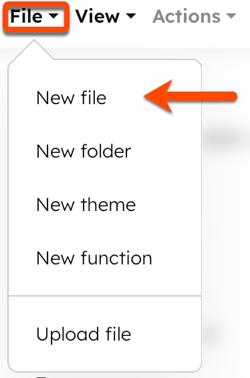
- At the top of the finder, click the File dropdown menu and select New file.

- In the dialog box, click the What would you like to build today? dropdown menu and select HTML + HubL.

- In the What are you building? field, select an option:
- Template: defines the layout and the structure of the content that will be displayed on the website pages, landing pages, blog posts, or email.
- Template Partial: is reusable code or a snippet of code that can be included in multiple other templates.
- Click the Template type dropdown menu and select a type for the custom coded template (page, blog post/listing, email, or system page). Learn more about template types.
- Enter a file name in the File name field.
- To update the file's location, click Change in the File location section and select a folder.
- When finished, click Create.
Add HTML + HubL to your template
After you have configured your new file, you'll be directed to the code editor to add your custom code and preview how it'll appear on a live page.
Add HTML + HubL
- Enter the HTML for the template. Learn more about adding CSS and JavaScript files to custom coded templates.
- To display how the HTML + HubL will render, toggle the Show output switch on on the top left. A panel will open on the right with the rendered preview.
Add required HTML + HubL
Custom coded templates require specific HTML or HubL variables to function. If any of these required variables are missing, an error message may appear when you try to publish the template.
- Page and blog templates require the following variables:
 <!-- Enter above the closing </header> tag -->
 {{ standard_header_includes }}

 <!-- Enter above the closing </body> tag -->
 {{ standard_footer_includes }}
- Email templates require the following variables to be CAN-SPAM compliant:
 <!-- Enter variables above the closing </body> tag -->
 {{ site_settings.company_name }}
 {{ site_settings.company_street_address_1 }}
 {{ site_settings.company_city }}
 {{ site_settings.company_state }}
 {{ site_settings.company_zip }}
 {{ site_settings.company_country }}

 <!-- Choose one unsubscribe variable -->
 {{ unsubscribe_link }}
 {{ unsubscribe_link_all }}
- Email templates require the following code to display preview text in certain email clients:
<!-- Preview text (text which appears right after subject in certain email clients) -->

 <div id="preview_text" style="display:none!important">{% text "preview_text" label="Preview Text <span class=help-text>This will be used as the preview text that displays in some email clients</span>", value="", no_wrapper=True %}
</div>
Clone a template to HTML
In addition to creating templates from scratch, you can also clone drag and drop templates for blogs, website pages, and landing pages to HTML.
- In your HubSpot account, navigate to Content > Design Manager.
- In the finder, click the name of template you want to clone.
- Click the Actions dropdown menu and select Clone to HTML. The HTML file will be created in the same folder as the original file.

Preview and publish your template
Once you've created your template, you can preview how it'll appear on a live page, then publish it.
- In your HubSpot account, navigate to Content > Design Manager.
- In the finder, click the name of template you want to preview or publish.
- In the top right, click the Preview dropdown menu and select an option:
- If you select Live preview with display options, you can preview your template as it appears on other devices by selecting the Viewport preset.
- If you select Preview without display options, you can only preview how your template will appear on browsers.
- When finished, click Publish changes.
- If there are any code errors, an error message will appear. Review more information about these errors in the error console below the code editor:
-
- In the error message at the top of the page, click error console to open the console below the code editor.
- Alternatively, navigate to the bottom left of the code editor and click Show details.