- Knowledge Base
- Content
- Blog
- Create and manage your blog authors
Create and manage your blog authors
Last updated: June 11, 2025
Available with any of the following subscriptions, except where noted:
When publishing a blog post in HubSpot, you are required to select an author. Blog authors can be created from the Authors dashboard or in the Settings tab of an individual blog post. Once created, authors can be edited or deleted at any time.
For each author, HubSpot automatically generates separate pages listing all the posts they've written for each blog. These pages have a title of [Blog name] | [Author name] and a meta description of the author's bio.
Please note: if you're creating blog content in multiple languages, learn more about creating language variations for blog authors.
Create a new blog author
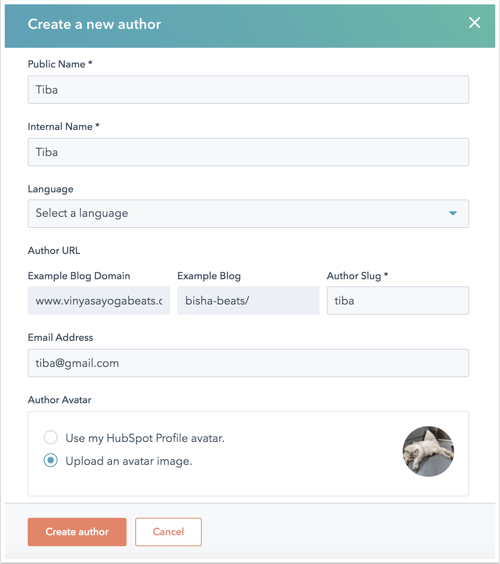
You can create a new blog author by providing required fields such as Public Name, Internal Name, and Author Slug. Optional fields like Language, Email address, Author avatar, Author bio, Website, and social media profiles can also be added to enrich their presence.
- In your HubSpot account, navigate to Content > Blog.
- In the top right, click the Configure dropdown menu and select Authors.
- On the author dashboard, click Add new author.
- In the right panel, enter your new author information.
- The following fields are required:
- Public Name: the author name that appears on live blog posts.
- Internal Name: the author name that appears in the Authors dashboard in the blog tool.
- The following fields are required:
-
-
- Author Slug: the unique string of the author URL. The rest of the URL pulls from the blogs where the author appears.
- The following fields are optional:
- Language: the primary language of the author's content. Only authors writing multi-language blog content need a value for this field.
- Email address: the author's email address.
- Author avatar: an image of the author. You can use the author's HubSpot profile avatar or add a custom avatar image from the files tool.
- Author bio: a description of the author.
- Website: the author's personal website.
- Facebook/X/LinkedIn: the author's social media profiles.
-
- When you've finished adding the author details, click Create author.

Edit a blog author's profile
You can edit an existing blog author's profile by filtering or searching for the author and updating their information.
- In your HubSpot account, navigate to Content > Blog.
- In the top right, click the Configure dropdown menu and select Authors.
- In the upper left, filter the authors:
- To filter by blog, click the All blogs dropdown menu and select a blog.
- To filter by whether an author has published posts, click the All authors dropdown menu and select Active or Inactive.
- Hover over an author and click Edit full profile.
- In the right panel, enter the author's profile information. Then click Update blog author to take the changes live.
Add a blog author to a post
You can add a blog author to a specific blog post directly within the content editor settings.
- In your HubSpot account, navigate to Content > Blog.
- Click the name of the blog post.
- In the content editor, click Settings in the top right.
- In the Settings dialog box, click the Author dropdown menu, then select an existing author or click Create a new author to create a new author.

- When you've finished adding the author, click Update in the top right to take your changes live.
Delete a blog author
You can delete a blog author. When you delete an author, you'll reassign their blog posts to another author in your account.
- In your HubSpot account, navigate to Content > Blog.
- In the top right, click the Configure dropdown menu and select Authors.
- On the author dashboard, hover over the author, then click the More dropdown menu and select Delete.
- Click the Reassign blog posts to dropdown menu and select an author to reassign the deleted author's live posts to them. If the deleted author has no live posts, this option will not appear.
- In the Type "delete" below to verify that you want to delete this author field, enter delete to confirm you want to delete this author.
- Click Delete author.
