Last updated: October 3, 2025
Available with any of the following subscriptions, except where noted:
With blog tags, you can manage your blog posts by subject. Once you've added tags to your posts, you can customize your templates to link to a feed of all posts by tag. You can also add a post filter module so visitors can filter posts by tag.
Create a new blog tag
You can create a new blog tag from the blog tag dashboard or the content editor.
To create a new blog tag from the blog tag dashboard:- In your HubSpot account, navigate to Content > Blog.
- In the top right, click the Configure dropdown menu and select Tags.

- On the Blog tags page, click Add new tag on the top right.
- In the dialog box, enter a name in the Tag name field.
- Click the Language dropdown menu and select a language.
- When finished, click Create.

- In your HubSpot account, navigate to Content > Blog.
- Click the name of your post.
- In the content editor, click Settings on the top right.
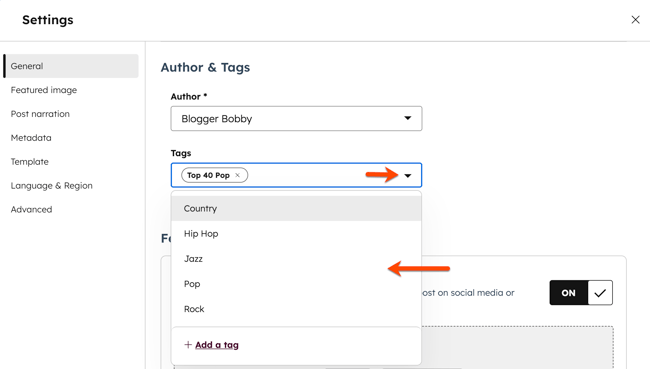
- In the dialog box, for the Author & Tags section, click the Tags dropdown menu and select the relevant tag options.
- To add a new tag, click + Add a tag or type your tag in the field and then click + Add [name of new tag] tag.

- When finished, click X to close the dialog box. Then click Publish or Update in the top right of the content editor.
Edit a blog tag
- In your HubSpot account, navigate to Content > Blog.
- In the top right, click the Configure dropdown menu and select Tags.
- Hover over the blog tag and click Edit.
- To edit the blog tag's name, enter new text in the Tag name field.
- To change the blog tag's language, click the Language dropdown menu and select a new language.
- When finished, click Update.
Combine blog tags
- In your HubSpot account, navigate to Content > Blog.
- In the upper left, click the Blog posts dropdown menu and select Tags.
- Select the checkboxes next to the tags you want to combine.
- At the top of the table, click Combine.

Please note: to combine blog tags with the same name, you must first change one of the tag names.
- In the dialog box, click the Tag to reassign to blog posts dropdown menu and select a tag. The selected tag will replace the previously used tags on blog posts.

Delete a blog tag
- In your HubSpot account, navigate to Content > Blog.
- In the upper left, click the Blog posts dropdown menu and select Tags.
- Hover over the tag, then click the More dropdown menu and select Delete.
- Type delete in the text field, then click Delete to finish deleting the tag.
Add a blog tag to your blog post
- In your HubSpot account, navigate to Content > Blog.
- Click the name of your post.
- In the content editor, click Settings in the top right.
- In the Author & Tags section of the dialog box, click the Tags dropdown menu and select the tag.
- When finished, click X to close the dialog box. Then click Publish or Update in the top right of the content editor.