- Knowledge Base
- Account & Setup
- Integrations
- Connect HubSpot and Snowflake Data Share
Connect HubSpot and Snowflake Data Share
Last updated: September 23, 2025
Available with any of the following subscriptions, except where noted:
-
Data Hub Enterprise
HubSpot's integration with Snowflake allows you to access all your HubSpot data directly within Snowflake, where you can then query it using SQL. Learn more about querying HubSpot data in Snowflake. The integration enables you and your team to retrieve valuable insights by combining HubSpot data with other datasets in Snowflake.
- Marketing Teams: they can use the data share to gain a deeper understanding of their campaigns and customer engagement.
- Sales Teams: they can use the data share to get a complete view of their leads and prospects, measuring conversion events and gaining insights into buyer behaviors.
- Service Teams: service and success teams can use the data share to analyze customer relationships, measure success health, and improve service quality.
- Analytics Teams: analytics teams can create powerful cross-departmental reports and insights.
- Content Teams: content teams can use the data share to understand their content engagement and audience preferences.
Before you begin
Permissions required You must be a Super Admin or have App Marketplace permissions in your HubSpot account to install the integration.
- You must have an active Snowflake account. If you don't currently have an account, you can sign up for one on Snowflake's website. You'll be responsible for all Snowflake costs incurred while accessing HubSpot’s Data Share. Please see Snowflake’s Terms of Service for more information and pricing details.
- HubSpot's integration with Snowflake Data Sharing is available to all Snowflake account regions, and will be regularly updated to support newly added regions.
- To get your Snowflake account's region, run the following command in Snowflake: SELECT CURRENT_REGION();. The command will return your account region, such as AWS_US_EAST_1. Learn more about this command in Snowflake’s documentation.
- If you're storing HIPAA-protected Sensitive Data, the Snowflake Data Share integration is only supported for two regions: AWS US_EAST_1 and AWS EU_CENTRAL_1. If your existing account is in a different region, you must create a new account in one of the supported regions to connect and store protected health information.
- If you have the HubSpot Snowflake integration (Snowflake Data Share) and want to use HIPAA, you'll need to reinstall the Snowflake integration to use a Snowflake Business Critical account.
Connect HubSpot and Snowflake
- In your Snowflake account, navigate to the listing page for CRM Platform Data from HubSpot.
- Click Request, then accept Snowflake's terms. This must be completed before you proceed with the rest of the steps.

- In your HubSpot account, click the marketplace Marketplace icon in the top navigation bar, then select HubSpot Marketplace.
- Click the search bar and enter Snowflake Data Share.
- Click Snowflake Data Share from the listing page.
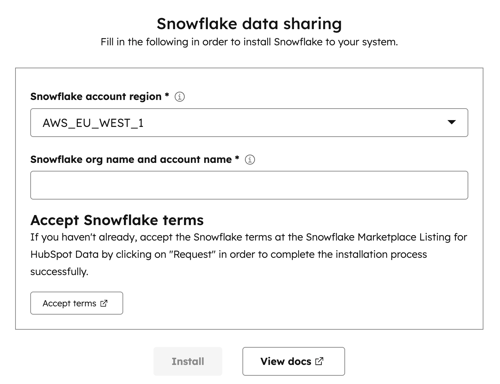
- Click Install.
- Click the Snowflake account region dropdown menu and select your Snowflake account's region (e.g. AWS_US_EAST_1). To find your account region, run: SELECT CURRENT_REGION();
- Enter your Snowflake account name, using the format <org_name>.<account_name>. You can find this by running:
SELECT CONCAT(CURRENT_ORGANIZATION_NAME(),'.',CURRENT_ACCOUNT_NAME()); - If you haven't requested the CRM Platform Data from HubSpot product in Snowflake, click the Accept terms button to accept Snowflake's terms for installing the app. You'll be redirected to your Snowflake account.
-
- In your Snowflake account, click Request.
- Click Install.

- On the dialog box for HubSpot is requesting permission to share your data with Snowflake, click Allow and install.

12. Once the app has been installed, you'll receive an email from Snowflake with the subject line Snowflake Marketplace: Listing Request Approved. The email contains steps on how to create a database in Snowflake.

The integration will then begin processing your HubSpot data. If you have a larger amount of data, this process will take longer.
If you encounter the following error Share ‘HUBSPOT_PRODUCT.HUB_12345’ cannot be imported because the terms for the associated listing ‘GZSOZ4LK70’ in data exchange ‘SNOWFLAKE_DATA_MARKETPLACE’ have not been accepted, it’s recommended that you follow the steps below:
- Navigate to the Snowflake Marketplace listing for HubSpot Data.
- Accept Snowflake's terms.
- Create a database in Snowflake.
Create a database in Snowflake
Once connected, you can create a database in Snowflake for your HubSpot data.
- In Snowflake, navigate to the listing page for CRM Platform Data from HubSpot.
- Click Get to create a database and query your HubSpot data.
Supported regions
HubSpot customers hosting data in all major AWS regions can install the data share integration. In addition, the integration supports Snowflake data with Google Cloud Platform (GCP) and Microsoft Azure. The list of supported regions includes:
- AWS US_EAST_1
- AWS EU_CENTRAL_1
- AWS US_WEST_2
- AWS AP_SOUTHEAST_2
- AWS EU_WEST_1
- AWS AP_SOUTHEAST_1
- AWS CA_CENTRAL_1
- AWS US_EAST_2
- AWS AP_NORTHEAST_1
- AWS AP_SOUTH_1
- AWS EU_WEST_2
- AWS_EU_WEST_3
- AWS AP_NORTHEAST_2
- AWS_AP_NORTHEAST_3
- AWS_SA_EAST_1
- AWS EU_NORTH_1
- AZURE EASTUS2
- AZURE WESTEUROPE
- AZURE AUSTRALIAEAST
- AZURE CANADACENTRAL
- AZURE SOUTHEASTASIA
- AZURE WESTUS2
- AZURE SWITZERLANDN
- AZURE_CENTRALINDIA
- AZURE CENTRALUS
- AZURE JAPANEAST
- AZURE NORTHEUROPE
- AZURE SOUTHCENTRALUS
- AZURE UAENORTH
- AZURE_UKSOUTH
- GCP US_CENTRAL1
- GCP_US_EAST4
- GCP EUROPE_WEST2
- GCP EUROPE_WEST4
- GCP EUROPE_WEST4
Next steps
Learn how to set up your Snowflake environment and query your HubSpot data in Snowflake.