- Knowledge Base
- Content
- Website & Landing Pages
- Run an adaptive test on a page
Run an adaptive test on a page
Last updated: October 20, 2025
Available with any of the following subscriptions, except where noted:
-
Content Hub Professional, Enterprise
With an adaptive test, you can see how making small changes to your page can affect its conversion rate. You can test up to five page variations at a time. Over time, the variation that performs the best will automatically be shown to visitors more often. Learn more about adaptive page testing.
Please note: all adaptive test variations must include a form.
Set up an adaptive test
You can run an adaptive test on any published page. If your page is part of a multi-language group, you can run a test for each language variation.
-
Navigate to your content:
- Website Pages: In your HubSpot account, navigate to Content > Website Pages.
- Landing Pages: In your HubSpot account, navigate to Content > Landing Pages.
- Click the name of your page.
- In the left sidebar menu, click the testIcon Test icon and then click Adaptive test. You can also click File menu and select New > Run Adaptive test at the top of the page.
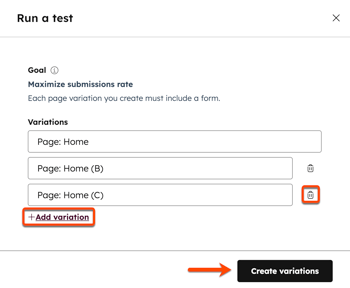
- In the dialog box, enter a name for each page variation. By default, one page variation is added.
- To add additional variations, click + Add variation.
- To delete a variation, click the delete delete variation icon next to it.
- Click Create variations.

- In the content editor, update the content for your page variation. It is recommended to consider testing the following variables:
- CTAs: experiment with different CTAs. You could test a banner versus an embedded button on the page.
- Copy: experiment with the formatting and style of the content. You could test plain paragraphs versus bullet points or a longer block of text vs a shorter block of text.
- Media: experiment with a different image or video to see how the conversion rate is influenced.
- Form fields: experiment with the length of your form. You could test requesting only an email address versus asking for more information.
Please note: all variations of the page will have the same live URL, but different preview URLs for testing.
- To switch to the page variation you're editing, click the testIcon test variation dropdown menu in the top left and select a variation.

- To rename, add, or delete a variation, click the testIcon test variation dropdown menu in the top left and select Manage test.
- To begin the test, click Publish in the top right, then click Publish now in the dialog box. This will set all versions of your page live.
Please note: publishing one page variation will make all page variations in the test live. You can continue to make edits to each variation while the test is running, but you will no longer be able to add, remove, or rename variations.
Review adaptive test results
After visitors have started engaging with your page variations, you can review the test results.
-
Navigate to your content:
- Website Pages: In your HubSpot account, navigate to Content > Website Pages.
- Landing Pages: In your HubSpot account, navigate to Content > Landing Pages.
- Hover over the name of the page with the adaptive test, then click Performance.
- Click the Test results tab.
- To analyze the variation with the highest conversion rate, view the report at the top of the page (e.g., "[Page name]" page has the highest submission rate).
- To analyze traffic across each variation, view the Traffic distribution report. Overtime, this data will show traffic increasing to the variations that get more conversions.
- To analyze metrics including page views, new contacts, and average bounce rate, view the table at the bottom of the page.
- To end an adaptive test, click End test at the top of the page.

-
- In the dialog box, select the variation you'd like to keep.
- Enter text to confirm ending the test and archiving all unselected page variations.
- When finished, click Yes, end test.
After the test ends, a summary of each variation's performance is saved in the Test results tab of the page's details.