- Knowledge Base
- Content
- Website & Landing Pages
- Import your website structure and navigation
Import your website structure and navigation
Last updated: August 27, 2025
Available with any of the following subscriptions, except where noted:
To begin transitioning your website into HubSpot, you can import the URL slug, title, and meta description for each of your external pages, as well as your website navigation.
Please note: page content can not currently be imported. Website page imports will only import a page's title, URL, and meta description.
Set up your content import
- In your HubSpot account, click the settings settings icon in the top navigation bar.
- In the left sidebar menu, navigate to Content > Blog.
- In the Current view section, click the first dropdown menu and select Import blog.

- On the content import screen, click the Start new import dropdown menu and select Website pages.
- Enter the URL of your website's main page in the My homepage field, then click Review content in the bottom right.
Depending on the size of your site, it can take up to six hours for your pages to be scanned.
Finish your content import
After the scan is finished, your content import status will change to Ready for import. You can now review and complete your import:
Please note: only 400 pages can be included in a single import. You can repeat the following process multiple times for the same website scan.
- In your HubSpot account, click the settings settings icon in the top navigation bar.
- In the left sidebar menu, navigate to Content > Blog.
- In the upper right, click Import blog.
- Next to the Page URL whose pages you want to import, click Review results.
- All navigation elements that the import tool was able to scan will be displayed. How links will be imported depends on the link type:
- Internal URL: URLs hosted on the scanned domain will link to a new page created during the import process.
- External URL: URLs hosted externally (e.g. social media pages) will stay the same.
- No URL: navigation items without a URL will create a non-linking element
- URL not valid for import: URLs that are not importable or not included in the import will create a non-linking element.
- By default, all navigation elements will be imported. To not include a menu item in the import, clear the checkbox next to that menu item.

- Once you've reviewed all the navigation menus, click Next.
- There will be a listing of all pages hosted on the URL you specified in the initial import steps.
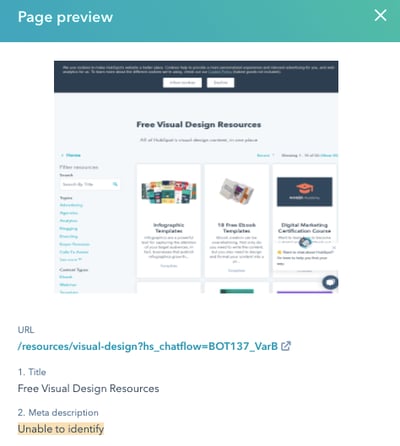
- Click Preview to see a preview of a page's content, as well as values for its URL, title, and meta description. If a page is missing its title or meta description, that value will display as Unable to identify. If there's an issue with a page's URL, you may see one of these errors.
Please note: a title is required in order for a page to be eligible for import. A meta description is recommended, but optional.

- To select all pages for import, click Select all [x] pages at the top of the table
- To select an individual page, select the checkbox next to its title.
- To select the template a page will use, click the dropdown menu in the Template column and select a template. By default, pages will be set to Set template later

- To view only selected or unselected pages, click the Selection dropdown menu and select an option.
- To view only specific types of pages - blog posts, landing pages, or website pages - click the Page type dropdown menu and select the checkbox next to each page type you want to display.
- Once you have selected pages to import, click Import in the bottom right. You can also click Export selected pages to a CSV file at the bottom of the page to view page data in a spreadsheet.
- In the dialog box, click the Select domain dropdown menu and select the domain these pages will use. This option will only appear if more than one domain is available for publishing.
- Select a publishing status for your imported pages. Imported pages can be created as drafts or published pages.
Please note: It's strongly recommended to import pages as drafts. Page content will not be imported, so imported pages will be blank and not have an assigned template unless one is selected during the import process.
- To prioritize imported pages when URL conflicts occur, select the Overwrite any existing content with imported content checkbox.
- Click Save.

- Content import status will update to Import in progress. Once the import is complete, the status will update to Import completed.
- To import additional pages from the same scanned website, click the More dropdown menu and select Back to import review. This will return you to the listing of scanned pages from that website.