- Help Center
-
- Academy Content Library A complete library of Academy’s free online video lessons and certification courses.
- Academy Certification Courses A collection of lessons and practical exercises leading to an industry-recognized certification in HubSpot’s tools or strategy.
- Classroom Training Schedule in-person training for a hands-on and personalized HubSpot training experience.
-
- CRM & Sales Hub Ask and answer questions about using HubSpot’s CRM and Sales Hub.
- Marketing Hub Discuss and learn HubSpot’s marketing tools and inbound strategy.
- Service Hub Learn about Service Hub and share your expertise.
- Meet the Experts Learn how to get the most out of HubSpot from those who know it best.
- Submit Ideas Search, vote for, and submit ideas to improve the HubSpot platform.
- HubSpot Developers Ask questions and connect with users building on HubSpot.
- HubSpot User Groups Meet regularly with your local community of HubSpot users.
- Knowledge Base
- Content
- Website & Landing Pages
- Create and manage smart content rules
Create and manage smart content rules
Last updated: February 18, 2025
Available with any of the following subscriptions, except where noted:
-
Marketing Hub Professional, Enterprise
-
Content Hub Professional, Enterprise
Smart content modules display different versions of your content based on viewer category. For example, you could create alternatives for visitors from a specific country or those viewing on a mobile device.
Learn more about which modules are eligible for smart content in emails, blog posts, pages, and templates.
The types of content eligible for smart rules depend on your HubSpot subscription, as shown below:
| Subscription | Content type | |||
| Blog | Landing pages | Website pages | Marketing Email | |
| Marketing Hub Professional/Enterprise | ✓ | |||
| Content Hub Professional/Enterprise | ✓ | ✓ | ✓ | |
Smart rule categories
You can base your smart rules on the following categories:
- Ad source: show content to viewers based on the ad they've clicked. The ad source is determined by the UTM parameters in the page URL. Learn more about requirements for tracking ad interactions.
- Country: display content to your viewer based on their country. The country is determined by the IP address of the visitor.
- Device type: target visitors accessing your site via mobile, tablet, or desktop. The smart content tools analyze the user agent of your visitor’s browser to determine their device type. Since this can be changed manually on the device, accurate segmentation cannot be guaranteed.
- Referral source: show visitors smart content based on how they found your site.
- Preferred language: personalize your content based on the language set within the visitor's web browser.
- Contact list membership: show different content to visitors who are members of a specific HubSpot list.
- Lifecycle stage: display different content based on a visitor's Lifecycle stage property value.
Please note: contact list membership and lifecycle stage are evaluated by using cookies to associate visitors with known contacts. Learn more about how HubSpot associates contacts with visitors.
- Query parameter: show content based on the query parameters in the visitor's page URL. A query parameter rule is determined by the name of the parameter and the query string value. For example, to set a rule for users with "HubSpot" in a utm_source URL parameter, enter utm_source in the first field, then select Contains in the dropdown menu, then enter HubSpot in the last field.

Please note: the following characters are not supported in query parameters: #, %, =, &, and ;. To use one of these characters, replace it with the corresponding encoded character listed here.
Add smart content to your marketing emails (Marketing Hub Professional and Enterprise only)
You can add smart rules to the subject line and modules of marketing emails. Learn more about editing smart content in an email template.
Add a smart rule to a subject line
- In your HubSpot account, navigate to Marketing > Email.
- Hover over your email and click Edit, or create a new email.
- To add a smart subject line, navigate to the Settings tab. In the Subject line section, click Add smart rule.

Add a smart rule to a module
- In your HubSpot account, navigate to Marketing > Email.
- Hover over the module, click the More dropdown menu, then click Add smart rule.
- In the dialog box, click the Show different content based on dropdown menu and select Contact List Membership or Contact lifecycle stage. Because emails are sent to known contacts, you can't use smart content categories based on anonymous information like device type or referral source.
- Click the dropdown menu and select the checkbox next to each list or lifecycle stage you want to target.
- Click Create.

Preview your email as a specific contact
When you're finished editing your smart rules, you can preview your email to see how it will appear to a specific contact. This allows you to see how multiple smart modules interact together.- In your HubSpot account, navigate to Marketing > Email.
- Hover over your email and click Edit.
- In the top right, click Preview.
- In the top left of the preview screen, click the Preview as a specific contact dropdown menu and select your contact.
All smart modules will display the version that applies to the contact you're testing. To preview a smart subject line, send a test email instead.
Manage your smart rules
- In your HubSpot account, navigate to Marketing > Email.
- Hover over your email and click Edit.
- To manage a smart rule for a subject line, navigate to the Settings tab. In the Subject line section, click Manage smart rules. To add a new smart rule, click Add smart rule.

- To manage a smart rule for a module, hover over the module, click the More dropdown menu, and select Manage smart rules.

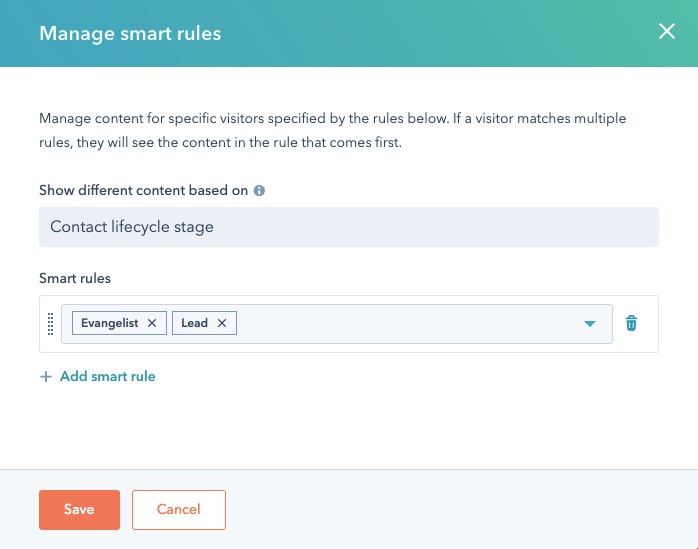
- In the right panel, click Add smart rule to add a rule, then click the dropdown menu and select a new smart rule category.
- To delete a rule, click the trash icon delete next to the rule.
- To change the rule type, delete all existing rules, then click the Show different content based on dropdown menu and select a different rule type.
- When you've finished managing your smart rules, click Save.
Add smart content to a blog post or page (Content Hub Professional and Enterprise only)
You can add smart content to any module on a blog post or page, except the Blog content module. Smart content based on contact list membership or lifecycle stage will only apply to tracked contacts.
Visitors to your page who qualify for a smart rule category will see the content you’ve set for that rule. If a visitor qualifies for multiple categories, they will see the content set for the matching rule that appears first on the list.
Add a smart rule to a blog post or page
-
Navigate to your content:
- Website Pages: In your HubSpot account, navigate to Content > Website Pages.
- Landing Pages: In your HubSpot account, navigate to Content > Landing Pages.
- Blog: In your HubSpot account, navigate to Content > Blog.
- Click the name of your content.
- In the content editor, click the module you want to make smart.
- In the sidebar editor, click Add in the Smart rules section.

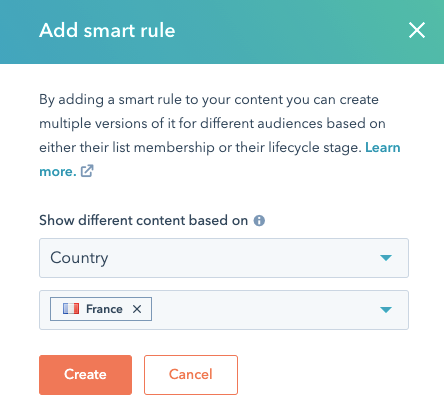
- In the right panel, click the Show different content based on dropdown menu and select a rule type. You can only select one rule type per module.
- Click Add smart rule.
- Select a smart rule category.
- Click Add smart rule again to add additional rules based on the same rule type.
- To change the rule type, click the trash icon delete next to each existing rule. Then click the Show different content based on dropdown menu and select a different rule type.
- When you have added all smart rules, click Save.

- In the sidebar editor, click the Editing for dropdown menu to switch between the default content and smart content for each rule.
- Click Manage to add new rules or edit existing ones.

Preview your content's smart rules
To view a page or post's smart rules from the content editor:-
Navigate to your content:
- Website Pages: In your HubSpot account, navigate to Content > Website Pages.
- Landing Pages: In your HubSpot account, navigate to Content > Landing Pages.
- Blog: In your HubSpot account, navigate to Content > Blog.
- Click the name of your content.
- In the content editor, click the smart module.
- In the sidebar editor, select your Smart rule.
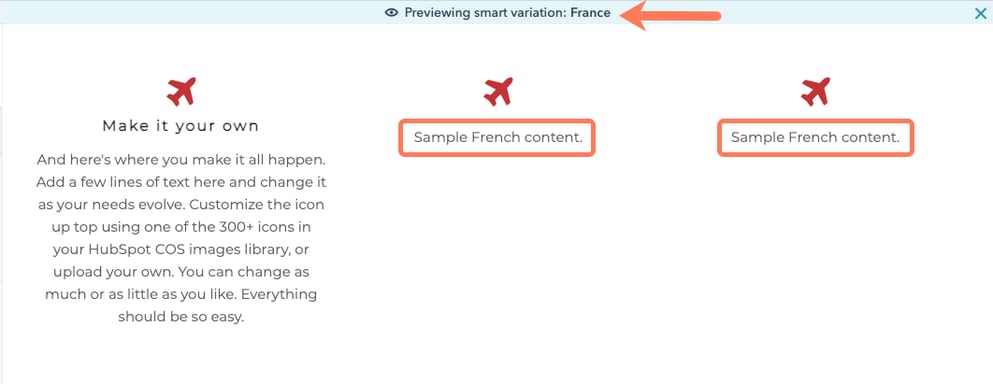
When you've selected a smart variation, the content editor will display the version of your content those visitors will see. All smart modules with the same rule will display content from that smart variation. You can check which variation you're viewing at the top of the editor in the Previewing smart variation banner.

- Navigate to your content:
- Website Pages: In your HubSpot account, navigate to Content > Website Pages.
- Landing Pages: In your HubSpot account, navigate to Content > Landing Pages.
- Blog: In your HubSpot account, navigate to Content > Blog.
- Click the name of your content.
- In the content editor, click Preview in the top right.
- In the top left of the preview screen, click the Preview as dropdown menu and select Smart rule.
- Click the Select a smart rule (optional) dropdown menu, then select a smart rule variation.
Add smart content in the design manager
In the layout editor, you can set a module to display smart content. This will automatically prevent users from editing this module in the content editor.
Add smart content to a local module

- In the dialog box, click the Show different content based on dropdown menu and select a rule type. You can only select one rule type per module.
- Click the dropdown menu and select a smart rule category.
- Click Create.

- In the Default content section of the inspector, edit your module's smart content.
- Click the Editing for dropdown menu to switch between the default content and smart content for each rule.
- To add or change smart rules, click Manage smart rules.

-
- In the right panel, click Add smart rule to add additional rules based on the same rule type.
- To change the rule type, click the trash icon delete next to each existing rule. Then click the Show different content based on dropdown menu and select a different rule type.
- When you have finished editing your smart rules, click Save.

- In the upper right, click Publish changes to take your changes live.
Add smart content to a global module
Please note: global modules support smart content, but modules inside global groups do not.
- In your HubSpot account, navigate to Content > Design Manager.
- In the finder, select your global module.
- In the inspector, click Edit global module.

- In the global content editor, click Add in the Smart rules section of the sidebar editor.

- In the right panel, click the Show different content based on dropdown menu and select a rule type. You can only select one rule type per module.
- Click Add smart rule.
- Select a smart rule category.
- Click Add smart rule again to add additional rules based on the same rule type.
- To change the rule type, click the trash icon delete next to each existing rule. Then click the Show different content based on dropdown menu and select a different rule type.
- When you have added all smart rules, click Save.
- In the upper right, click Publish to [#] assets to take your changes live.