- Knowledge Base
- Marketing
- Social
- Create a custom social publishing schedule
Create a custom social publishing schedule
Last updated: September 30, 2025
Available with any of the following subscriptions, except where noted:
-
Marketing Hub Professional, Enterprise
HubSpot's social tool gives you the option to post social posts immediately, at a custom time, or on a default publishing schedule.
In addition, you can create a custom publishing schedule to easily schedule your social posts based on when you anticipate getting the most engagement.
Please note: ensure that your account time zone is correct before determining the optimal times to schedule your social posts or setting up your custom social publishing schedule.
Determine the optimal times to schedule your social posts
To get a better sense of which times work best for publishing your social posts, you can review your Top Posts report and the data on the Published tab of your Social dashboard.
Learn more about how you can review and compare your published social posts to optimize your social engagements.
Review your Top Posts report
You can check the Top Posts report to get an overview of the publish times of your top ten social posts:
- In your HubSpot account, navigate to Marketing > Social.
- Click the Analyze tab.
- At the bottom of the page, review the Top Posts report. The published date will display on the report.
- To filter your posts, click the Filter by dropdown menu to filter the posts by Most interactions, Most impressions, Most clicks, or Most shares.

Analyze and filter your published social posts
If you want to get more information on the best times to publish your social posts, you can filter and review publish times on your social dashboard.
- In your HubSpot account, navigate to Marketing > Social.
-
In the upper left of the table, leave the account filter set to All accounts and the campaign filter set to All campaigns.
-
At the top of the table, click the Clicks column header to sort your published social posts by the number of clicks received.
-
Review the Published Time column to see the date and time each post was published. Write down the publish times of the 10 most frequently clicked posts to determine what time of day works best.
Set up your custom social publishing schedule
- In your HubSpot account, click the settings settings icon in the top navigation bar.
- In the left sidebar menu, navigate to Marketing > Social.
- Click the Publishing tab.
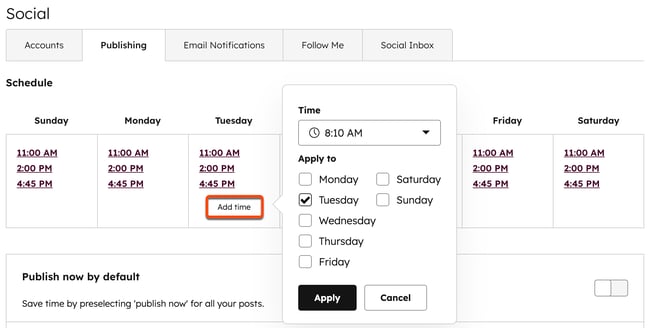
- Hover over a day you want to add a publish time to, then click Add time.
-
In the dialog box, click the Time dropdown menu to select a time. Select the checkboxes for any extra days of the week you want this time to apply to, then click Apply.

- To delete an existing publish time, hover over the time and click the deletedelete icon.
- To vary your publish times so that posts are published within 10 minutes (before or after) of the scheduled time, click to toggle the Publish like a human switch on.
