- Knowledge Base
- CRM
- Inbox
- Configure chat capacity limits for users in your account
Configure chat capacity limits for users in your account
Last updated: August 28, 2025
Available with any of the following subscriptions, except where noted:
-
Service Hub Enterprise
You can turn on and configure capacity limits for live chat agents in your HubSpot account to help them decrease the time to their first response to a visitor, reduce their average conversation length, and improve overall customer sentiment.
Please note: chat capacity limits apply only to chat conversations from channels connected to the conversations inbox. Chats assigned to the user that are not from a channel connected to the conversations inbox do not count towards the user's chat capacity limit. To manage limits for channels connected to your help desk, learn more about setting ticket capacity limits.
Permissions required Super Admin permissions are required to configure chat capacity limits.
Turn on and configure capacity limits
To configure your chat capacity limits:
- In your HubSpot account, click the settings settings icon in the top navigation bar.
- In the left sidebar menu, navigate to Account Defaults.
- Click the User Defaults tab.
- Under Capacity limits, toggle the Enable capacity limit switch on.
- Once turned on, incoming chat conversations will be auto-assigned to an available live agent until the number of active chats reaches the capacity limit you've set in your settings. An active chat will count toward's a live agent's capacity limit if the following criteria is met:
- The conversation is not considered spam, blocked, trash, or otherwise filtered from the inbox.
-
- The conversation is from a chat channel connected to the conversations inbox.
- The conversation's status is Open and assigned to the agent.
- A message was sent between the agent or the visitor in the last 30 minutes. This will also include any comments that the agent made within this time period.
- The default capacity limit for live chat is set to three active chats. You can enter a new limit under Chat capacity limit, up to a maximum of 99.
- In the bottom left, click Save.

Once an agent reaches their max capacity in the conversations inbox, the green dot that indicates their availability will switch to a warning triangle , and they will no longer be auto-assigned new conversations. When the agent closes enough active chats to bring them back under their max capacity, they'll once again be eligible for automatic assignment.

If all agents are at max capacity, any incoming new chats will be unassigned. You can still manually assign conversations to an agent who is at max capacity.
Set live chat behavior during max capacity
To specify the behavior for your live chat launcher when all agents are at max capacity:
- In your HubSpot account, click the settings settings icon in the top navigation bar.
- In the left sidebar menu, navigate to Inbox & Help Desk > Inboxes.
- On the Channels tab, hover over the chat channel and click Edit.
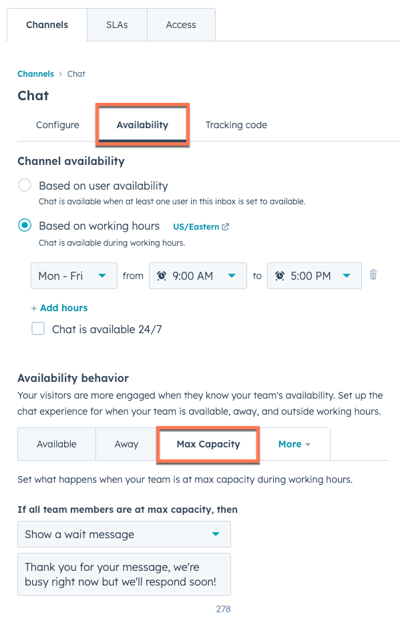
- Click the Availability tab.
- Under Availability behavior, click the Max capacity tab.
- Click the dropdown menu to customize the live chat launcher behavior during max capacity:
- Show a wait message: website visitors will still be prompted by your live chat launcher, but when they start a conversation, your configured wait message will appear in the chat window. Any new conversations will remain in the Unassigned view of your inbox.
- Hide chat launcher: the chat launcher will not appear to any visitors to your website, and they won't be able to start any conversations with live agents.
- Do nothing: website visitors will be prompted by your live chat launcher, and if they choose to start a conversation, they'll go through the normal greeting experience without an indication that all agents are at max capacity. Any new conversations will remain in the Unassigned view of your inbox.

- In the bottom left, click Save.
Please note: if you've configured chat launcher behavior for when all agents are away and at max capacity, the behavior you specified in the Away tab will take precedence if all agents are simultaneously away or at max capacity.