Last updated: March 4, 2024
Available with any of the following subscriptions, except where noted:
|
|
After connecting your LinkedIn ad account to HubSpot, you can create lead ads and website traffic ads through the HubSpot ads tool.
Please note: when creating a LinkedIn ad campaign in HubSpot, you can create one ad per campaign.
To create a new ad campaign:- In your HubSpot account, navigate to Marketing > Ads.
- In the upper right, click Create ad campaign, then select an ad type:
-
- Website visit ad: use website visit ads to promote and direct visitors to your website. You can also create a website visit ad from one of your HubSpot landing pages:
- In your HubSpot account, navigate to Content > Landing Pages.
- Click on the name of the landing page you want to create an ad from.
- In the top right, click Promote > Create ad campaign.
- In the right panel, select Linkedin website traffic.
- Website visit ad: use website visit ads to promote and direct visitors to your website. You can also create a website visit ad from one of your HubSpot landing pages:
-
- Lead generation ad: use lead generation ads to collect information from visitors with a LinkedIn form.
- In the top right, click Next.
- Click the pencil icon at the top of the page to enter a name for your ad.
Set up ad creative
In the Ad tab, you can preview your ad in the right panel. For lead generation ads, you can click the or buttons to cycle between your ad, form, and thank you section.
In the left panel, set up your ad creative and form:
- Ad account: select the ad account for the ad.
- Page: select the LinkedIn page for the ad.
- Only company pages will appear for selection when setting up your ad creative.
- Showcase pages are not supported and will not be available when creating a LinkedIn ad campaign in HubSpot.
- LinkedIn campaign group: select an existing LinkedIn campaign group.
- The Budget Optimization setting for the campaign group should not be toggled on. If this setting is toggled on, you will not be able to publish the ad. To resolve this, change to a campaign group where the setting is toggled off.
- Website page URL: if you're creating a website traffic ad campaign, you can select an existing HubSpot page or manually enter the URL of your website page.
- Image/Video: upload an image or video for your ad.
- Text/Body copy: enter text for your ad. You can also use AI assistants to generate copy for your ad. Learn how to use AI assistants when creating ad campaigns.
- Headline: enter a headline for your ad. After setting up your Text/Body copy, you can also use AI assistants to generate a headline based on the Text/Body copy content.
- Call-to-action: select a call-to-action for your ad.
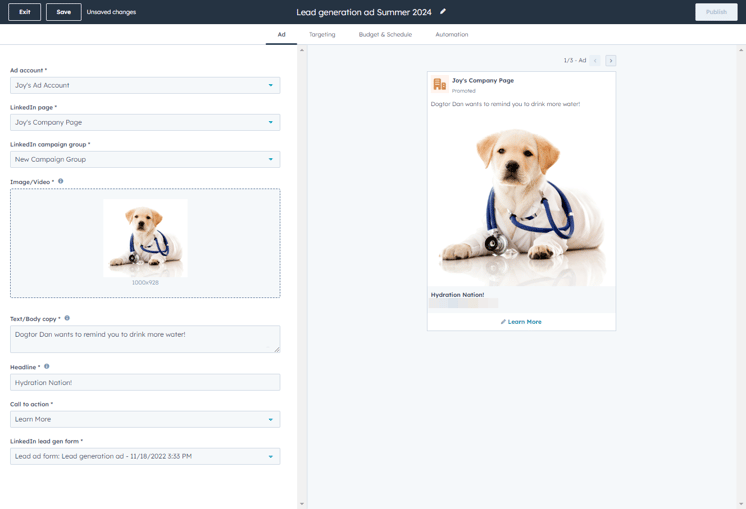
- LinkedIn lead gen form: if you're creating a lead ad campaign, select an existing form, or create a new form. When users click on the call-to-action button on your ad, LinkedIn will prompt them to fill out a form.
- To use an existing form from your LinkedIn or LinkedIn page, click the LinkedIn lead gen form dropdown menu, then select one of your forms.
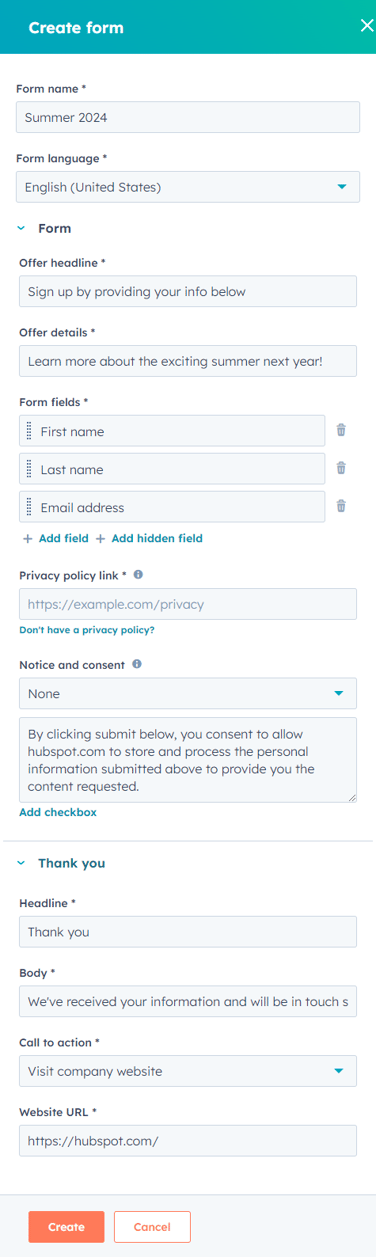
- To create a new form, click the LinkedIn lead gen form dropdown menu, then click Create new LinkedIn form. In the right panel, configure the following form details:
-
-
- Form name: enter a name for the form.
- Form language: select a language for the form.
- Offer headline: enter a headline for your form.
- Offer details: enter any additional details for your form.
- Form fields: select and arrange the order of the form fields for visitors to submit. To add a form field, click + Add field, to add a hidden field for reference, click + Add hidden field. Hidden fields will not be displayed to visitors.
- Privacy policy link: enter a link to your privacy policy.
- Notice and consent: select a notice and consent option to keep users informed of how you will use their data, and enter the corresponding text you want to prompt users with. If you want users to agree to multiple consent questions, you can click Add checkbox to add an additional prompt and checkbox.
- Thank you: configure the follow-up text to display after users submit your form.
-
Please note: after creating your form, you cannot edit or make any additional changes. If you made any mistakes or want to make updates to the form after it's been created, create a new form with your desired changes. Then, select the updated version for your ad campaign.
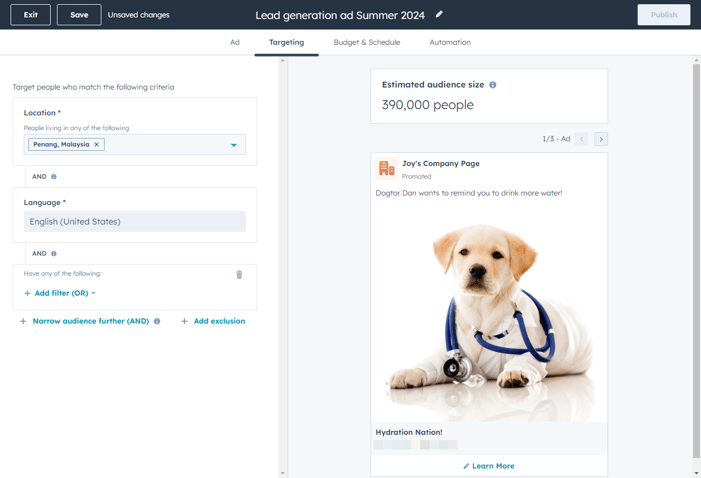
Specify targeting
In the Targeting tab, set up the targeting for your LinkedIn ad:
- Location: enter any specific city, state, or country.
- Language: the language set will be automatically determined by the LinkedIn lead gen form selected in the Ad tab.
- Have any of the following: to refine which users are targeted even further, you can add groups of filters:
- Under the bottommost AND filter, click Add filter (OR).
- To include a HubSpot audience, select Retargeting and lookalike audiences.
- To manually select the target interests, behaviors, or demographics for your ad, select Personal attributes.
- To broaden your audience further, specify another OR filter.
- Under the bottommost AND filter, click Add filter (OR).
- To further restrict your audience, click Narrow audience further (AND) to add another Have any of the following filter group. Then, select an additional criteria. Users must match at least one filter in each group to be targeted.
- To exclude certain audiences from seeing your ad:
- At the bottom, click Add exclusion.
- Then, click Add audience exclusions.
- In the right panel, select any audiences you'd like to exclude.
- If you're creating a website traffic ad, to place the ads on 3rd party publishers where LinkedIn audiences engage, select the Use the LinkedIn Audience Network checkbox.
Please note: you can add up to 100 filters for targeting. If the LinkedIn Ad has more than 100 filters, it will not publish.
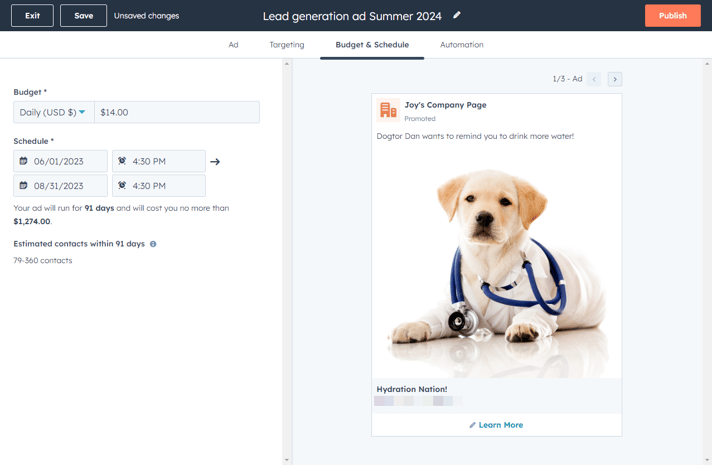
Enter budget and schedule
In the Budget & Schedule tab, set up the budgeting and schedule for your ad:- Budget: click the dropdown menu and select whether your budget is for Daily or the Total amount for the ad, and enter the amount.
- Schedule: click the dropdown menus to select the duration of your ad.
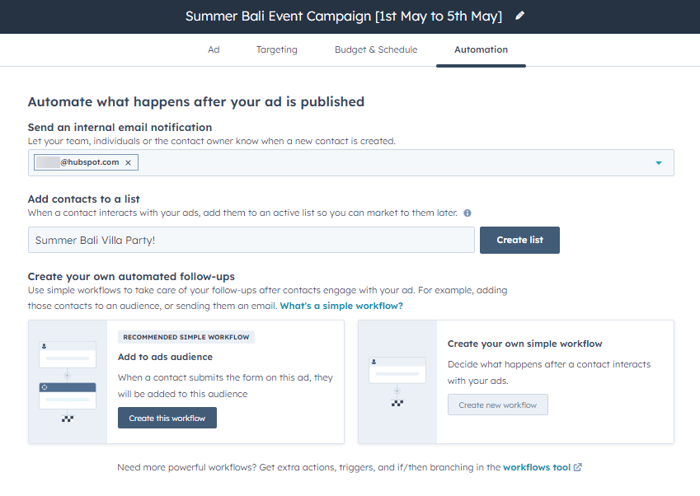
Set up automation
In the Automation tab, use simple automation features such as adding contacts who have interacted with your ad to an ads audience or list. You can also use the ad interaction as a trigger in a simple workflow. Learn more about how to use automations with the ads tool.
From the Automations tab, you can configure what happens after the ad interaction:- Send an internal email notification (lead generation ads only): send an internal notification to a user, team, or the contact's owner when a contact is created from an ad.
- Add contacts to a list: add contacts who have interacted with your ad to an active list.
- Create your own automated follow-ups: use a simple workflow template to add contacts who have interacted with your ad to an ads audience or create your own simple workflow in the editor.
Publish or Save
To publish or save your ad:
- In the top right, click Publish. Once you've published your ad, you can analyze the ad's performance from your Ads dashboard.
- If you're not done editing your ad, you can save your progress and return to finish your ad later. To save your ad as a draft:
-
- In the top left, click Exit.
- In the dialog box, click Save and Exit. HubSpot will save your drafted ad, which you can resume editing at any time.
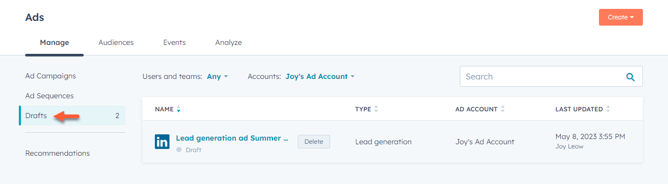
- To view your current drafted ad campaigns:
-
- In your HubSpot account, navigate to Marketing > Ads.
- In the left sidebar menu, click Drafts.
- To resume editing one of your drafted campaigns, click the campaign name.
- To remove a draft, hover over the campaign and click Delete. In the dialog box, enter delete. Then, click Delete draft.