
Last updated: April 29, 2024
Users with Marketing Hub Enterprise subscriptions who have purchased the Business Units Add-On can use business units to manage multiple brands in one HubSpot account. You can customize the branding for each business unit to streamline content creation.
You can also keep assets such as forms, pages, and more organized by associating them with a business unit. Learn more about leveraging business units from our HubSpot Academy.
Please note: you may need to manually opt-in to access certain tools related to business units, such as marketing emails and subscription types. If a contact enables an opt-out of all subscription types in their portal despite being opted-in to an individual subscription type in a business unit, they will not appear in lists created for that individual subscription type. If you don't have access to a specific feature outlined below but would like to reach out to your Customer Success Manager.
Before you get started
Before getting started, please note the following:
- Only super admins can create and edit business units.
- Each Business Units add-on allows for one business unit. You can add up to 100 business units by purchasing multiple instances of the Business units add-on.
- With each Business Units add-on, your HubSpot account will have access to one additional brand domain. It's optional to associate this domain to your new business unit. If you want to associate the brand domain, make sure that the brand domain is connected before setting up your business unit.
- HubSpot only allows for one primary domain per account. If you already have a primary domain set up in your HubSpot account, you must assign a business unit to a secondary domain.
- Creating a business unit will automatically create the Business units contact property in your account. You can filter your contacts by business unit and automatically set this property when a contact submits a form that's associated with a specific business unit.
Learn more about setting up business units from HubSpot Academy.
Create business units
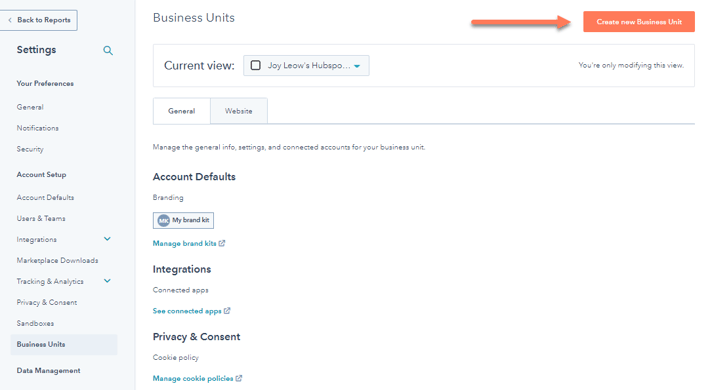
To create a new business unit:
- In your HubSpot account, click the settings icon in the top navigation bar.
- In the left sidebar menu, navigate to Business Units.
- In the top right, click Create new Business Unit.
- Enter a name for your business unit.
- Click Create.
Navigate to business units in the main navigation
- In the top right, click your profile picture, hover over Business Unit, then select the business unit you want to navigate to.
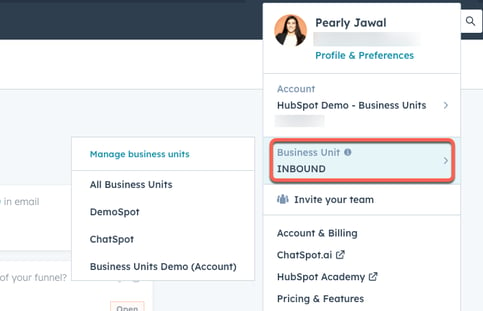
Once you click on the business unit, you can navigate to various parts of the CRM and see the information filtered to the specific business unit you selected. For example, you can create a record, import an email opt-out list, and customize email subscription pages for a specific business unit.
Rename or delete existing business units
Manage your business units from the business units settings page:
- In your HubSpot account, click the settings icon in the top navigation bar.
- In the left sidebar menu, navigate to Business Units.
- To rename a business unit or your default account business unit:
- Click the Current view dropdown menu and select the business unit you want to rename.
- In the upper right, click the Actions dropdown menu, then click Rename.
- In the dialog box, enter a new name for your business unit.
- Click Update. The business unit's new name will display in your HubSpot account.
- To delete a business unit, click the Current view dropdown menu at the top of the page, and select the business unit you wish to delete. Click Actions on the top right, then click Delete. A dialog box will appear to confirm the deletion. Type your business unit name, then click Delete business unit.
Please note:
- If you delete a business unit, the account will disappear but data associated with it won't get deleted.
- It is not possible to turn off business units. If you want to remove the business units feature, reach out to your Customer Success Manager to cancel the Business units add-on.
Customize branding for business units
You can set custom logos, favicons, and colors for each business unit by creating brand kits. When you create pages, emails, scheduling pages, and forms associated with a business unit, the brand colors will be displayed in the color picker favorites. Only users with Account Access and Edit account defaults permissions can create brand kits.
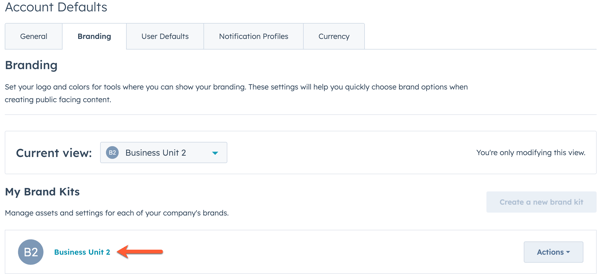
To create and manage brand kits, navigate to your business units settings:
- In your HubSpot account, click the settings icon in the top navigation bar.
- In the left sidebar menu, navigate to Business Units.
- To create a brand kit:
- In the Branding section, click Manage brand kits. You’ll then be directed to the Branding tab of the Account Defaults settings page.
- In the top left, click the Current view dropdown menu and select the business unit you want to create a brand kit for.
- In the top right, click Create a new brand kit.
- In the dialog box, enter a brand name for the brand kit.
- Click Save..
- After the brand kit is created, you can further edit the logo, favicon, and colors associated with the brand kit:
-
- On the Branding tab of the Account Defaults settings page, click the brand kit name.
-
- To add a new logo, click + Add in the Logos section.
- Add your new logo:
- To add an existing image from the files tool as your logo, click Browse images. In the right panel, click the image.
- To add a new image, click Upload, then add an image from your computer.
- Enter a Logo name.
- If you'd like to further customize your logo, you can add alt text, a URL, and configure the width and height of the logo.
- Click Save.
- Add your new logo:
- To add a brand favicon, click + Add in the Favicon section.
- To add a new logo, click + Add in the Logos section.
Please note: for best results, save your favicon as a 48 by 48 px image in one of these file formats: .ico, .gif, .png.
- To set brand colors:
- Click the Colors tab.
- To set your primary color color, enter a hexadecimal code or click the color picker and select a color. The primary color is used in scheduling pages, quotes, and conversations channels.
- To add more brand colors, click + Add, then enter a hexadecimal code or click the color picker and select a color.
- To delete a non-primary color, click the delete icon next to the color.
- Click Save.
- To delete a brand kit, under My Brand Kits, click Actions, then click Delete.

Install the HubSpot tracking code for a business unit
Each business unit is associated with its own unique tracking code. Unique tracking codes allow you to display different cookie policy banners on different pages. But, this won't affect reporting.
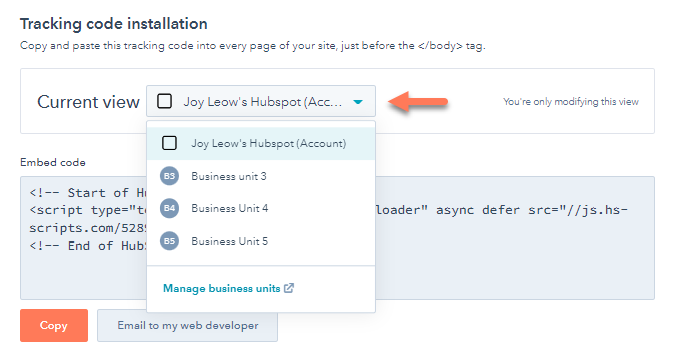
To install the tracking code:
- In your HubSpot account, click the settings icon in the top navigation bar.
- Navigate to Tracking & Analytics > Tracking code in the left sidebar menu.
- Click the Current view dropdown menu and select the business unit you want to install the tracking code for.
- Continue installing the tracking code.
Report on business units
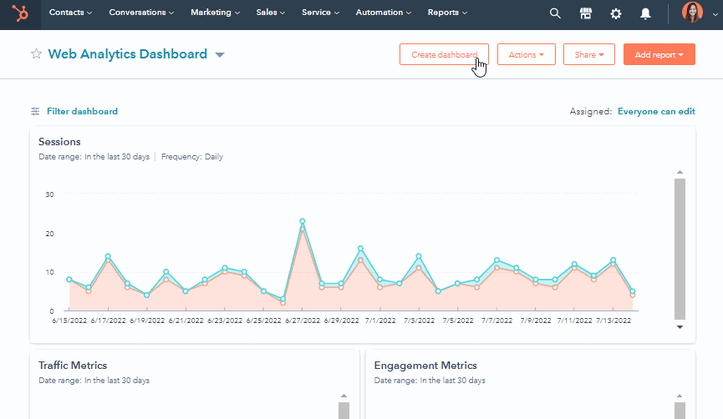
Track your brand's performance and keep your teams aligned using dashboards with custom business unit reports. You can also associate existing dashboards and reports with a business unit. Learn more about managing dashboards.
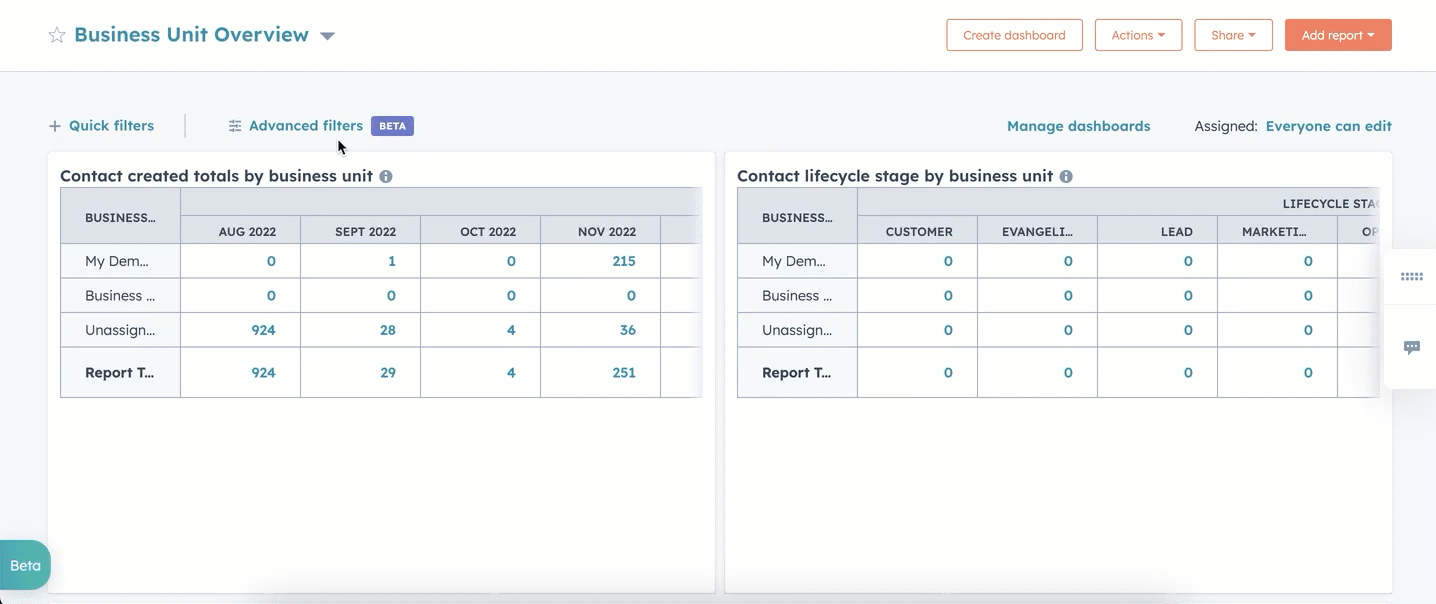
Create and manage business unit dashboards
- In your HubSpot account, navigate to Reporting & Data > Dashboards.
- In the upper right, click Create dashboard. You'll be brought to the dashboard library.
- Select the Business Unit Overview template.
- In the right panel, review the reports included in the dashboard. Clear the checkboxes next to the reports you don't want to include.
- Click Next.
- Continue creating your dashboard.
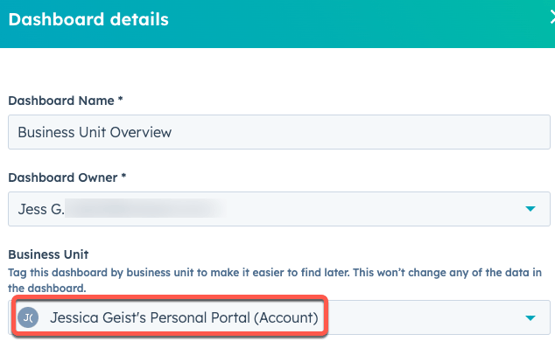
- To edit the business unit a dashboard is associated with:
- In the top right, click the Actions > Dashboard details.
- In the right panel, click the Business unit dropdown menu and select a business unit.
- Click Save.
- To filter a report by a specific business unit:
- In the custom report builder, customize the report filters using the Business units property.
- On the dashboard, click Advanced filters.
- Click + Add filter.
- Use the search bar to find and select the business unit filter you want to use.
- Click the Business unit dropdown menu, and select a business unit.
- Click Apply filter.
Create and manage business unit reports
In addition to using the reports from the Business Unit Overview template, you can also create custom reports using the Business units property. Learn more about managing reports.
- To create a custom contact report to analyze business units, use the Business units property in the custom report builder.
- To associate an existing report with a business unit:
- In your HubSpot account, navigate to Reporting & Data > Reports.
- From the report list, select the checkbox next to the reports you'd like to associate and click Set business unit.
- In the dialog box, click the Business unit dropdown menu and select a business unit.
- Click Set business unit.
