- Knowledge Base
- Account & Setup
- Tracking Code
- AutoCapture website events
BetaAutoCapture website events
Last updated: September 3, 2025
Available with any of the following subscriptions, except where noted:
-
Marketing Hub Enterprise
-
Sales Hub Enterprise
-
Service Hub Enterprise
-
Data Hub Enterprise
-
Content Hub Enterprise
-
Smart CRM Enterprise
-
Commerce Hub Enterprise
AutoCapture is HubSpot's automatic event tracking tool that captures clicks on interactive elements (i.e., links and buttons) across your entire website without needing manual setup. Custom events manually track selected website interactions, but AutoCapture automatically records all visitor actions. This gives you complete behavioral data to improve personalization and AI-driven decision making. Once your tracking code is installed and active, you'll need to verify raw events to use them throughout HubSpot tools.
Before you get started
Before getting started with Autocapture, please note the following information.
Understand requirements
AutoCapture turns on automatically once your HubSpot tracking code is installed and active.Understand limitations & considerations
- You should monitor your raw events regularly to identify new interaction patterns you want to verify.
- Raw events are limited to 250M occurances a month.
- Verified events are limited to 50M occurences a month. You can create up to 2000 verified events per HubSpot account.
Understand raw and verified events
When working with AutoCapture, there are two types of events: raw and verified. You must manually verify raw events to create verified events.
Raw events
AutoCapture automatically captures website interactions as raw events. These appear in the Raw events table and include:
- Clicks on interactive elements (buttons, links, menu items, tabs).
- Detailed interaction data, including name, description, URL path, CSS selector, number of occurrences, and last seen date.
-
Please note:
- Raw events are captured and stored but aren't available in HubSpot tools.
- HubSpot is explicitly excluding certain types of clicks from being captured. These include:
- Clicks on empty spaces, images, plain text, checkboxes, and iframes.
- Repeated clicks on the same interactive element in quick succession without page refresh.
Verified events
To use raw events throughout HubSpot, you need to verify them. Verified events are:
- Available across all HubSpot tools (i.e., workflows, lists, etc.).
- Displayed on contact record timelines.
- Usable in lead scoring and segmentation.
- Integrated with datasets and journeys.
Verify an event
Raw events can be verified in the event visualizer. The visualizer is AutoCapture's built-in website viewer where you can:
- View which website element corresponds to each event.
- Verify you're tracking the correct interactions.
- Edit event criteria within HubSpot.
- Review how many occurrences each event has had.
To verify an event:
- In your HubSpot account, navigate to Data Management > Event Management.
- In the left side menu, select the Explorer tab.
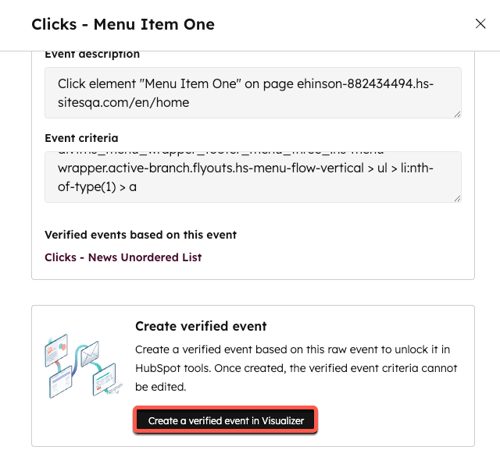
- On the Raw events tab, in the table, click the raw event name.
- Verify the name of the raw event or edit the name to be more specific. It's best to use descriptive event names (e.g., Learn Our History - Homepage)
- Click Create verified event in the Visualizer. You'll be redirected.

- Verify or edit the Event name, Event description, and Event criteria. Adding a detailed description helps AI generate more accurate and relevant content.
Please note: when you edit the event criteria (CSS), it adjusts what makes the event fire. Editing CSS selectors required a foundational understanding of CSS and your website's structure. Consult with a web developer if you aren't able to make changes.
- I'd like to track this on section, select an option.
- Click Create a verified event.
When you verify an event, historical data is backfilled for 90 days or 50,000 of the most recent occurrences (whichever is smaller). The backfilled data can take up to a few hours to appear. During this time, there will be a loading icon by the verified event name. New data will populate in your verified event in real time.
Please note: once a verified event is created, you can't modify the event criteria. If you need to make changes, you need to create a new verified event from the original raw event and delete the original.
Edit verified events
Once an event if verified, you can only edit the name and description.
- In your HubSpot account, navigate to Data Management > Event Management.
- In the right side menu, select the Explorer tab.
- Click the Verified events tab.
- In the table, click the verified event name.
- Edit the name or description.
- Click Save event.
![]()
Delete verified events
You can only delete a verified event if it's not used in a HubSpot tool (lists reports, workflows, etc.). When you delete a verified event, all data is removed and it can't be undone.
- In your HubSpot account, navigate to Data Management > Event Management.
- In the right side menu, select the Explorer tab.
- Click the Verified events tab.
- In the table, hover over the verified event name.
- Click the Actions menu and select Delete.
![]()
Work with verified events
Once you have verified events, you can:
- Create segments: group contacts by similar behaviors for personalized experiences.
- Create workflows: automate business processes triggered by custom behavior.
- Create reports: analyze behavioral data for insights.
- Create journeys: design customer journeys