- Knowledge Base
- Data
- Data Management
- Sync data to HubSpot's CRM in Data Studio
BetaSync data to HubSpot's CRM in Data Studio
Last updated: December 9, 2025
Available with any of the following subscriptions, except where noted:
-
Data Hub Professional, Enterprise
-
HubSpot Credits required
After creating a dataset in HubSpot, you can sync the data back to the CRM to improve your audience segmentation, help you send more personalized marketing emails, or improve your sales outreach based on learnings derived from the data.
- In your HubSpot account, navigate to Data Management > Data Studio.
- Hover over an existing dataset, and click Use in, then click Sync to CRM.

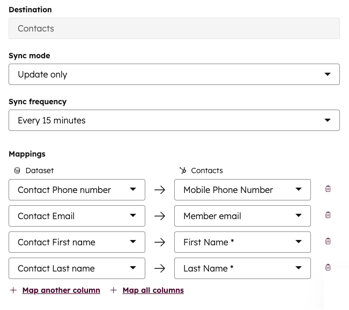
- In the right sidebar menu, select the following:
- Destination: the HubSpot object you want to sync data to
- Sync mode: Create and update, Create, Update
- Sync frequency: Once, Every 15 minutes, Hourly, Daily, Weekly, Monthly
Please note: the initial sync runs immediately upon activation. Subsequent syncs will then occur at the specified interval from the time of initiation. For example, if you start an hourly sync at 11:45 am, the next sync will run at 12:00 pm, followed by a sync every hour after that.
-
- Mappings: choose a column and a property to be used to match rows across source and destination.

Please note:
- If your primary data source is not a HubSpot object, you'll need to provide a match key column to align the dataset with your existing HubSpot CRM. This prevents duplicate records during the sync process.
- Required fields vary by record type—e.g., First Name, Last Name, or Email for Contacts, and Deal Name, Deal Stage, and Pipeline for Deals. You can also create new properties directly in the mapping table dropdown.
- Once your sync is configured, click Start sync.
- On the Datasets tab, click the dataset you synced to the CRM. At the top of the table, a note will appear saying your external data is being synced.

- Click View sync health to be taken to the Sync Health & Monitoring page. Here you can see a full report on the performance of your sync—including the number of records created, the unique number of records updated, and the number of errors in your sync. For the unique number of records updated, if there are five updates to the same record in the specified time period, you would only see one update.
- On the Summary tab, at the top of the page, you can see when the sync last ran and the next time it will run.
- Click Sync now to do an incremental sync of your data since the last sync.
- Click the Actions dropdown menu to pause, cancel, or edit the sync.
- On the Summary tab, at the top of the page, you can see when the sync last ran and the next time it will run.
-
- On the Summary tab, at the bottom of the page, the Sync activity table provides detailed insights into how CRM records have interacted with the sync. It includes information on errors and explanations for records that failed to sync properly. Use the search bar to find a specific record included in the sync.
-
- On the Configuration tab, you can review the sync configuration that you created in the dataset builder. To edit this configuration, click Edit sync.
Data Management
Thank you for your feedback, it means a lot to us.
This form is used for documentation feedback only. Learn how to get help with HubSpot.