- Knowledge Base
- Content
- Website & Landing Pages
- Create and populate HubDB tables
Create and populate HubDB tables
Last updated: December 15, 2025
Available with any of the following subscriptions, except where noted:
-
Marketing Hub Enterprise
-
Content Hub Professional, Enterprise
HubDB is a database tool used to create and manage structured tables of data. You can use HubDB tables to create dynamic pages and query tables externally through the HubDB API. HubDB stores structured data (e.g., product lists, team directories, or event schedules) so the information can be updated in a central place instead of updating multiple pages individually. Learn more about HubDB in HubSpot's developer documentation.
Before you get started
Before you begin working with this feature, make sure to fully understand what steps should be taken ahead of time, as well as the limitations of the feature and potential consequences of using it.
Subscription required The following subscriptions are required:
- Content Hub Professional or Enterprise is required to use HubDB for dynamic pages.
- Marketing Hub Enterprise is required to use HubDB for programmable emails.
Permissions required The following permissions are required:
- HubDB table settings permission is required to create, clone, or delete HubDB tables.
- HubDB permission is required to view, edit, or publish HubDB tables.
Understand limitations & considerations
- All new tables created are set with a status of draft. Tables can't be used to output data with HubL or API until the table is published.
- Review HubDB technical limits.
Create a table
- In your HubSpot account, navigate to Content > HubDB.
- Click Create table.
- In the dialog box, enter a Table label and Table name. You can't change the name of a table after you publish it.
- Click Create.
Add or import table data
After you've created a table, you can add new columns and rows to structure the data used on your website pages or through the HubDB API. You can also import a CSV file to merge its data into a HubDB table.
Add table columns
Columns define the type of data stored in each part of the table. When you add a column, you select a column type and configure settings that determine how data is entered and used.
- In your HubSpot account, navigate to Content > HubDB.
- Click the name of a table.
- In the top right, click the Actions dropdown menu and select Add column.
- In the dialog box, enter a Column label.
- Enter a Column name. You can use this name to query your data with the HubDB API.
- Enter a Column description. This description will appear when a user hovers over the info info icon next to the column name.
- Click the Column type dropdown menu and select a column type. Some column types will display additional options (e.g., Select or Multi-select) to configure.
- When finished, click Add column.
Add table rows
Rows store individual records in the table. Add rows to populate your table with structured data or update existing rows as your data changes.
- In your HubSpot account, navigate to Content > HubDB.
- Click the name of a table.
- In the top right, click the Actions dropdown menu and select Add row.
- A new row will be created. If you have existing rows in the table, the new row will be added beneath any existing rows. Enter a value for each column you've configured for the table.
Import table data with a CSV file
Import data from a CSV file to add multiple rows to your HubDB table at once. This is useful when you're working with large datasets or migrating existing information into HubDB.
- In your HubSpot account, navigate to Content > HubDB.
- Click the name of a table.
- In the top right, click the Actions dropdown menu and select Import.
- Click the Add or Replace tile:
- Add: rows from your spreadsheet will be added to your existing data.
- Replace: rows from your spreadsheet will overwrite and replace any existing data in your table. If row IDs are included in the spreadsheet, rows will be updated instead of replaced.
- Click Next.
- On the Select file page, click Choose file.
- Locate the CSV file in your file system, then click Open.
- By default, HubSpot will detect the encoding of the data in your CSV. To manually specify the data encoding:
- Click Advanced options.
- Click the Customize data encoding dropdown menu, then select an encoding.
- Click Next.
- On the Map columns page, specify how you want to map each field from your CSV to the corresponding HubDB table column:
- Click the HubDB Table Column dropdown menu, then select a column.
- If you haven't configured an associated column for the CSV field, click Add column. In the dialog box, enter a label, name, and select a type. When you're done, click Add column.
- When finished, click Import.
- When your import is complete, click Done.
Please note:
- To import an image into a HubDB table, add the image's URL to the CSV file. To set dimensions for the image, add the width and height to the end of the URL, offset by commas (e.g., http://www.hubspot.com/sample-image.jpg,100,300).
- Imported dates must use MM/DD/YYYY formatting. For example, November 6th, 2022 would be 11/06/2022.
Manage table data
Manage the structure and content of your HubDB table by removing columns or rows and adjusting their order. These actions help keep the table organized and ensure the data is structured correctly for use on your website or through the HubDB API.
Remove table columns
- In your HubSpot account, navigate to Content > HubDB.
- Click the name of a table.
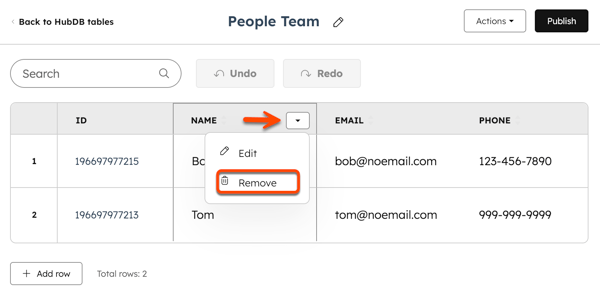
- Hover over a column label and click the dropdown menu, then select Remove.
- In the dialog box, click Delete.

Remove table rows
- In your HubSpot account, navigate to Content > HubDB.
- Click the name of a table.
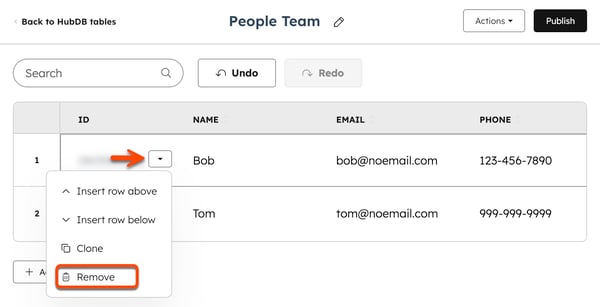
- Hover over a row ID and click the dropdown menu, then select Remove.

Reorder table columns and rows
- In your HubSpot account, navigate to Content > HubDB.
- Click the name of a table.
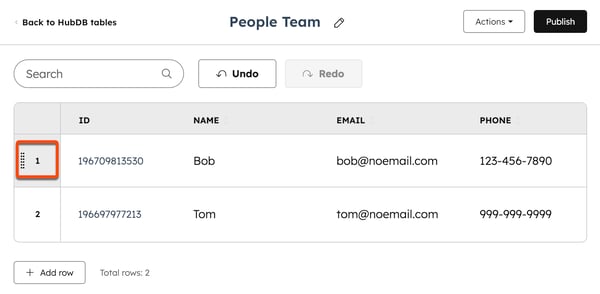
- To change the order of a row, hover over the row number and click the dragHandleIcon drag and drop icon. Then move the row up or down to a new position.

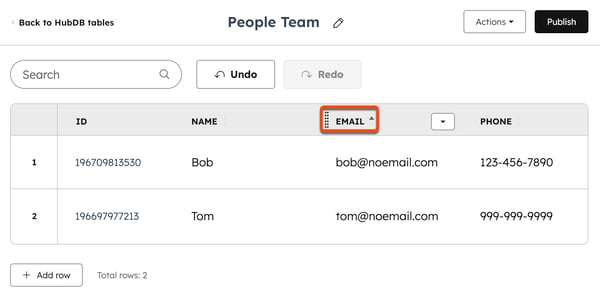
- To change the order of a column, hover over the column and click the dragHandleIcon drag and drop icon. Then move the column left or right to a new position.

Manage table settings
Manage individual HubDB table settings, including options for public API access and whether the data can be used to create dynamic pages.
- In your HubSpot account, navigate to Content > HubDB.
- Click the name of a table.
- In the top right, click the Actions dropdown menu and select Manage settings.
- In the right panel, toggle the Allow public API access switch on to turn on unauthenticated API calls to query the table's data.
- To create dynamic pages using the table, toggle the Enable creation of dynamic pages using row data switch on. You can then configure the following additional options:
- In the Metadata section, click the dropdown menus and select which columns will populate dynamic pages with meta description, featured image, and canonical URL data. For new tables, you'll need to create new columns to contain this data.
- Meta description: must be a text type column.
- Featured image: must be an image type column.
- Canonical URL: must be a URL type column.
- In the Child tables section, select the Allow use of child tables checkbox to turn on references to other HubDB tables in this table.
- To automatically create intermediate listing pages, select the Automatically create listing pages for child tables checkbox.Learn more about building multilevel dynamic pages using HubDB.
- In the Metadata section, click the dropdown menus and select which columns will populate dynamic pages with meta description, featured image, and canonical URL data. For new tables, you'll need to create new columns to contain this data.
- When finished, click Save.
Please note: a parent table cannot reference a child table that also references the parent table. This will create a loop that results in an error when trying to select the child table within the parent table.
Publish a table
Publish a HubDB table to make the latest structure and data available for use on your website or through the HubDB API. After creating a table or making updates to columns or rows, publish the table so the changes are applied.
- In your HubSpot account, navigate to Content > HubDB.
- Click the name of a table.
- In the top right, click Publish.
- In the dialog box, click Publish to take your changes live.
Export table data
- In your HubSpot account, navigate to Content > HubDB.
- Click the name of a table.
- In the top right, click the Actions dropdown menu and select Export. Then select a file format option (e.g., CSV). The HubDB table data will begin downloading immediately.
Please note: images exported from a HubDB table will be formatted as image URLs. If the image's dimensions have been customized, they will appear at the end of the URL.
View table dependents
Before updating or deleting a HubDB table, view which assets rely on it. Viewing table dependents helps you understand the affect of changes on your website content or API usage.
- In your HubSpot account, navigate to Content > HubDB.
- Click the Actions dropdown menu and select Show dependents.
- In the dialog box, click an asset type (e.g., Blog posts or Modules) to expand the section and view the individual assets.