- Knowledge Base
- Account & Setup
- Account Security
- Provision HubSpot users with SCIM through Google
Provision HubSpot users with SCIM through Google
Last updated: November 3, 2025
Available with any of the following subscriptions, except where noted:
-
Marketing Hub Professional, Enterprise
-
Sales Hub Professional, Enterprise
-
Service Hub Professional, Enterprise
-
Content Hub Professional, Enterprise
-
Commerce Hub Professional, Enterprise
Provisioning users through SCIM (the System for Cross-domain Identity Management) provides a secure and automated way to create and manage HubSpot users through Google.
If your identity provider is not Okta or Google, you can set up a custom SCIM integration. This allows you to set up SCIM to provision users from providers like Microsoft Entra ID, PingFederate, OneLogin, and JumpCloud. Learn more about setting up SCIM for your identify provider.
Below, learn how to set up user provisioning through Google.
Before you get started
- Single sign-on (SSO) must be turned on in your HubSpot account.
- It's recommended to set up user permission sets in HubSpot based on your team's Google custom attribute mapping before setting up SCIM.
- To set user permissions, you must create permission sets in HubSpot. Google can then assign permissions to a user if their mapped custom attribute in Google matches the name of the HubSpot permission set. For example, the Google custom attribute named “HubSpot Roles” is configured to map to the "HubSpot Roles" attribute.

- To assign seats for users set up with SCIM, you must first purchase the seats in HubSpot, then create a permission set with a paid seat. In Google, set the user's custom attribute to be the same as the permission set.
- To verify your domain, you'll need to update your DNS records. Ensure you have the login details for your DNS provider and have access to the TXT records.
Set up SCIM provisioning
To set up SCIM user provisioning through Google, follow Google's instructions for setting up auto-provisioning.
Verify your domain
After adding the HubSpot app through Google, you'll need to verify your domain in HubSpot by updating your DNS records.
- In your HubSpot account, click the settings settings icon in the top navigation bar.
- In the left sidebar menu, navigate to Integrations > Connected Apps.
- On the Apps tab, click Google SCIM.

- On the General Settings tab, enter your users’ email sending domain in the Domain field.
- At the bottom, click Save.
- Click Verify it now.

- In the right panel, click Next.
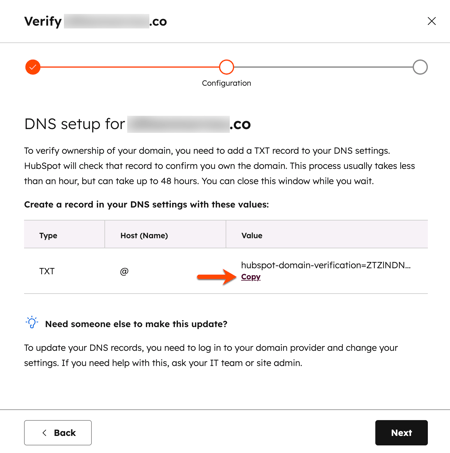
- Copy the value in the Value column. You’ll use this value when creating a new TXT record in your DNS provider.

- Log in to your DNS provider account. Create a new TXT record for the domain you’re verifying. Paste the value copied from HubSpot into the Value/Points To/Target field.
- After you've created the TXT record, navigate back to HubSpot, then click Next. Once the DNS changes propagate, the domain will be verified.

Please note: it can take up to 48 hours for the DNS changes to propagate and reflect in HubSpot.
Sync Google roles with HubSpot permission sets
To set user permissions, you must create permission sets in HubSpot. Google can then assign permissions to a user if their Role in Google matches the exact name of the HubSpot permission set, including all spaces and caps.
To give Google access to assign permission sets to users:
- In your HubSpot account, click the settings settings icon in the top navigation bar.
- In the left sidebar menu, click Integrations > Connected Apps.
- Under Apps, click Google SCIM.
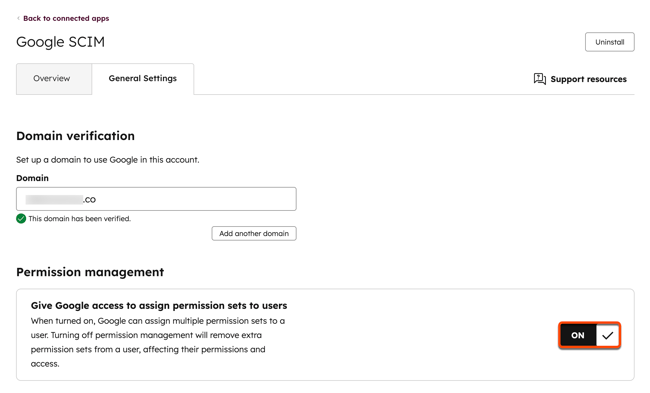
- On the General Settings tab, under Permission management, toggle the Give Google access to assign permission sets to users switch on.

Disable SCIM provisioning
Follow Google’s instructions to disable auto-provisioning.
Frequently Asked Questions
Can users created through SCIM be edited in HubSpot?
Only user permissions can be edited in HubSpot, and only if permission set management is not configured. All other user information, including user name and email address, can only be updated through your identity provider.
Why is my assigned Google role not showing up on my user permission set in HubSpot?
You must turn on Permission set management in HubSpot to have Google roles sync with HubSpot permission sets. The permission set name in HubSpot must match the exact Role name in Google, including all spaces and caps.
Can Google assign users to teams?
No. However, after the user is added to HubSpot, you can update their team manually in HubSpot.
What happens if I delete a SCIM user in HubSpot or Google?
Deleting a user in HubSpot will not delete the user in Google. However, if you remove a user's access to HubSpot from Google, or deactivate their account in Google, the user will be deleted in HubSpot. Adding a user to HubSpot will not add the user to Google.
What happens to existing users in my HubSpot account when I connect Google?
After setting up SCIM through Google, any existing HubSpot users that match users in Google will automatically be converted to SCIM users. HubSpot will try to assign the user a permission set based on their custom attribute if the attribute is mapped to HubSpot Roles in Google. If the user does not have a role in Google that matches a permission set in HubSpot, the user will have only minimal permissions in HubSpot.
I'm seeing the error "This domain couldn't be verified". How do I fix this?
If you're seeing this error, ensure your domain has been entered correctly with no spelling mistakes. Also, check that you have copied the correct value for the TXT record from the Configuration step in HubSpot into your DNS provider.