
Last updated: April 12, 2024
Available with any of the following subscriptions, except where noted:
|
|
|
|
Single sign-on (SSO) is a way to log into different applications securely with one username and password.
With SSO for private content, your IT administrator can set up a HubSpot application in your identity provider account, such as Google or Okta. Members of your organization with access to the HubSpot application within your identity provider account can log in with SSO to view private content.
You can further refine which individuals have access to specific content based on their list memberships in your HubSpot account. To access content by list membership, these members of your team must have contact records in your HubSpot account.
SSO for private content is available for the following subscriptions:
- Content Hub Professional and Enterprise accounts can set up SSO for blogs, landing pages, and website pages.
- Service Hub Professional and Enterprise accounts can set up SSO for knowledge base articles and customer portals.
Before you get started
- This setup process must be done by an IT administrator with experience creating applications in your identity provider account and permission to edit website settings in HubSpot.
- SSO can be configured for one HubSpot-hosted subdomain per identity provider account. For best results, it's recommended to dedicate one subdomain for SSO membership only.
- Notification emails and login pages for private content that requires SSO will be handled by your identity provider account, rather than your private content settings in HubSpot.
- Private content that requires SSO won't be crawled by search engines and can only be viewed by contacts who have access and are logged in.
- Any page assets such as images and forms will only require SSO to access as part of the page. If the URLs to the assets themselves are provided separately, they will not require SSO to access. Learn more about setting URL visibility for assets in the files tool.
- If you turn on SSO for a domain that previously required member registration, SSO will use your original membership lists. If you turn off SSO again, the content will revert to requiring member registration for the same lists.
Set up SSO for HubSpot private content in your identity provider account
To set up SSO for private content hosted in HubSpot, your IT administrator will create a new application for HubSpot content access. To complete this process, your IT administrator will reference values from your private content settings in HubSpot.
Please note: if you require SSO for a subdomain that already hosts private content with member registration, that content will no longer be accessible to registered contacts.
The steps and fields required to add a new application in your identity provider may vary. General instructions for setting up SSO for private content are outlined below.
Set up SSO for a SAML-based application
To create a new SAML application for HubSpot private content in your identity provider account:
- Log in to your identity provider account.
- Navigate to your applications within your identity provider account.
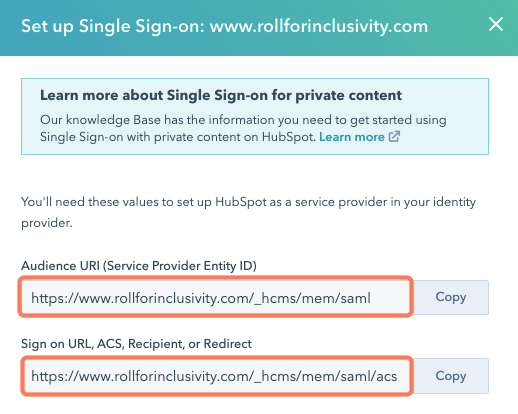
- In your HubSpot account, collect the required values for your new HubSpot application:
- In your HubSpot account, click the settings icon in the top navigation bar.
- In the left sidebar menu, navigate to Content > Private Content.
- At the top of the page, click the Choose a domain to edit dropdown menu and select a subdomain.
- In the Single sign-on (SSO) section, click Set up SSO.
- In the right panel, click the Security token format dropdown menu and select SAML.
- Copy the Audience URL and Sign on URL.
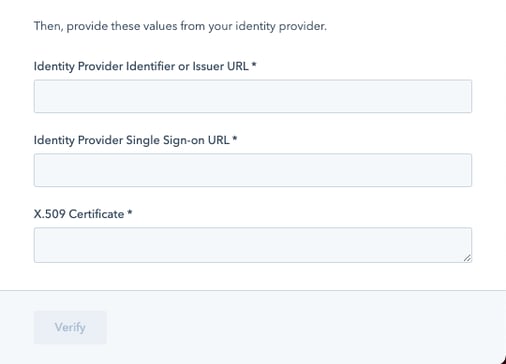
- In your identity provider account:
- Paste the Audience URL and Sign on URL copied from HubSpot into the corresponding fields.
-
- Copy the identifiers for the Issuer URL, Single Sign-on URL, and Certificate.
- In your HubSpot account:
- Paste the Issuer URL, Single Sign-on URL, and Certificate values into the corresponding fields in the Set up Single Sign-on panel.
- Click Verify.
Once the verification process is complete, you'll see confirmation that Single sign-on is enabled for your domain in your private content settings.
Set up SSO for a JWT-based application
- In your identity provider account:
- Navigate to your applications within your identity provider account.
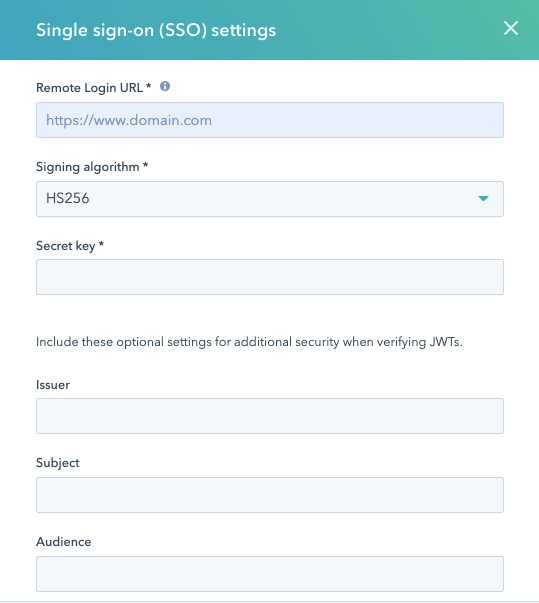
- Copy the identifiers for Remote Login URL and Secret Key. Locate the Signing algorithm.
- For added security, copy the Issue, Subject, and Audience.
- In your HubSpot account, input these values into your SSO settings:
- In your HubSpot account, click the settings icon in the top navigation bar.
- In the left sidebar menu, navigate to Content > Private Content.
- At the top of the page, click the Choose a domain to edit dropdown menu and select a subdomain.
- In the Single sign-on (SSO) section, click Set up SSO.
- In the right panel, click the Security token format dropdown menu and select JWT.
- Paste the Remote Login URL
- Click the Signing algorithm dropdown menu and select the value in your identity provider account.
- Paste the Secret Key. If using an asymmetric signing algorithm with both public and private keys, the Secret Key will be the public key.
- When using a public key, including the header and footer are not required.
- If you do include the header and footer, copy and paste the following text, then replace the placeholder with your public key:
-
-----BEGIN PUBLIC KEY-----
[your public key]
-----END PUBLIC KEY-----
-
-
- For added security, paste the Issue, Subject, and Audience.
- Click Verify.
A window will open to the 'Remote Login URL' specified within the SSO settings. The URL opened in the window will include a query parameter 'redirect_url' with a value of a URL on the domain you are configuring and the path '_hcms/mem/jwt/verify'.
For verification, a request needs to be made to the URL specified within the 'redirect_url' param after credentials are entered on the 'Remote Login URL'. This request must include a supported query param for which the value must be a JWT/hash, which once decrypted contains an 'email' field in its payload with a valid email address. Supported query params are ‘jwt’, ‘code’, ‘id_token’, and ‘access_token’.
The JWT/hash will be decrypted by HubSpot using the Signing Algorithm and Secret Key provided within the SSO settings. The sending of this subsequent request, made after valid credentials have been entered on the 'Remote Login URL' page, should be configured within your identity provider account.
Once the verification process is complete, you'll see confirmation that Single sign-on is enabled for your domain in your private content settings.
Once verification is complete, visitors who pass verification at the 'Remote login URL' should be sent to '_hcms/mem/jwt' with two query params:
- 'jwt', ‘code’, ‘id_token’, or ‘access_token’ query param with a hash that, once decrypted, contains the visitor's email address in an email field.
- 'redirect_url' query param that specifies the page where the visitor should be directed. This URL should be the same as the value of the 'redirect_url' query param in the request sent to the 'Remote login URL'.
Troubleshoot common JWT errors
If you are having trouble setting up SSO for a JWT-based application, it's recommended to verify your JSON web token using JWT's debugger.
Once you have verified your JWT, you can address the following errors:
- NO_SETTINGS: the portal and domain combination does not return any JWT settings
- COULD_NOT_PARSE_HEADER: JWT header must be present and base64 encoded
- WRONG_TYPE_IN_HEADER: JWT token header has a field "typ" and it does not equal "jwt"
- ALGORITHM_MISSING_IN_HEADER: JWT token header does not have an "alg" field for the algorithm
- NONE_ALGORITHM_PROVIDED: "alg" field is equal to "none", which is insecure and not supported
- TOKEN_VERIFICATION_FAILED: token may be empty, null, incorrect, or the query parameter is unsupported. We support “jwt”, “code”, “id_token”, and “access_token” query parameters.
- MISSING_EMAIL_IN_TOKEN: decoded token is missing an email field or it is null or empty
- INVALID_KEY: secret key is missing or invalid
- INVALID_KEY_LENGTH: secret key length does not match the selected signing algorithm’s requirements
- PRIVATE_KEY_PROVIDED: selected signing algorithm requires a public key as the secret key, but a private key was provided
- INVALID_LOGIN_URL: provided remote login URL is not valid
- JTI_CLAIM_INVALID: JWT checks cannot be replayed
Require SSO for your content
There are two options for requiring private content with SSO:
- Private - Single sign-on (SSO) required: everyone in your identity provider organization with access to the HubSpot application can log in with SSO to view the private content.
- Private - Single sign-on (SSO) required with list filtering: individuals in your identity provider organization who also have specific HubSpot list memberships can log in with SSO to view private content. These individuals must have access to the HubSpot application within your identity provider account (such as Okta or Google), but they don't need to be users in your HubSpot account.
Require SSO for a blog
You can require SSO for blogs hosted on the subdomain you've connected in your identity provider account. Turning on SSO for a specific blog will impact all blog posts published on that blog. It's not possible to require SSO for a specific blog post.
Please note: if you require SSO for a blog that already hosts private content with member registration, that blog will no longer be accessible to those contacts.
To set up SSO for a blog:
- In your HubSpot account, click the settings icon in the top navigation bar.
- In the left sidebar menu, navigate to Content > Blog.
- In the upper left, click the Select a blog to modify dropdown menu and select a blog hosted on the subdomain you've set up with your identity provider.
- In the Control audience access section, set up SSO:
- Select Private - Single sign-on (SSO) required to grant access to everyone in your identity provider organization with access to the HubSpot application.
- Select Private - Single sign-on required with list filtering to grant access to individuals in your identity provider account with access to the HubSpot application and specific list memberships. Then select the lists you want to have access to this content.
- In the lower left, click Save.
Require SSO for landing pages or website pages
You can require SSO for landing pages or website pages hosted on the subdomain you've connected in your identity provider account.
Please note: if you require SSO for a landing page or website page that is already set to private content with member registration, that page will no longer be accessible to those contacts.
To set up SSO for specific pages:-
Navigate to your content:
- Website Pages: In your HubSpot account, navigate to Content > Website Pages.
- Landing Pages: In your HubSpot account, navigate to Content > Landing Pages.
- Select the checkbox next to any page you want to require SSO.
- At the top of the table, click the More dropdown menu and select Control audience access.
- In the right panel, set up SSO for the pages you've selected, then click Save:
- Select Private - Single sign-on required to grant access to everyone in your identity provider organization with access to the HubSpot application.
- Select Private - Single sign-on required with list filtering to grant access to individuals in your identity provider account with access to the HubSpot application and specific list memberships. Then select the specific lists you want to have access to this content.
- You can also control audience access to a specific page in the Settings tab of the content editor.
Require SSO for specific knowledge base articles
You can set up SSO for specific knowledge base articles hosted on the subdomain you've connected in your identity provider account.
Please note: if you require SSO for a knowledge base article that is already set to private content with member registration, that article will no longer be accessible to those contacts.
To set up SSO for specific knowledge base articles:
- In your HubSpot account, navigate to Content > Knowledge Base.
- Click the Articles tab.
- Select the checkbox next to any article you want to require SSO.
- At the top of the table, click Control audience access.
- In the right panel, set up SSO for these articles, then click Save:
- Select Private - Single sign-on required to grant access to everyone in your identity provider organization with access to the HubSpot application.
- Select Private - Single sign-on required with list filtering to grant access to individuals in your identity provider account with access to the HubSpot application and specific list memberships. Then select the specific lists you want to have access to this content.
You can also control audience access to a specific article in the Settings tab of the article editor.
Turn off SSO for private content
Turning off SSO for private content will impact your content different depending on the setting you've selected.
- Content that's set to Private - Single sign-on required will become public.
- Content that's set to Private - Single sign-on required with list filtering will become inaccessible.
To keep your private content private when you turn off SSO, HubSpot recommends changing audience access for your private content to Private - Single sign-on required with list filtering. You can then change audience access for this content to require CMS membership registration instead.
To turn off SSO for private content:
- In your HubSpot account, click the settings icon in the top navigation bar.
- In the left sidebar menu, navigate to Content > Private Content.
- At the top of your settings, click the Choose a domain to edit dropdown menu and select a domain.
- In the Single sign-on (SSO) section, click Manage SSO.
- At the bottom of the panel, click to toggle the SSO Enabled switch off.
