- Knowledge Base
- Content
- Design Manager
- Create, edit, and attach CSS files to style your site
Create, edit, and attach CSS files to style your site
Last updated: February 11, 2025
Available with any of the following subscriptions, except where noted:
CSS (Cascading Style Sheets) files are coded files that select elements of your page and control their presentation. CSS files cannot be attached to emails or email templates.
This article walks through creating, publishing, and attaching a CSS file in HubSpot. You can learn how to make simple design changes to a particular page. If you're using a theme template, learn how to edit your theme settings.
Create a new CSS file
- In your HubSpot account, navigate to Content > Design Manager.
- Click the folder icon folder in the upper left-hand corner to expand the sidebar menu. Then click File > New file.
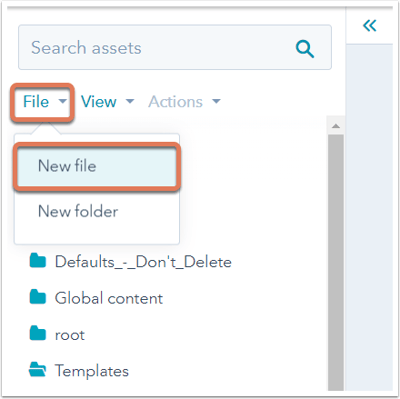
- In the dialog box, click CSS stylesheet. Then enter a name for your CSS stylesheet and click Create.
Edit the CSS file
Once you have created or opened an existing CSS file, make your edits in the code editor. In addition to standard CSS, the code editor supports HubL variables and macros to make maintaining your CSS easier. To preview how your HubL will render, click to toggle the Show output switch on at the top of the editor. A panel will open on the right with the rendered preview.

To see a list of standard CSS selectors for HubSpot templates, check out Boilerplate CSS.
Before publishing, check your code for HubL errors. There are three places to find HubL errors or warnings in a custom module or coded file:
- In the error console along the bottom of the code editor.
- In the error gutter along the left-hand side of the code editor.
- In the scroll bar on the right-hand side of the editor.
Errors preventing you from publishing will be in red, while general warnings will be in yellow. At the bottom of the code editor, click Show details to see more information on the errors in the error console and Hide details to collapse the error console.
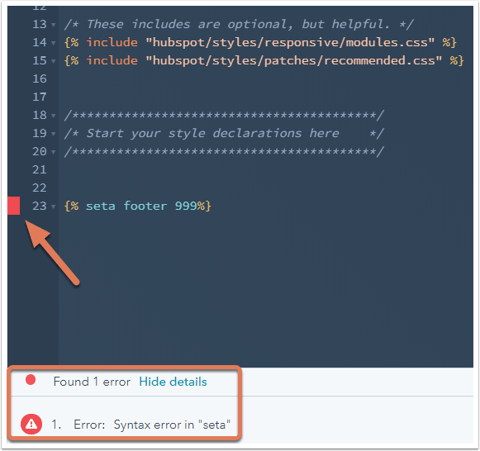
In the error console, there will be links to wherever there are HubL errors or warnings in your code or custom module. Hover over the red error indicators on the left-hand side of the code editor to see the error or warning in your code. Clicking the error will cycle your cursor to all errors or warnings on that line. Clicking a scrollbar annotation will bring you to that part of the file.
You can also click a line number within the code editor and have the URL of the file update accordingly. This allows you to share a link to your code with others and direct them to exactly where you're working within the file.
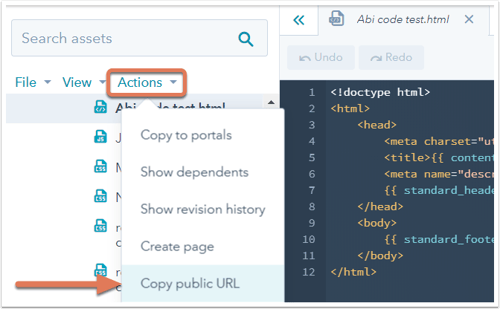
After editing the file, click Publish changes in the upper right. If you'd like to call this stylesheet in another coded template, copy the sheet's URL by clicking Actions > Copy public URL in the left sidebar menu.
Attach to template
In HubSpot, you can attach stylesheets to your content in a few different ways. Below is the order in which attached stylesheets are linked on your site:
- public_common.css*: a stylesheet primarily used by HubSpot's app, but also for certain site features.
- Header HTML in settings under Website > Pages: link tags added to the global <head> of the site.
- Layout.css **: default responsive CSS file attached to all drag-and-drop template layouts.
- Attached stylesheets in settings under Website > Pages: stylesheets attached to your entire site.
- Attached stylesheets in settings under Website > Blog: stylesheets attached to your blog (overrides site global sheets).
- Linked stylesheets***: stylesheets attached in the template layout.
- Additional <head> markup in the template: link tags added to the <head> of a particular template layout.
- Page-specific stylesheets: stylesheets attached in a page's settings.
- Page head HTML: link tags added to the <head> of a particular page in the page's settings.
* Required
** Required for drag and drop layouts
*** Recommended method of stylesheet attachment for template layouts
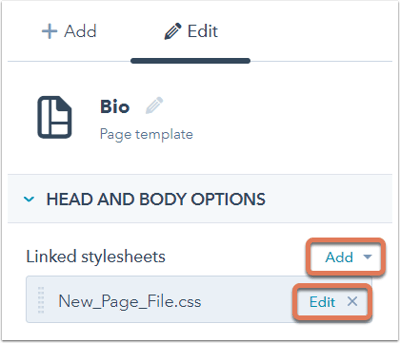
To attach stylesheets to a template, open the template in your design manager. In the right sidebar menu under Head and Body Options, select a file from the Add dropdown menu next to Linked stylesheets.
You can edit or remove a stylesheet that's already attached by hovering over it and clicking Edit to make changes to it or the X to remove it.
After adding a stylesheet, click Publish changes in the upper right-hand corner to apply your changes to the live pagess using the template.
Attach or remove stylesheets on a specific page (Marketing Hub Professional and Enterprise only)
Please note: this option isn't available for theme templates. Learn how to edit your theme settings.
To add or remove a page-specific stylesheet from the settings section of the page editor:
-
Navigate to your content:
- Website Pages: In your HubSpot account, navigate to Content > Website Pages.
- Landing Pages: In your HubSpot account, navigate to Content > Landing Pages.
- Click the name of your page.
- In the content editor, click the Settings menu and select Advanced.
- In the Page Stylesheets section of the dialog box, click the Attach a stylesheet dropdown menu and select a stylesheet. To remove a stylesheet, click X next to that stylesheet.
- To turn off stylesheets that are inherited from the template or domain, click the dropdown menu next to the stylesheet and select Disabled.

Attach or remove domain stylesheets (Marketing Hub Professional and Enterprise only)
Please note: theme templates must include the annotation enableDomainStylesheets: true in order to use domain-level stylesheets. Learn more about template annotations.
To add or remove a stylesheet from all content on a domain:
- In your HubSpot account, click the settings settings icon in the top navigation bar.
- In the sidebar menu, click Website > Pages.
- Click the dropdown menu to select the domain you want to update settings for.
- On theTemplates tab, scroll to CSS & Stylesheets. To add a stylesheet, click + Add style sheet. Click the X beside an attached stylesheet to remove it.
- Click Save.

Please note: when downgrading to HubSpot’s Starter or free tools, attached domain-level stylesheets will remain active until you remove them. Once all stylesheets are removed, you can no longer attach stylesheets at the domain-level. Learn more about downgrading a subscription.
