- Knowledge Base
- Content
- Website & Landing Pages
- Set up site navigation menus
Set up site navigation menus
Last updated: September 23, 2025
Available with any of the following subscriptions, except where noted:
When building your website, you'll spend time organizing the information architecture of your content. Your navigation menus will include the most important pages that your website visitors will want to access quickly or frequently while browsing your site. After you've organized your website and menus, you can customize your sitemap in HubSpot.
Create a new menu
A menu can contain a few important pages from your site, or have a hierarchy of pages using parent and child menu items. These menus can be selected in an advanced menu module in your templates in the design manager tool.
To create a new menu in settings:
- In your HubSpot account, click the settings settings icon in the top navigation bar.
- In the left sidebar menu, navigate to Content > Navigation menus. Your default menu contains the pages that'll automatically populate the default content of an advanced menu module.
- Click the navigation dropdown menu and then click + Add menu.

- To create a copy of an existing advanced menu, click the More dropdown menu in the top right, then select Clone.
To create a new menu in the global content editor:
-
Navigate to your content:
- Website Pages: In your HubSpot account, navigate to Content > Website Pages.
- Landing Pages: In your HubSpot account, navigate to Content > Landing Pages.
- Blog: In your HubSpot account, navigate to Content > Blog.
- Click the name of a page or post or click Create in the top right.
- In the content editor, click the siteTreeIcon content icon and then click the globalGroupIcon global content icon for the global module.
- In the global content editor, click the siteTreeIcon content icon and then click the module containing the navigation menu.
- In the sidebar editor, click Create new below the Menu field.
- In the dialog box, continue to add menu items, pages, and child pages. Learn more about editing content in the global content editor.
- When finished, click Publish to [#] assets.
Add menu items
You can add menu items to a navigation menu in the settings or within the global content editor. You can also add child menu items.
To add menu items in settings:
- In your HubSpot account, click the settings settings icon in the top navigation bar.
- In the left sidebar menu, navigate to Content > Navigation menus.
- Click the navigation dropdown menu to select an existing menu to update.
- At the bottom of the existing navigation menu, click the + Add menu item dropdown menu and select an option:
- Add item without link: adds a menu item that doesn't link to an existing page. This is often used as a placeholder for child menu items.
- Add page link: adds a menu item that links to a specific HubSpot page.
- Add Page link with URL parameter: adds a menu item that links to a specific HubSpot page. With this option, you can type to enter the exact URL of the page you want.
- Add URL link: adds a menu item that links to an external URL.
- To reorder a menu item, click the dragHandleIcon drag handle icon next to the menu item, and drag it into a new position.
- To have a menu item URL link open in a new window, hover over the right side of the menu item, click the Actions dropdown menu, and select the Open link in new window checkbox.
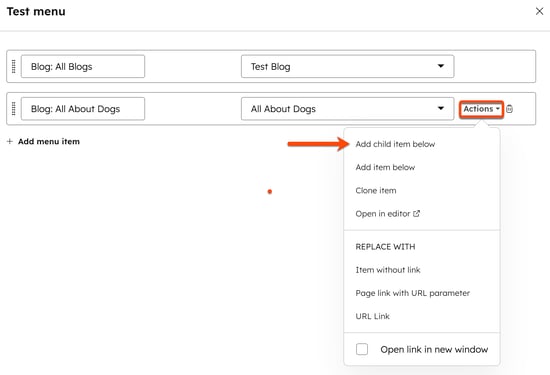
- To add a child menu item, hover over the right side of the menu item, click the Actions dropdown menu, and select Add child item below.
- Enter a name for the menu item in the Menu item label field.
- Click the Select a page dropdown menu to select a page for the link. To enter a URL manually, click Actions and select URL Link to change the child menu item type.
- When finished, click Save in the top right.

To add menu items in the global content editor:
- Navigate to your content:
- Website Pages: In your HubSpot account, navigate to Content > Website Pages.
- Landing Pages: In your HubSpot account, navigate to Content > Landing Pages.
- Blog: In your HubSpot account, navigate to Content > Blog.
- Click the name of a page or post or click Create in the top right.
- In the content editor, click the siteTreeIcon content icon and then click the globalGroupIcon global content icon for the global module.
- In the global content editor, click the siteTreeIcon content icon and then click the module containing the navigation menu. In the sidebar editor, click Edit.
- In the dialog box, at the bottom of the existing navigation menu, click the + Add menu item dropdown menu and select an option:
- Add item without link: adds a menu item that doesn't link to an existing page. This is often used as a placeholder for child menu items.
- Add page link: adds a menu item that links to a specific HubSpot page.
- Add Page link with URL parameter: adds a menu item that links to a specific HubSpot page. With this option, you can type to enter the exact URL of the page you want.
- Add URL link: adds a menu item that links to an external URL.

Please note: when adding a URL link, you must enter the full URL including the http or https protocol.
- To reorder a menu item, click the dragHandleIcon drag handle icon next to the menu item, and drag it into a new position.
- To have a menu item URL link open in a new window, hover over the right side of the menu item, click the Actions dropdown menu, and select the Open link in new window checkbox.
- To add a child menu item, hover over the right side of the menu item, click the Actions dropdown menu, and select Add child item below.

-
- Enter a name for the menu item in the Menu item label field.
- Click the Select a page dropdown menu to select a page for the link. To enter a URL manually, click Actions and select URL Link to change the child menu item type.
- When finished, click Save.
- To take your changes live, click Publish to [#] assets in the top right.
Create a secondary menu
You can create multiple menus for your site. A secondary menu could be used on a specific page, or to provide additional navigation on your page footer.
To create a secondary menu in settings:
- In your HubSpot account, click the settings settings icon in the top navigation bar.
- In the left sidebar menu, navigate to Content > Navigation menus.
- Click the navigation dropdown menu and then click + Add new.
- Enter a name for the navigation menu.
- Then complete the steps to add menu items.
To create a secondary menu in the global content editor:
-
Navigate to your content:
- Website Pages: In your HubSpot account, navigate to Content > Website Pages.
- Landing Pages: In your HubSpot account, navigate to Content > Landing Pages.
- Blog: In your HubSpot account, navigate to Content > Blog.
- Click the name of a page or post or click Create in the top right.
- In the content editor, click the siteTreeIcon content icon and then click the globalGroupIcon global content icon for the global module.
- In the global content editor, click the siteTreeIcon content icon and then click the module containing the navigation menu. In the sidebar editor, click Create new.
- Then complete the steps to add menu items.
View revisions to a menu
You can view and restore previously published versions of your menu in the revisions history. Each version includes a date, timestamp, and which user created the revision.
To view a menu's revision history in settings:- In your HubSpot account, click the settings settings icon in the top navigation bar.
- In the left sidebar menu, navigate to Content > Navigation menus.
- Click the navigation dropdown menu to select an existing menu to update.
- Click the More dropdown menu and select Show revisions.
- In the dialog box, in the left column, click on a timestamp to review the menu's content from that date and time.
- To restore a previously published version of your menu, click Choose on the bottom left.
- When finished, click Save.

- Navigate to your content:
- Website Pages: In your HubSpot account, navigate to Content > Website Pages.
- Landing Pages: In your HubSpot account, navigate to Content > Landing Pages.
- Blog: In your HubSpot account, navigate to Content > Blog.
- Click the name of an existing page or post.
- In the content editor, click the siteTreeIcon content icon and then click the globalGroupIcon global content icon for the global module.
- In the global content editor, click the siteTreeIcon content icon and then click the module containing the navigation menu. In the sidebar editor, click Edit.
- In the dialog box, click the More dropdown menu and select Show revisions on the bottom left. You'll be directed to the navigation menu settings.
- In the dialog box, in the left column, click on a timestamp to review the menu's content from that date and time.
- To restore a previously published version of your menu, click Choose on the bottom left.
- When finished, click Save.
