- Knowledge Base
- Account & Setup
- Connected Email
- Troubleshoot the HubSpot Sales Chrome extension
Troubleshoot the HubSpot Sales Chrome extension
Last updated: October 24, 2025
Available with any of the following subscriptions, except where noted:
Follow the troubleshooting steps below to resolve common issues with the HubSpot Sales Chrome extension.
Updates
If you're having issues installing or using the Chrome extension, try updating your Chrome browser and your extension.
Please note: Google's Rapid Release track is not compatible with the extension. If you're using this version, talk to your IT team about switching to the default release track.
Update your Chrome browser
It's highly recommended to update Chrome to the latest version.
- In the top right of your Chrome browser, click the three vertical dots icon. Then select Help > About Google Chrome.
- On the About page, click Update Google Chrome. If you don't see this option, then you are on the most up-to-date version of Google Chrome.
- Click Relaunch.
Once Chrome reopens, you'll be on the most up-to-date version.
Update your HubSpot Sales Chrome extension
Chrome automatically checks for updates, but the updates do not always happen in real-time. Therefore, you may occasionally need to manually update your extension.
If you have installed the extension through the Chrome Web Store:
- In the top right of your Chrome browser, click the Extensions icon and select Manage Extensions.
- In the top right, click to toggle the Developer mode switch on.
- Click Update. Refresh the page to see the version number change.

If you have installed the extension through your Google Admin:
- Update the HubSpot Sales Chrome extension to the latest version.
- If you're managing extensions using a local policy or a group policy, configure the ExtensionSettings policy in Chrome.
- If you're using the Google Admin console to manage Chrome policies, learn how to automatically install apps and extensions.
Accessibility
When the Chrome extension is successfully installed, the HubSpot sprocket icon will appear in your Google Chrome navigation bar. When you load your Gmail inbox, the HubSpot sprocket icon will also appear in your in your inbox, with a green dot indicating that the extension is turned on. If the extension does not appear in your browser and/or email inbox, review the troubleshooting steps below.
Extension is not appearing in Google Chrome
If the extension does not appear in your Google Chrome navigation bar:
Make sure the extension is not hidden:
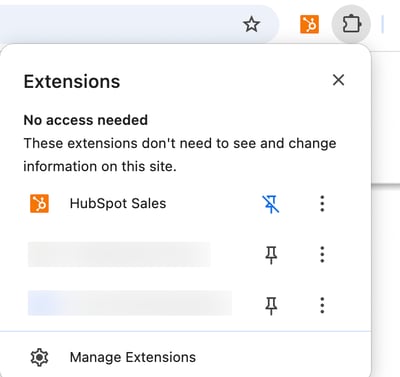
- In the top right of your Chrome browser, click the Extensions icon.
- Next to HubSpot Sales, click the pin iconet to pin the extension to the toolbar.
Make sure the extension is allowed in Chrome:
- In the top right of your Chrome browser, click the three vertical dots icon. Then select Settings.
- In the Privacy and security section, click Cookies and other site data.
- Ensure that you have the following options set:
-
- Allow all cookies – Turned on
- Block all cookies (not recommended) – Turned off
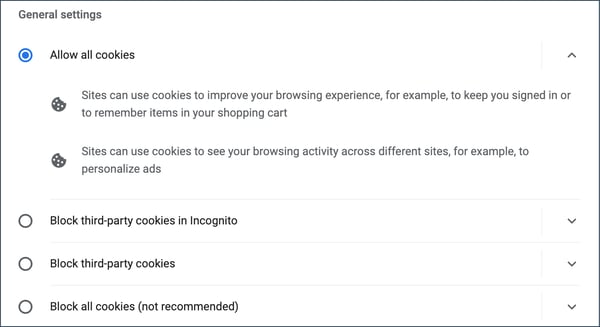
- If you have Block third-party cookies turned on, you should add the following to your Sites that can always use cookies list:
- [*.]getsidekick.com
- [*.]hubspot.com
- [*.]hsappstatic.net

Make sure the extension is turned on:
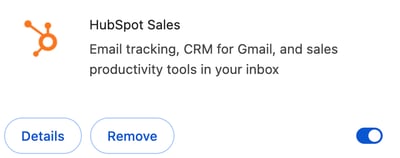
- In the top right of your Chrome browser, click the Extensions icon and select Manage Extensions.
- Locate the HubSpot Sales extension and click to toggle the HubSpot Sales switch on.
Log in to the correct Chrome profile
Google Chrome extensions are tied to your Google Chrome profile. If you downloaded the HubSpot Sales extension while logged into one Google Chrome profile but are currently logged into another profile, the extension may not appear in your browser window. To see which Google Chrome profile you're currently using and switch to another profile:
- Click the Chrome account menu button in the top-right corner of your browser window to view the name and email for the current profile.
- Click on the name of another user to switch profiles or go to Manage Chrome Profiles and click Add to add a new login for Chrome.
Extension is not appearing in Gmail
If you are not seeing the HubSpot Sales Chrome extension in your Gmail account, below are some common causes and troubleshooting steps:
Turn off conflicting advanced settings
Follow the steps below to identify and turn off any conflicting settings on the Advanced tab:
- Click the gear icon in the top right of your inbox, then select Settings.
- Click the Advanced tab.
- If you have any advanced features turned on, they will be shown at the top of the list as Enabled. Disable all advanced features, and then click Save Changes at the bottom of the page.
- Reload your inbox and see if HubSpot Sales appears.
Clear your browser cache
If HubSpot Sales still does not appear in Gmail, clear your cache and cookies in your Chrome browser:
- Go to chrome://settings/clearBrowserData in Chrome.
- Click the Time range dropdown menu and select All time.
- Select the Cached images and files checkbox and the Cookies and other sites checkbox.
- Click Clear browsing data.
Turn off conflicting Chrome extensions
Some Chrome extensions can conflict with the HubSpot Sales extension. The following extensions are known to conflict with the HubSpot email extension:
- AdBlock
- Apollo
- Bomb Bomb
- Boomerang
- DuckDuckGo
- Ghostery
- Gmail - reply from top
- MailTrack
- Privacy Badger
- Streak
- Yesware
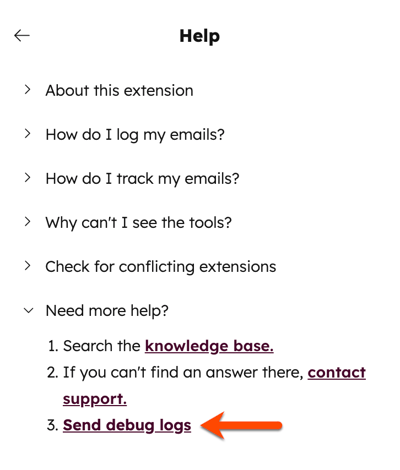
You can check for known conflicting extensions directly from the Help & troubleshooting section of the Chrome extension settings.
- In your Gmail inbox, click the sprocket sprocket icon the top right, then select Help & troubleshooting.
- Click to expand the Check for conflicting extensions section.
- Click Check for conflicting extensions.
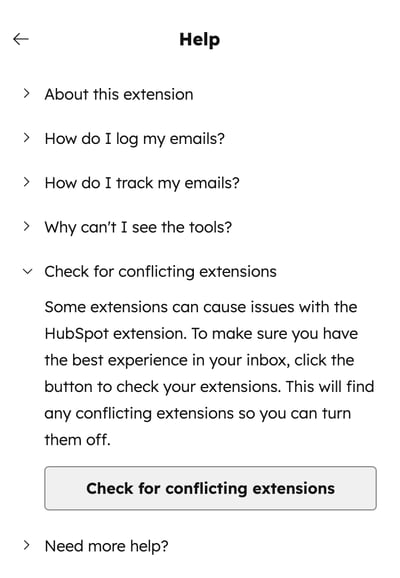
The conflicting extension installed will appear here. Turn off the extension then check to see if HubSpot Sales appears in your inbox.
Other Chrome extensions may also conflict with HubSpot in addition to the extensions listed above. If you turn off all of your Chrome extensions and HubSpot Sales successfully appears in your inbox, then it is likely that another extension is interfering with HubSpot.
Exit incognito mode
The HubSpot Sales Chrome extension will not display if your browser window is in incognito mode for private browsing. To exit incognito mode, close all incognito windows.
Tracking
If your emails are not tracking, below are troubleshooting steps to take in Gmail and in your Chrome browser.Troubleshooting in Chrome for emails not tracking
Try the below troubleshooting steps in your Chrome browser if emails are not tracking:
Turn off conflicting Chrome extensions
Some Chrome extensions can conflict with email tracking. The following extensions are known to conflict with the HubSpot email extension:
- AdBlock
- Bomb Bomb
- Boomerang
- Ghostery
- Gmail - reply from top
- MailTrack
- Privacy Badger
- Yesware
Check for known conflicting extensions directly from the Help & troubleshooting section of the Chrome extension settings:
- In your Gmail inbox, click the sprocket sprocket icon the top right, then select Help & troubleshooting.
- Click to expand the Check for conflicting extensions section.
- Click Check for conflicting extensions.

The conflicting extension installed will appear here. Turn off the extension, then send a tracked email to bh@hubspot.com. If the email is tracked successfully, then the extension is interfering with HubSpot Sales.
Other Chrome extensions may also conflict with HubSpot in addition to the extensions listed above. To determine which extension is interfering with tracking, turn off all of your Chrome extensions, then send a tracked email to bh@hubspot.com. If the email is tracked successfully, turn on each extensions one-by-one. After turning on each extension, send a tracked email to bh@hubspot.com to determine which extension is conflicting with HubSpot Sales.
Uninstall and reinstall the extension
If there aren't any conflicting Chrome extensions, try uninstalling and reinstalling the extension. Then resend a test email to bh@hubspot.com.
Turn off VPN software
VPN software installed on your device can interfere with email tracking. If you're using a VPN software, such as NordVPN, the connection may block the tracking request from reaching HubSpot, causing emails to not be tracked propertly.
To troubleshoot, try temporarily disabling the VPN and send a tracked test email to bh@hubspot.com. If the email is tracked successfully, disabling your VPN while using HubSpot for optimal performance.
Troubleshooting in Gmail for emails not tracking
Try the below troubleshooting steps in your Gmail account if emails are not tracking:
Ensure that the Track box was checked
If the track email box was not selected, the tracking pixel that the extension uses to track email opens will not be inserted in the email.
To check if the tracking pixel was inserted in a sent email, access the source content of the email in Gmail by clicking the dropdown arrow icon in the upper right corner of the sent email, then select Show original. Look for code similar to the following:
<img src=3D"http://t.sidekickopen69.com/e1t/o/5/f18dQhb0S7ks8dDMPbW2n0x6l2B= 9gXrN7sKj6v5dlMTVfn3cs3M2y_-W2B89RP1pctGFW8mdf1T1k1H6H0?si= 3D56803726671216=64&pi=3D01cd79e8-c6c3-455d-d1aa-5175f2b770de&ti=3Dundefined" style=3D"display:none!important" height=3D"1" width=3D"1">
Switch from Plain Text to HTML mode
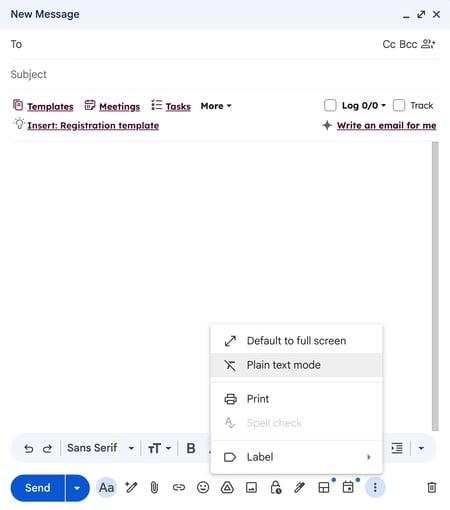
HubSpot Sales is unable to track emails if they are sent in Plain Text mode. If you see that emails are being sent in Plain Text, switch to HTML mode.
- Compose a new email in Gmail.
- Click the three vertical dots icon in the bottom right of the email composer and select Plain text mode to turn off plain text.
Notifications
The most common issues with notifications pertain to notifications for the wrong email account or real-time notifications not appearing.Notifications are not appearing
If you're not receiving real-time notifications for tracked email activity, check the following:Ensure that notifications are turned on and you're signed in to the correct HubSpot account
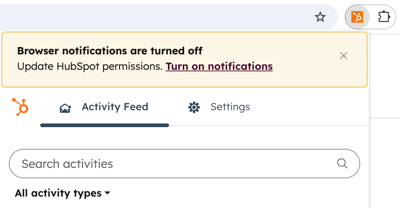
- Make sure that notifications are turned on in the HubSpot Sales Chrome extension.
- In the top right of your Chrome browser, click the Extensions icon.
- Click HubSpot Sales.
-
- If a banner appears at the top of the activity feed window with the title Browser notifications are turned off, click Turn on notifications.
- If you are using both Google Chrome and Outlook, it's possible you could be signed into one HubSpot account in Google Chrome and a different account in Outlook. Ensure that you're signed into the correct account in both platforms.
Ensure that your Chrome settings are not blocking HubSpot notifications
Occasionally, some Chrome settings can prevent HubSpot Sales notifications from appearing. Ensure your browser is not blocking pop-up notifications by navigating to your Chrome settings:
- In the top right of your Chrome browser, click the three vertical dots icon. Then select Settings.
- In the left panel, click Privacy and Security.
- Click Site Settings. Older versions of Chrome label this as Content settings.
- Click Notifications.
- Select Sites can ask to send notifications.
- In the Allow to send notifications section, click Add. In the pop-up box that appears, type [*.]hubspot.com in the Site field and then click ADD.
- Navigate back to your Chrome Site Settings and click Third-party cookies.
- In the Sites allows to use third-party cookies section, click Add.

- In the dialog box that appears, type [*.]hubspot.com in the Site field and click ADD.
- Send a tracked email to bh@hubspot.com. You should see a real-time notification pop-up in Chrome.
Turn off conflicting Chrome extensions
Some Chrome extensions conflict with notifications. To resolve this:
- In the top right of your Chrome browser, click the three vertical dots icon. Then select Extensions > Manage Extensions.
- Temporarily turn off all extensions, except HubSpot Sales.
- Send a tracked email to bh@hubspot.com.
You can also check for known conflicting extensions from the Chrome extension settings.
Turn off conflicting advanced settings
Follow the steps below to identify and turn off any conflicting settings on the Advanced tab:
- Click the gear icon in the top-right corner of your inbox, then select Settings.
- Click the Advanced tab.
- If you have any advanced features turned on, they will be shown at the top of the list as Enabled. Turn off all advanced features, and then click Save Changes at the bottom of the page.
- Reload your inbox and see if HubSpot Sales appears.
Ensure that notifications aren't turned off on your device
Check your Mac or Windows device's settings and make sure that you haven't turned off notifications on your device.
Receiving notifications for a friend's email account
If multiple people are sending emails from their Gmail accounts in the same Google Chrome browser, HubSpot Sales will automatically track that email send in the HubSpot Sales account that is logged in.
As a result, you might begin getting notifications for emails that you never sent or do not recognize.
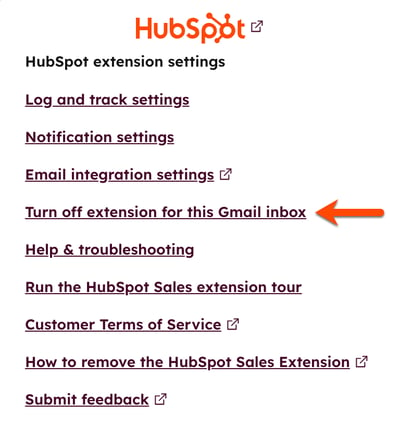
To stop the extension from tracking the other person's emails, you can ask whomever is sending emails from your computer to turn off the extension in their inbox following the steps below:
- In the upper right of your Gmail inbox, click the sprocket icon sprocket.
- Select Turn off extension for this Gmail inbox.
- Create a separate Chrome profile for each individual that uses the computer. Anyone else using your computer will be able to check their email in a separate Chrome profile, preventing your sales extension from tracking their emails.
Stuck notifications on screen
If you're noticing notifications freezing on your desktop, you may need to restart Gmail by logging out, closing your Chrome browser, and then logging into Gmail again in Chrome.
Alternatively, if you're on a Mac, you can enter fullscreen mode and then exit fullscreen to see if the notifications are removed. This can be done by clicking the green circle in the upper left-hand corner of your Chrome window.
If you're still seeing a frozen notification, you may need to restart your computer.
Errors
The below troubleshooting steps addresses error while operating and installing the HubSpot Sales Chrome extension.Network error in Chrome
When installing the HubSpot Sales Chrome extension, you may see a Network Failed error message. This notification comes directly from your Chrome browser. There are a couple of contributing factors:
- There may be a slow connection between the Chrome Web Store and your computer, which would cause a timeout.
- There may be security software installed on your computer preventing you from downloading a mail extension to your Chrome browser. Try either lowering your security settings or connecting with your IT team to see if they allow a mail tracking tool to be installed in browsers. By relaxing the security on which extensions you are able to download, you may then be able to install the extension.
Account connection error
If you haven’t selected a HubSpot account for your sales activities to sync to, you will see an alert in the HubSpot sprocket icon in the upper right of Gmail.
Clicking this sprocket icon sprocket will open a window prompting you to select an account for your sales email activity to sync to.
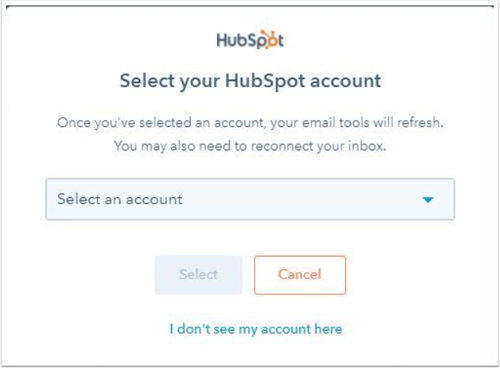
If you don't see your account listed in the Select an account dropdown menu or only see No results found, then click I don't see my account here to see all of your accounts.
Debug logs
When working with HubSpot's support team to troubleshoot the HubSpot Sales Chrome extension, you may be asked to provide debug logs. When the extension is installed, it stores information in report logs. If your extension isn't functioning as expected, send these logs to support to help pinpoint the issue.
- In the top right of your Gmail inbox, click the sprocket icon sprocket. Then select Help & troubleshooting.
- Click to expand Need more help?, then select Send debug logs. An email composition window will pop open with information about your extension and any error logs.
- Click Send. If you're working with a HubSpot support rep, add the support representative's email address in the To field before sending the email.
