Last updated: December 3, 2025
Available with any of the following subscriptions, except where noted:
Each object index page has views that show groups of records based on specific criteria. For each view, you can customize which properties are shown as columns in the table. You can also select a property to sort the records by and the order of the sort. You can manage your columns individually or in bulk.
If you're viewing deals, tickets, or custom object records in board view, learn how to customize the board view.
Add, move, or remove an individual column
Permissions required The user who created the view tab or Super Admin permissions are required to save changes made to a view tab.
You can manage columns in an index view with actions such as, sort, freeze, add, remove, or reorder.
- Navigate to a view tab.
- Click the three vertical dots icon in an existing column and select one of the following:
- Sort ascending: sort from lowest to highest value.
- Sort descending: sort from highest to lowest value.
- Freeze column: keep the column present when scrolling the properties table.
- Add column: add an existing property or create a new text, number, date, file, user, or enumeration property. Creating a new property opens a right panel on the index page.
- Remove column: remove the property from the view.

- Use the drag handle of a column to place it in the desired position.
- Click Save to save your changes.
Add, reorder, or remove multiple columns
Permissions required The user who created the view tab or Super Admin permissions are required to save changes made to a view tab.
In the column editor, customize multiple property columns in a view at once. You can also select columns to remain visible when scrolling horizontally through the properties table.
- Navigate to a view tab.
- Click the view type button and select Table view.
- Click Edit columns.
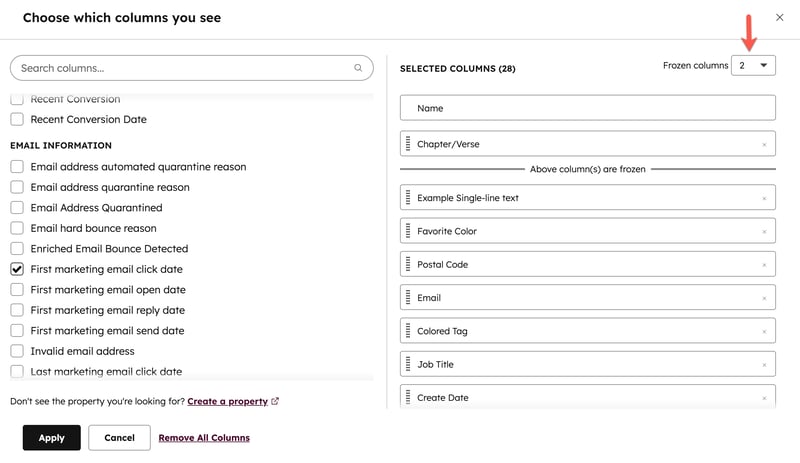
- In the dialog box:
- Add properties: add a property as a column. In the Choose which columns you see section, select the property's checkbox.
-
Reorder properties: arrange display of the properties. In the Selected columns section, use the drag handle to place properties.
- Move to the top: set a property as the second column in the view. In the Selected columns section, hover a property, then click Move To Top. By default, the record's name will be the first column and cannot be removed.
-
Remove properties: remove a column. In the Selected columns section, click the x next to a property. If you want to clear all columns, click Remove All Columns.
- Freeze properties: retain the left most columns in the view. In the Selected columns section, click the Frozen columns dropdown menu and select a number. Freeze up to three properties. The number you select will always include the primary display property, so selecting 1 will freeze only the default first column (e.g., First name for contacts).
- When you're finished, click Apply.
- Click Save.