- Knowledge Base
- Account & Setup
- Account Management
- Create a sandbox and deploy changes to production
Create a sandbox and deploy changes to production
Last updated: December 15, 2025
Available with any of the following subscriptions, except where noted:
-
Marketing Hub Enterprise
-
Sales Hub Enterprise
-
Service Hub Enterprise
-
Data Hub Enterprise
-
Content Hub Enterprise
-
Smart CRM Enterprise
-
Commerce Hub Enterprise
Permissions required Super Admin permissions are required to create a sandbox and deploy changes to production.
Before you get started
Understand requirements
You must create a new standard sandbox to use the deploy to production feature.Deploy to production isn't supported in legacy sandbox.
Limitations & considerations
- You'll have access to one additional sandbox (standard sandbox) in your account until March 16th, 2025.
- By default, all Super Admins in production will be copied to the sandbox at creation.
- After creation, when you add a Super Admin to the production account, you'll need to manually add them to the sandbox account.
- After creation, when a Super Admin is removed from the production account, they will automatically be removed from the sandbox account.
- Learn more about which object configurations and assets are supported in the deploy to production feature.
- Contact, company, deal, ticket, and custom object IDs will have different IDs between sandbox and production accounts. You can consider creating a new custom property (e.g. External record ID) and use automations to copy production record IDs into this field, which you can then use in your sandbox if needed for testing purposes.
- You can only enroll 100,000 records per day in all workflows for the entire sandbox account. Any additional workflow enrollments past the maximum will be dropped. You'll be notified in your account when the cap has been reached, and the time you'll be able to sync again.
- If a certain asset type doesn't copy to a standard sandbox account at creation, assets that are dependent on that asset type will also not sync. For example, since surveys aren't eligible to copy to standard sandbox accounts, all workflows that use surveys as triggers or actions won't be copied.
- Integrations in your production account won't be connected automatically to the standard sandbox account. For any existing integrations you want to connect to a sandbox account, HubSpot recommends connecting to the sandbox version of that integration to prevent disruptions to your CRM data.
Create a standard sandbox
To create the sandbox:
- In your HubSpot account, click the settings settings icon in the top navigation bar.
- In the left sidebar menu, select Sandboxes.
- Click Create sandbox.

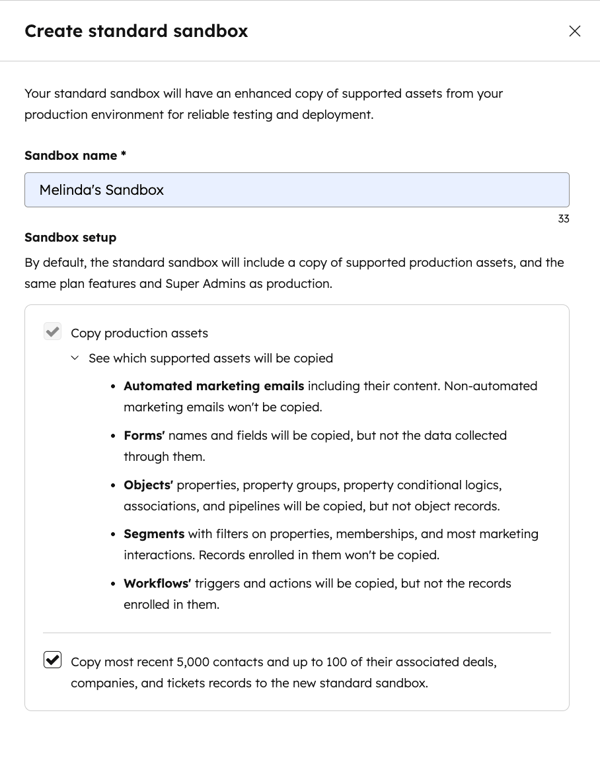
- In the right panel, under Sandbox name, enter the name of the sandbox.
- The Copy production assets checkbox will be selected by default as the sandbox must mimic your production account. Click the downIcon Down icon to review the list of assets that'll be copied to your sandbox.
- Select the Copy 5,000 contacts and associated records checkbox to copy your 5,000 most recently updated contacts, and up to 100 of their associated deals, companies, and tickets (per contact).

Please note: you can copy 5,000 contacts and associated records when creating your standard sandbox.If you don't copy records during the sandbox creation, you can export and import test records to your sandbox at a later date.You can manually import up to 200,000 contacts, companies, deals, tickets, custom objects, carts, invoices, marketing events, and orders per type record type. For the remaining record types, learn how to track your CRM data usage.
- Click Create standard sandbox.
- The process to create the sandbox may take a few hours, depending on how many assets, production plan features, and Super Admins need to be copied from your production account. Learn how Super Admins are handled in sandbox accounts.
- The creation status will be displayed on the Activity Log tab, under the Status column.
- Once created, the status will update, and you'll receive an email notification.

- Click the status next to the sandbox to view the creation details.
- Click the Failed assets tab to see any failed assets and the error details.
- Click the Copied assets tab to see a list of created assets.

Access the standard sandbox
All Super Admins who were copied during sandbox creation can access a sandbox from their main account menu.
- In your HubSpot account, click your account name in the upper right.
- Hover over your account name to see a list of your recent accounts.
- In the dropdown menu, click the name of the sandbox you want to access.

- A banner will display at the top of the window, showing that you're in the standard sandbox account.

Super Admins can also access a sandbox from account settings:
- In your HubSpot account, click the settings settings icon in the top navigation bar.
- In the left sidebar menu, select Sandboxes.
- Click the name of the sandbox you want to access.
- To exit a sandbox account, in the upper right, click your production account name.
Set up a production deploy
Once you have made your changes in your sandbox, you can deploy supported assets to your production account. To set up a production deploy, navigate to your production account, then:
- In your HubSpot account, click the settings settings icon in the top navigation bar.
- In the left sidebar menu, select Sandboxes.
- Hover over the sandbox, click Actions, then select Set up a deploy.
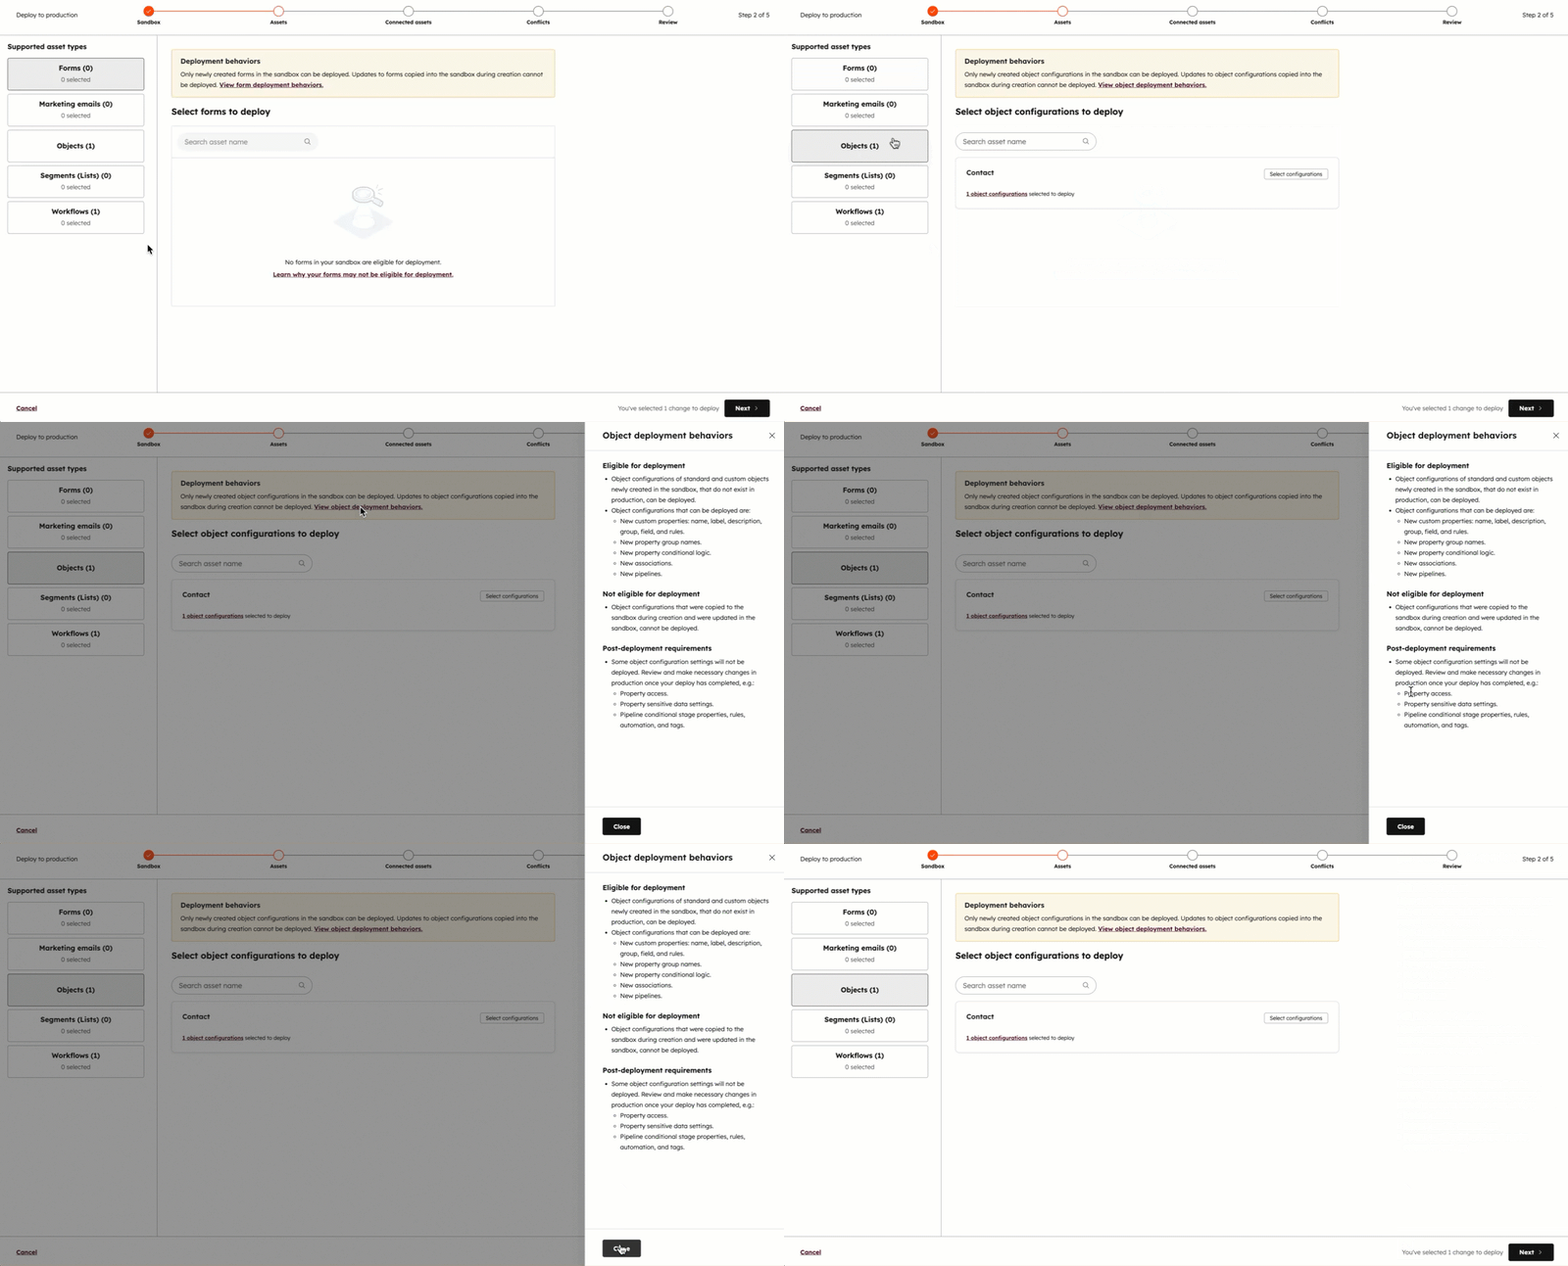
- In the Supported asset types column, select the assets you want to deploy. If you're deploying objects, next to the assets, click Select configuration.
- To understand what's eligible to deploy with each asset, in the top banner, click View [X] deployment behaviors. In the right panel, review the information. Then, click Close.

- Select the checkbox next to each change that's eligible to be deployed. If you're deploying objects, this will be in the right panel, and you must click Save selection.
Please note: you can deploy up to 300 changes at a time.
- Click Next.
- Any connections will display at the Connected Assets step. Connected assets are other assets that are used by your selected assets and which are required for your deployment.
- Click View object configurations in the Name column to view what'll be deployed, based on the connection.
- Click x selected assets in the Used by column to view the connections.
-
To include the configuration in the deployment, click the Add x connections to my deploy to continue checkbox, then click Next.
- Any conflicts will be automatically detected. Review the error, and resolve any conflicts to proceed with the deployment. If no conflicts are detected, click Next.
- In the Deploy name field, enter a name for your deploy. In the Description field, enter a description. Click Next.
- Review your production deployment. When you're ready, click Deploy to Production.
- Click Deploy to production to confirm.

- Once the deployment has started, the production Activity log tab will show the Status column In progress. Once a deployment has started, it can't be canceled.
- Once the deployment is complete, the status will update to [#] changes deployed.
- Please note: if your deployment fails, review the deploy error log to review what may have caused the failure. For further assistance, contact support.

- Click the deployment name or [#] changes deployed to view the deployment details.
Sandbox best practices
Sandboxes allow users to innovate safely outside of their production accounts. It’s recommended to define a development strategy, and consider the following aspects to ensure reliable testing in sandboxes:
- What’s the purpose of the sandbox? (e.g., active development, integration testing, training).
- Who needs access? (e.g., consider limiting conflicts that can affect testing reliability).
- Is there a need for more sandboxes to support various use cases?
- What's the best way to create and manage sandboxes to support development needs?
Clearly defining these aspects will aid reliable testing, and deployments of supported assets to production, while accommodating other use cases.
Below are examples of different purposes of sandboxes, users who should get access, and creation strategies to ensure reliable testing and development:
| Sandbox use case |
Purpose |
Users |
Creation Strategy |
| Active development and deployment |
An agile workspace for ongoing development, testing, and deployments that supports active development cycles, rapid prototyping, and deployment to production. |
Active builders and testers involved in development projects aimed to be deployed to production. Limiting sandbox access prevents disruptive changes that can impact reliable testing and deployments. |
It's recommended to regularly delete and create new sandboxes to accurately mirror supported assets of a production environment. This ensures new development takes place in an accurate environment (e.g., after completion of a major development project). |
| Integration Testing |
A stable workspace for integrations, ideal for observing changes and carrying out rigorous testing, that supports the deployment of supported assets to production. It doesn't include deployment of integration-specific configurations. |
Teams managing or extending integrations and verifying end-to-end processes with external systems. |
Less frequent sandbox deletion and creation is needed, as the primary goal is to maintain integration connections. But, over time, deleting and creating new sandboxes is recommended, so testing takes place in an accurate environment. |
| Sandbox for New User Training |
An isolated sandbox that offers new hires a safe environment to learn the system and build confidence before using a production account. |
Primarily new hires and employees undergoing training for system functionalities and role-specific business processes. Access should be limited to these individuals to maintain a controlled learning environment. |
Sandbox deletion and creation will be as-needed, based on new hires or significant business workflow updates. |
| Sandbox for Testing New Features |
A dedicated testing sandbox allowing for testing of new features or complex changes before production adoption. |
Access should be limited to a core group of testers and stakeholders for feedback. |
Sandbox deletion and creation will be as-needed, depending on what's being tested. |