- Knowledge Base
- Data
- Data Management
- How to Create Custom Events
How to Create Custom Events
Last updated: January 12, 2026
Available with any of the following subscriptions, except where noted:
-
Marketing Hub Enterprise
-
Sales Hub Enterprise
-
Service Hub Enterprise
-
Data Hub Enterprise
-
Content Hub Enterprise
-
Smart CRM Enterprise
Custom events allow you to define and track events that are unique to your business. Custom events can be tied to event properties, which you can then use across HubSpot's tools.
There are different ways to create custom events:
- Send via API: use the Custom event definition endpoint to create your event. From there, use your event ID with the send Custom event endpoint to send event occurrences to HubSpot.
- Capture data from your website without the API:
- Code Javascript: using Custom Javascript, you can insert custom code into your HubSpot tracking script by using the code editor.
- Use event visualizer (Marketing Hub Enterprise only): track page views or clicked elements by selecting them on your website. Learn more about creating Custom events with the Event visualizer.
- Import spreadsheet: upload a spreadsheet of event data to capture offline activity, backfill data, or manually integrate any tool with HubSpot.
- Setup webhooks (Data Hub Professional and Enterprise only): customize the conditions that trigger a webhook to be fired and the data that'll be sent.
Please note: any events created in the legacy Custom Events tool will no longer work after August 1st, 2025.
The event creation process involves two parts:
- Defining the event in HubSpot, including any custom event properties.
- Creating a Javascript Code Snippet or Defining the API call that will trigger the event.
Create event via API
If you’re sending data to HubSpot via API, you can use the Send via API option or use the Custom event definition endpoint to create your event. Learn more about defining your API call in HubSpot's developer documentation.
You'll need a few pieces of information for your API call, which you can get from inside HubSpot:
- Event name: the internal name for the event.
- Property names: the internal names for the properties you'll be sending data to.
To finish creating your event to send data via API:
- Select Send data to HubSpot and copy the Tracking ID.
- Click Create.
To find the internal event name for an existing event and property names:
- In your HubSpot account, navigate to Data Management > Event Management.
- Click the name of the event. You'll then be taken to the event details page.
- At the top, locate the event name under Internal name. To copy the internal name, click the copy icon next to the name.

- To find the internal names for the properties you'll be updating, click the name of a property.
- In the right panel, click the code icon, then view the name under Internal name.
When sending data to your event, the below limits apply:
- The property names are limited to 50 characters.
- URL and referrer properties can receive up to 1024 characters, while all other properties can receive up to 256 characters.
- Each event occurrence can contain data for up to 50 properties.
- Property internal names must start with a letter and contain only lowercase letters a-z, numbers 0-9, and underscores. Properties with the same internal name after lowercasing are considered duplicates, and only one of the properties will be used after the occurrence.
Create events with a Javascript code snippet
- In your HubSpot account, navigate to Data Management > Event Management.
- In the top right, click Create an event, then select Create custom event.
- Select Code Javascript.

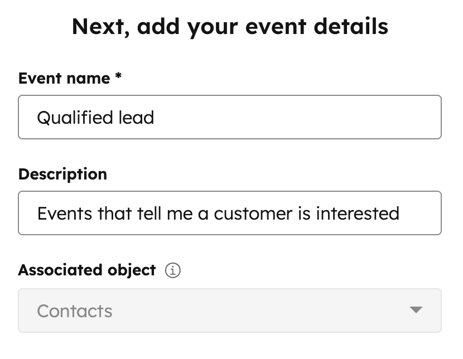
- Enter an Event name and optionally provide your event description.
- Select an Associated object. This allows you to associate your event occurrences with different objects in HubSpot, including Contacts, Companies, Deals, and Tickets.

- Click Next.
Add properties
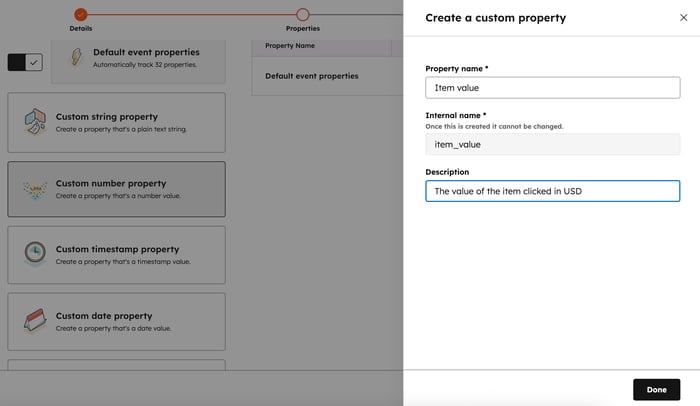
When an event is created, default event properties will be available. You can also create your own custom properties. Event properties are stored separately from other CRM properties, and are unique to the event (i.e. you can't edit these properties from your account settings).
- To turn off the creation of default event properties, toggle the Default event properties to off.
- To create custom properties, select the property type by clicking the Field type for your property. Options include:
- Custom string property: create a property that is a plain text string.
- Custom number property: create a property that is a number value.
- Custom timestamp property: create a property that’s a date value. You must send your data in the form of epoch milliseconds or ISO8601.
- Custom date property: create a property that's a date value.
- Custom boolean property: create a property that's a boolean value.
- Custom enumeration property: create a property with a set of predefined values.
- When you have selected your property, configure the property in the right panel:

- Enter a name for the property and enter a Description for the property.
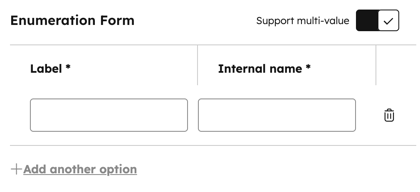
- For Enumeration properties, click Next and enter your property Labels and Values.
- Enumeration properties can be single or multi-select. To enable multi-select values, toggle the Support multi-value toggle on.
- For Enumeration properties, click Next and enter your property Labels and Values.

-
-
- You must set your values and labels before sending data to them. If this step isn't completed before sending data that’s not in the list, the data won't be available to use. To send multiple values via API, separate them with a semicolon.
-
- Click Next.
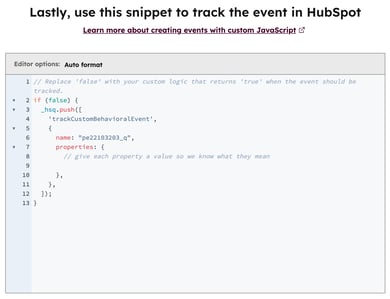
- After setting up the event and its properties, you can add this event to your website’s tracking code by selecting Javascript code snippet.
- Click Done.
Creating events with a Javascript code snippet allows you to add Javascript to your HubSpot tracking code automatically. This can be used for capturing more complex event data which the tracking code does not capture by default.
- Select Javascript code snippet. Use the snippet in the right panel to track the event in HubSpot. Any custom properties created will be predefined within the code snippet.
- Modify the snippet as needed by entering text within the right panel. Any code you add will automatically be included as part of your HubSpot tracking code.
- When you’re finished, click Create to finish your event and automatically start tracking.

Import event data
Upload your attendance data from in person events, timestamped data coming from apps you don't integrate with HubSpot, one off lead or campaign data from a vendor, or any other event data in spreadsheet form. Events allow you to capture behavior and then use the behavior across HubSpot.
Imports can create and update contact records. Event imports can only be used for events which have already occurred. The following must be included in a custom event import file:- Contact email address.
- Occurred at timestamp. Learn more about formatting date properties in import files.

To import custom events:
- In your HubSpot account, navigate to Data Management > Event Management.
- In the top right, click Create an event, then select Create custom event.
- Select Import spreadsheet.
- Enter an Event name and optionally provide your event description.
- Select an Associated object. At this time, events created via import can only be associated with contacts.
- Upload the file. Select how to import the objects and the file language, then click Next.
- Map columns to event and contact properties, then click Next.
- Confirm the name of your import file.
- click the checkbox to agree that contacts expect to hear from you and that your import file does not include a purchased list. Learn more about HubSpot's acceptable use policy.
- Select the date format of the Occurred at property.
- Click Finish import.
Create events via API
- In your HubSpot account, navigate to Data Management > Event Management.
- In the top right, click Create an event, then select Create custom event.
- Select Send via API.
- Enter an Event name, and optionally, provide your event description.
- To add custom event properties:
- Type a property name. This name will be applied to the internal name as well.
- Click the Field type dropdown menu, and select a field type.
- Optionally, add a description.
- If you want to add more custom properties, click + Add custom property.
- Click Next.
- To link objects:
- Click the Select a primary object dropdown menu, then select an associated object. This allows you to associate your event occurrences with different objects, including contacts, companies, deals, and tickets.
- Click Customize the match and selecting your matching ID between your event and object records. The event will only link to the object record when their matching IDs are identical. If you use a custom matching ID, the object property you select must require unique values.
- Click Next.
- To track the event in HubSpot, click Copy next to the tracking ID.
- Click Create event.
Please note:
- You can only match event properties and object properties of the same data type.
- If needed, you can edit the custom match later, but you can't change the primary object selected.
Set up webhooks
Set the conditions that will trigger a webhook.
- In your HubSpot account, navigate to Data Management > Event Management.
- In the top right, click Create an event, then select Create custom event.
- Select Setup webhooks.
- Enter an Event name and select an Associated object.
- Click Next.
- Set up a test event:
- Copy the Webhook URL.
- Navigate to the webhook settings page in the third-party app you want to integrate with.
- Paste in the copied URL.
- Click Send a test event.
- Click Next.
- Review the properties for your webhook. Click the Property type dropdown menu to select a property type.
- Click Next.
- Select a property from your third-party webhook that's an exact match for a HubSpot object property.

Use custom event data
Custom event data can be viewed and used across HubSpot's tools. Below, learn where to view event occurrences and the ways that you can incorporate that data into other tools.
You can open your selected events directly in select HubSpot tools with the actions dropdown in your event list, the single event view, or the top right corner of charts in the analyze tab.
Report on custom events
Custom event occurrences can be analyzed from the custom events tool, and event data will also be available in the custom report builder and attribution reports.
Learn more about analyzing your custom events.
View event occurrences on the contact timeline
Event occurrences will appear on the contact record timeline, along with any properties that were populated.
To view event details on the contact timeline:
- Navigate to a contact record where a custom event has occurred.
- To filter a contact timeline by event occurrences, click Filter activity, then select Custom event.
- In the contact timeline, click to expand the event to display the event details.
Please note: you cannot view timeline activity on custom events created using webhooks.
Use custom events in workflows
In a workflow, you can delay based on custom event occurrences using a Delay until event happens action or an event enrollment trigger.
- In your HubSpot account, navigate to Automation > Workflows.
- Click the name of a workflow. Or, learn how to create a new workflow.
- To add a trigger:
- In the workflow editor, click Set up triggers.
- In the left panel, select When an event occurs. Set up the trigger, then click Apply filter.
- To further refine your trigger, click Add refinement filters. You can select additional properties to refine the objects that you'd like to enroll in the workflow.
- By default, records will only enroll in a workflow the first time they meet the enrollment triggers. To enable re-enrollment, under the Should [object] be re-enrolled in this workflow? section, select Yes, re-enroll every time the trigger occurs.
- To add a delay:
- In the workflow editor, click the + plus icon to add a workflow action.
- In the right panel, select Delay until event happens.
- Configure the delay:
- Click the Event dropdown menu, then select a custom event.
- Then, select the event property that you want to delay on.
- Select the filter for the event property.
- Click Apply filter.
-
- Select the maximum wait time, or select the Delay as long as possible checkbox.
- Click Save.
Please note: all event enrollment triggers will be separated using the OR operator. This means that only one of the event enrollment triggers must occur for the record to enroll in the workflow.
The workflow will then delay enrolled records until they meet the specified custom event criteria or will be triggered when the event occurs.
Manage event health and delivery forms
To ensure your data remains accurate and your integrations are functioning as expected, you can use the Monitor tab within the Event Management tool.
Tracking performance
-
Completion trends: In your HubSpot account, navigate to Data Management > Event Management. Click the Monitor tab to compare event completion volumes across different time periods.
-
Troubleshooting delivery errors: In your HubSpot account, navigate to Data Management > Event Management. In the left sidebar of the Monitor tab, select Delivery errors. This table identifies events that failed to sync and provides the specific reason for the failure (e.g., mismatched data types or schema violations).
Resolving "Unknown Property" errors
If data is sent via API for a property that was never defined in HubSpot, it will appear in the error log. You can resolve this quickly:
-
Hover over the event in the Error logs table.
-
Click Actions, then select Add properties to event.
-
Confirm the suggested field types to allow HubSpot to begin accepting that data immediately.