- Knowledge Base
- Content
- Domains & URLs
- Connect a domain to HubSpot
Connect a domain to HubSpot
Last updated: October 7, 2025
Available with any of the following subscriptions, except where noted:
Connect your website domain to HubSpot to publish your content on HubSpot-hosted website or landing pages, blog posts, knowledge base articles, and customer portal.
Before you get started
- Learn more about the types of content you can publish to your domain based on your subscription.
- To connect a domain, you'll need to update your DNS records. Ensure you have login details for your DNS provider and access to the DNS records.
- If you're moving a live website to HubSpot, review the domain verification process if you want to pre-provision SSL for the domain.
- A subdomain or root domain can only host pages in a single location. If you connect a subdomain or root domain to HubSpot that is currently hosting external pages, links to those external pages will break. To host pages in multiple locations, such as HubSpot and WordPress, use a separate subdomain for each provider.
- To connect a subdomain to HubSpot (such as www.hubspot.com), you'll need to update CNAME records. To connect a root domain to HubSpot (such as hubspot.com), you'll need to update A records.
- All IP addresses are in IPv4 format. You can convert them to IPv6 format using an online tool like this one.
Connect a new domain
- In your HubSpot account, click the settings settings icon in the top navigation bar.
- In the left sidebar menu, navigate to Content > Domains & URLs.
- Click Connect a domain.
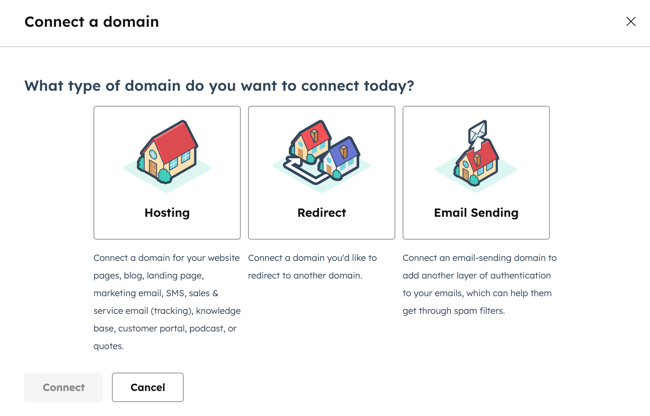
- Select the type of domain you want to connect:
- Hosting: the subdomain will be the default host for the selected content types in HubSpot.
- Redirect: this subdomain can't be used to host content, but will automatically redirect to another domain connected to HubSpot. You can also add individual URL redirects from redirect domains to any HubSpot-hosted page or external page.
- Email Sending: the subdomain will add another layer of authentication to your HubSpot emails. Learn more about how to connect an email sending domain.
- If you're connecting a reverse proxy, click to toggle the Connect with HubSpot's built-in content delivery network (CDN) switch off.
- Click Connect.

- Enter the subdomain (e.g., www), brand domain, (e.g., mywebsite) and top-level domain (e.g., com) in the Domain field:
- Subdomain: the subdomain is the first part of the domain name. For example, in www.mywebsite.com, www is the subdomain. Leave this field blank to connect and host content on the root domain.
- Brand domain: the brand domain, otherwise known as the domain name, is between the subdomain and the top-level domain. For example, in www.mywebsite.com, mywebsite is the brand domain. If you're connecting a domain for the first time, this domain will be set as your account's brand domain. Learn more about brand domains.
- Top-level domain: the top-level domain comes after the brand domain. For example, in www.mywebsite.com, com is the top-level domain.
- In the Advanced options section, click the Primary content types dropdown menu and select the relevant content types.
Please note: the Email content type is used for the web version, image, and subscription preferences page URLs of your marketing emails. This is separate from the email sending domain, which is used to authenticate the From address used to send your marketing emails. Learn how to connect an email sending domain.
- Click the Primary language dropdown menu and select a language. The primary language helps search engines understand the language of your page content for the subdomain. Learn more about managing multi-language content.
- Click Next.

Please note: if you encounter an error that your domain was already added by a HubSpot customer, verify that you are not using the domain in another HubSpot account. If you're unable to access the account using the domain or believe another customer account is using the domain in error, reach out to HubSpot Support
- Redirects will be automatically set up either from your root domain to the subdomain or from the www subdomain to your root domain, depending on whether you're connecting a root domain or subdomain.

- Click Next.
- For the next step of the process, you'll need to sign in to your DNS provider to access your DNS records. To confirm the hosting configuration details, click the I Understand checkbox. Learn more about updating your DNS records.

- Many common DNS providers support logging in and connecting to your domain from directly within HubSpot. If you're using a common provider such as GoDaddy, AWS, IONOS, Namecheap, or Cloudflare, click Sign in with [provider] and scroll down to the bottom of the dialog box.
- If you're using a different domain provider, or if you'd rather make the changes to your DNS configuration manually, click No, I'll set it up manually.
- If you can't access your DNS provider, click Share setup link to send to your IT team or admin for setup (powered by Entri). In the bottom left, click Finish later. You'll be able to resume connecting your domain to HubSpot at a later time.
- Sign in to your domain provider and locate your DNS record settings. If you can't find your DNS settings, reference the steps outlined by provider.
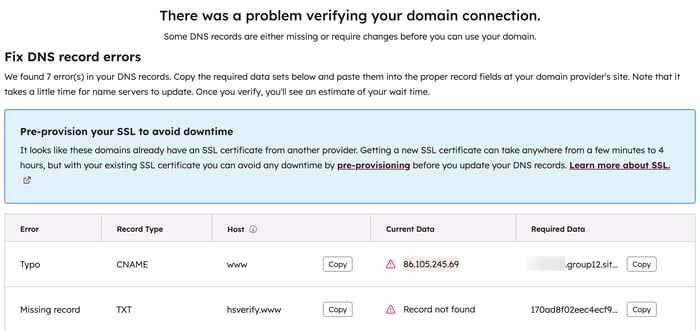
- Copy the values in the Host and Required Data columns in HubSpot. In your DNS provider account, paste the values into the appropriate record fields for the record of the subdomain you're connecting. Once you've entered the values into the record, click Verify.

Please note: some providers, such as Network Solutions, or GoDaddy, will add your brand domain and top-level domain to the end of DNS records automatically. For example, if you enter {hsdomainkey}.yourdomain.com, it'll turn that value to {hsdomainkey}.yourdomain.com.yourdomain.com, which will result in a DNS error. Instead, copy the value but remove the .yourdomain.com part, then paste into the corresponding field in your DNS provider account.
- Once you update your DNS records, they will be verified within 15 to 80 minutes. You can check on how much time remains at the bottom of the page. Leaving this page won't interfere with the validation process.

-
- If there are any problems verifying your DNS changes, you can review a detailed description of any errors that have occurred.
- For a more detailed description of the error, hover over the warning alert icon in the Current data column.

Once your domains are connected, SSL will be turned on automatically. This usually takes a few minutes, but can take up to four hours. Learn more about SSL and domain security and troubleshooting SSL certificate errors.
HubSpot doesn't provide SSL certificates for domains that exceed 64 characters. This limit includes the subdomain, domain, and top-level domain. If your domain needs to be longer than 64 characters, you can turn on SSL by purchasing a custom SSL certificate. To set this up, reach out to your HubSpot account representative, or contact HubSpot Support to get connected with the right person.
Add new content types to existing domains
Once you've connected a domain, you can edit which content types are hosted on that domain.
- In your HubSpot account, click the settings settings icon in the top navigation bar.
- In the left sidebar menu, navigate to Content > Domains & URLs.
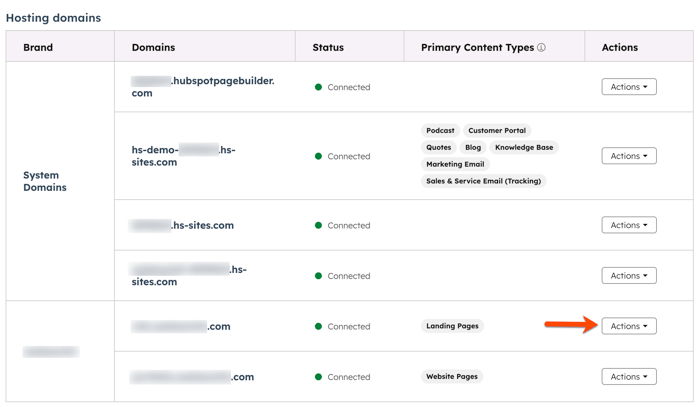
- Next to the domain you want to edit, click the Actions dropdown menu and select Change primary content types (e.g., Website pages).

- In the dialog box, select the checkbox next to each content type you want to host on this domain, then click Save.

- To confirm adding primary content type to a new hosting domain, select the I Understand checkbox.
- When finished, click Save Changes.
