
Last updated: September 16, 2026
Available with any of the following subscriptions, except where noted:
-
 Marketing Hub
Professional, Enterprise
Marketing Hub
Professional, Enterprise
Use Marketing Studio to design your campaign, create assets, and execute your plan in a single workspace. In Marketing Studio, you'll be able to plan your campaigns and create assets across different channels without switching tools.
When generating campaigns using AI in Marketing Studio, key details such as campaign name, goal, audience, and budget will be added. You can also add AI-suggested assets with built-in tracking directly in Marketing Studio. After creating your campaign, you can review your campaign details in a calendar, board, or asset list view.
To improve how your content performs and surfaces across answer engines, learn how to optimize content and improve brand visibility for AI.
Please note: you can manage AI feature access in your AI settings and configure what data is shared. Review HubSpot's AI Trust FAQs and AI Model Cards for detailed information on AI security controls, data use, and compliance.
Understand limitations and requirements
Permissions required Super Admin or Campaign permissions are required to create and manage campaigns in Marketing Studio.
- To use Marketing Studio, you must turn on your Give users access to generative AI tools and features AI settings. Learn more about managing your AI settings.
- When associating assets with a campaign, you'll need permissions for the corresponding asset. For example, to associate a sequence with a campaign, you will need Edit permissions for sequences. Learn more about user permissions in HubSpot.
Create a new campaign
When creating a new campaign in Marketing Studio, you can generate a new campaign using AI, duplicate an existing campaign, create a campaign using a suggested template, from an uploaded document, or from scratch.

Start from a campaign clone using Marketing Studio
- In your HubSpot account, navigate to Marketing > Marketing Studio.
- In the top right, click Create and select Create campaign.
- In the dialog box, select Clone campaign.
- Click the dropdown menu and select an existing campaign.
- Review and edit your cloned campaign details. Learn more about cloning a campaign in Marketing Studio.
- At the bottom, click Next: Assets.
- Select the checkboxes next to the assets you want to include in the new campaign. Some assets can be either associated or cloned:
- An associated asset will link the same asset between campaigns. The asset will carry over attributed data.
- A cloned asset will create a duplicate of the original asset. The asset won't carry over reporting data.
- At the bottom, click Clone campaign.
Create a campaign using a template in Marketing Studio
- In your HubSpot account, navigate to Marketing > Marketing Studio.
- In the top right, click Create and select Create campaign.
- In the dialog box, select Start from template.
- In the right panel, click Use template for the template that you'd like to apply.
- At the bottom, click Create.
The template will populate empty cards and a sticky note with descriptions on the Marketing Studio canvas. You can either generate new content using AI or select existing content to fill each card.
Create a campaign from an existing document
- In your HubSpot account, navigate to Marketing > Marketing Studio.
- In the top right, click Create and select Create campaign.
- In the dialog box, click Upload documents.
- In the Campaign name field, enter your new campaign name.
- In the Context field, upload the file for your campaign context. For example, you may want to upload a previous campaign brief that you'd like to duplicate for another event. You can upload files in the following formats:
- doc
- docx
- pptx
- txt
Create a campaign from scratch in Marketing Studio
- In your HubSpot account, navigate to Marketing > Marketing Studio.
- In the top right, click Create and select Create campaign.
- In the dialog box, click Start from scratch.
- Enter your campaign details.
- At the bottom, click Create campaign. You'll be automatically redirected to the campaign canvas to select your campaign assets and continue setting up your campaign.
Generate a campaign using AI in Marketing Studio
- In your HubSpot account, navigate to Marketing > Marketing Studio.
- In the top right, click Create and select Generate campaign with AI.
- In the left panel, follow the prompts to set up your campaign.
- When generating a campaign, you can preview the campaign details in the right panel.
- The campaign will automatically generate suggested assets and automations. These will not be created in a published state. You can continue using Campaign agent to
Update your campaign brief in Marketing Studio
After creating your campaign, you can update your campaign brief within Marketing Studio. The campaign brief will also determine the context that campaign agent uses when generating content and automations for your campaign.
To manage other campaign settings such as user and team access, campaign UTMs, and more, learn how to manage your campaign settings in Marketing Studio.
- In your HubSpot account, navigate to Marketing > Marketing Studio.
- In the campaigns table, hover over the campaign that you'd like to update and click the three vertical dots icon and select Edit in canvas.
- At the bottom, click the campaign brief icon.
- In the dialog box, review your campaign details:
- Context: upload additional files for context for your campaign brief. These files will be used when generating campaign assets with AI. You can select files from the files tool or upload files from your device. You can also import files from your Google Drive.
- Goal: a description of your campaign goal. For example, consider goals based on generating leads or SQLs, improving the cost per customer, increasing website traffic, increasing overall revenue, and more.
- Audience: a description of your ideal audience. You can also select existing segments (lists) to use as your audience.
- Messaging: set up the brand identity, personality and tone for the campaign.
- Additional details: include additional details for your campaign such as the campaign start and end dates, owner, and any additional notes.
- When updating your campaign brief, any changes will be automatically saved.
- To exit the campaign brief, click the x icon in the top right.
- To generate new asets based on the updated campaign brief, click Generate assets.

Plan and build your campaign in Marketing Studio
Set up your campaign in the canvas view. In the canvas view, structure your campaigns and create and review assets directly in Marketing Studio.
You can also use the collaboration sidebar to add comments to the campaign or specific campaign assets and collaborate with your teammates. Learn more about adding comments with the collaboration sidebar.
- In your HubSpot account, navigate to Marketing > Marketing Studio.
- In the campaigns table, hover over the campaign that you'd like to update and click the three vertical dots icon and select Edit in canvas.
- In the top right, click + Add asset.
- To use an existing asset, in the All assets tab, select checkboxes next to the assets that you'd like to add to the campaign. The asset will automatically appear on your canvas within a campaign card. Learn more about adding assets to your campaign.

- To create a new asset:
- At the top, click the New tab.
- Select a content type such as marketing email or blog post. The asset card for that content type will appear in the canvas.

-
- To add content to each of your content type cards. click + Add content. Then, select from the following:
- Select: associate an existing asset for the selected content type. Learn more about associating assets with campaigns.
- Create: create a new asset for the selected content type.
- To add content to each of your content type cards. click + Add content. Then, select from the following:
- To upload existing files from your device to your campaign, you can drag and drop the file directly onto the canvas. For example, you can add a PDF or image file to your campaign.
- To group assets together, click and drag the selection area to include the cards you’d like to group, and click the group icon.
Manage your campaign assets
- In your HubSpot account, navigate to Marketing > Marketing Studio.
- In the campaigns table, hover over the campaign that you'd like to update and click the three vertical dots icon and select Edit in canvas.
- To take action on the asset, click the three vertical dots icon on the asset card and select from the following:
- Remix from this: use content remix directly in Marketing Studio to create new content types using the selected asset as a source. This option will only appear for assets that can be remixed.
- Edit: edit your associated asset. You'll be automatically directed to the content editor.
- Clone: clone the content card and any associated assets. Alternatively, to copy and paste an asset, select the asset and tap ctrl + c or ⌘ + z. Then, tap ctrl + v or ⌘ + v.
- If an associated asset in the content card supports cloning, a clone of the asset will be created.
- If an asset does not support cloning, an error notification will appear.
-
-
- If duplicating a placeholder card without an associated asset, a new placeholder card will be created.
-
-
- Create task: create a task associated to the asset card. Learn more about campaign tasks.
- Add annotation: add a text annotation on the asset card. For example, you may want to add a note that this particular asset should be published on a different date.
- Copy link to card: copy a direct link to the asset card. Use this link to share the asset with another user in your HubSpot account.
- Assign owner: assign a HubSpot user to the content
- Delete [content type]: remove the content type from this campaign. If there are any associated assets, the assets will not be deleted and can still be accessed directly in the tool.

- To track the connection between your assets:
- Hover over the asset. Then, click and drag the arrow from your asset to a connection point of the asset that you'd like to connect to.
- The connection points will automatically appear on the asset edges.
- When moving your assets, the connection will remain.
- Hover over the asset. Then, click and drag the arrow from your asset to a connection point of the asset that you'd like to connect to.
-
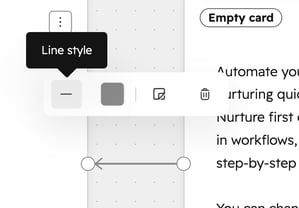
- To customize your line type, click the connection. Then, click the line icon and select a line style for your connection.
- To customize your line color, click the connection. Then, click the color icon and select a color for your connection.
- To manage multiple assets at once, click and drag the selection area to include the cards you’d like to take action on. Then, select from the following:
- Auto-layout: automatically arrange the selected assets in neat rows. Use this option to organize your canvas.
- Group: group and organize your assets together. Grouped assets can be moved together or deleted in bulk on the canvas.
-
- Clone: duplicate all assets in the selected area.
-
- Remix: generate new content based on the assets in the selected area. Placeholder and AI-generated assets cannot be remixed. If any placeholder or AI-generated assets are selected, this option will be greyed out .
- Remix: generate new content based on the assets in the selected area. Placeholder and AI-generated assets cannot be remixed. If any placeholder or AI-generated assets are selected, this option will be greyed out .

Additional resources
For more resources on using Marketing Studio, refer to these articles:
