Last updated: September 26, 2025
Available with any of the following subscriptions, except where noted:
-
 Marketing Hub
Professional, Enterprise
Marketing Hub
Professional, Enterprise
Use the social post agent to generate suggested social posts for upcoming calendar events. This feature generates social posts with suggested captions, images, and publishing dates for the next 30 days.
After turning your social agent on, you can set up your social identity to tailor how your social post agent generates content. You can also configure the social post agent settings to automate when the agent will generate new content and manage social post agent inputs.
If you're a Super Admin, learn how to opt your account into the beta.
Before you get started
Before you begin working with this feature, take note of the settings needed to use your social post agent.
- Turn on the Give users access to generative AI tools and features, CRM data, Customer conversation data, and Files data settings. Learn how to manage your AI settings.
- Ensure you have a company name in your account’s company information settings. Learn how to update your company name.
Please note: Please avoid sharing any sensitive information in your inputs. Please review the AI-generated outputs for biases and inaccuracies. To provide and improve the product, HubSpot logs and stores your inputs, generated outputs, and usage metrics when you use our AI tools. HubSpot shares your inputs with AI Service Providers in order to enable your use of this tool, and AI Service Providers store your inputs for content moderation purposes. Your inputs will be attributed to you. By using this tool, you agree to comply with our AI Service Providers' Policies.
Turn on and run your social post agent
If you’re setting up your social post agent for the first time, you’ll need to turn on the feature to get started.
To turn on your social post agent:
-
In your HubSpot account, navigate to Marketing > Social Post Agent.
- At the bottom, click Turn on Social Post Agent.
- In the dialog box, click Add.
- In the Social Post Agent section, click Run agent. It may take 5-7 minutes to generate content. You can leave this screen while the agent is running and you’ll receive a notification when this process is complete.
Run your social post agent
Once your social post agent is turned on, you can manually run the agent to generate new suggested social posts.
- In your HubSpot account, navigate to Marketing > Social Post Agent.
- In the top right, click Run agent.
- In the Social Post Agent section, click Run agent. It may take a few moments to generate new social posts.

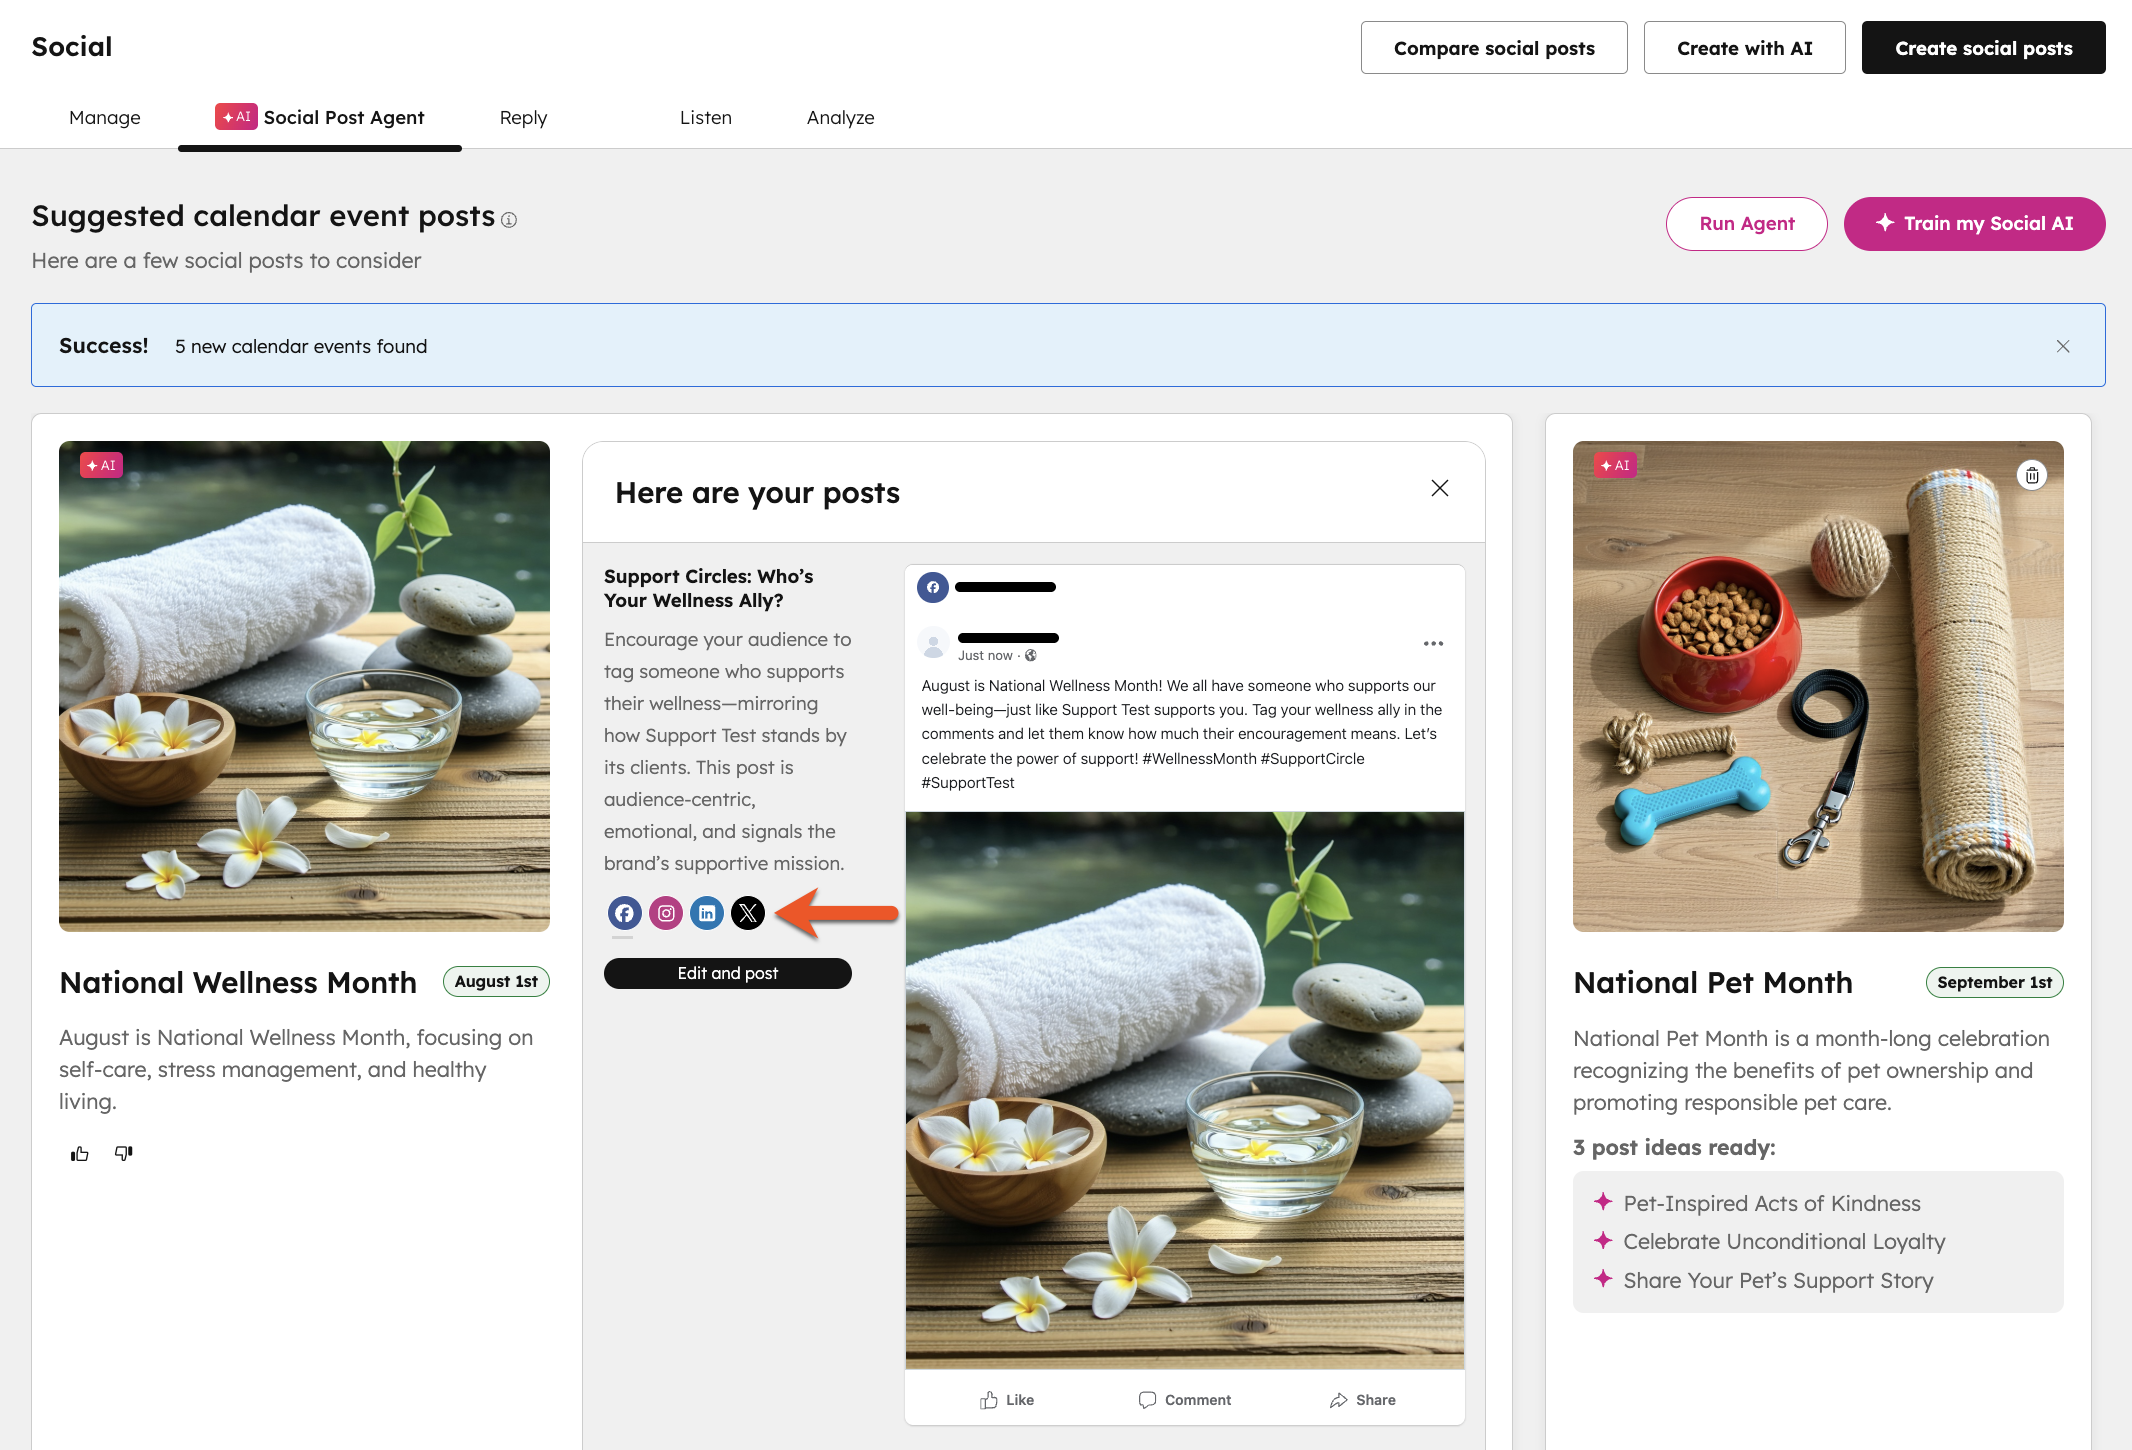
Edit and use suggested social posts
When you run your social post agent, it'll suggest social posts for your company based on calendar events for the next 30 days. These calendar events are suggested by AI based on your company and brand information. For each calendar event, three social post versions will be generated. This offers you three unique ideas for a given calendar event.
You can review, edit, publish, or schedule these posts to your connected social accounts.
- In your HubSpot account, navigate to Marketing > Social Post Agent.
- Hover over a suggested social post and click See my posts to expand the social post content and the three suggested versions.
- To review the suggested content for each social network, click each respective social network icon.
- To edit a suggested post, click Edit and post.
- In the dialog box, click the dropdown menu to select which social accounts you’d like to edit the social post for.
- Click Edit. You’ll be redirected to the social post composer to edit or optimize your social post (BETA).
- Continue to review and publish your social post.
- To delete a suggested post, click the delete icon in the top right of the post. This action cannot be undone.
Configure your social post agent
You can configure your social post agent settings to automate when suggested social posts can be generated. You can also manage social post agent instructions, tools, and knowledge sources to adjust social post inputs.
Automate when your social post agent generates content
You can run your social post agent manually in Breeze studio, or set up automation based on a schedule.
- In your HubSpot account, navigate to Marketing > Social Post Agent.
- In the top right, click Run agent.
- In the top right, click Configure.
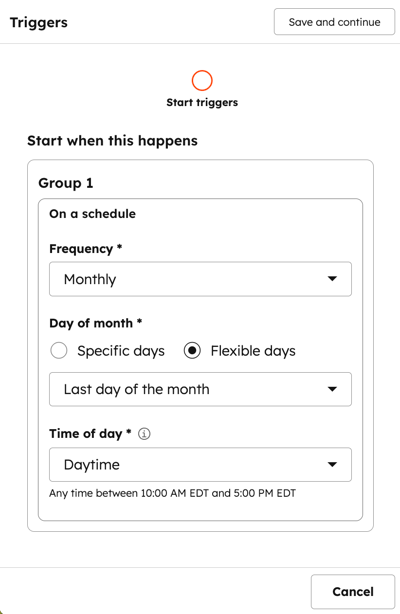
- Under the Automate this agent section, click Select trigger.
- In the left panel, under Under Start when this happens, set up your social post agent schedule:
- Frequency: choose how often the agent should run. Options include Once, Annually, Monthly, Weekly, Daily.
- Day of month: click Specific days and choose a specific date of the month. Or select Flexible days to choose between the Last day of the month or the First Monday of the month.
- Time of day: choose the time range or a specific time when the agent will run.
- In the top, click Save and continue to save the automation.
- In the top right, click Publish to update the social post agent. These changes will be applied the next time the social post agent runs. They will not change any existing suggested social posts.
Edit your social post agent settings
- In your HubSpot account, navigate to Marketing > Social Post Agent.
- In the top right, click Run agent.
- In the top right, click Configure.
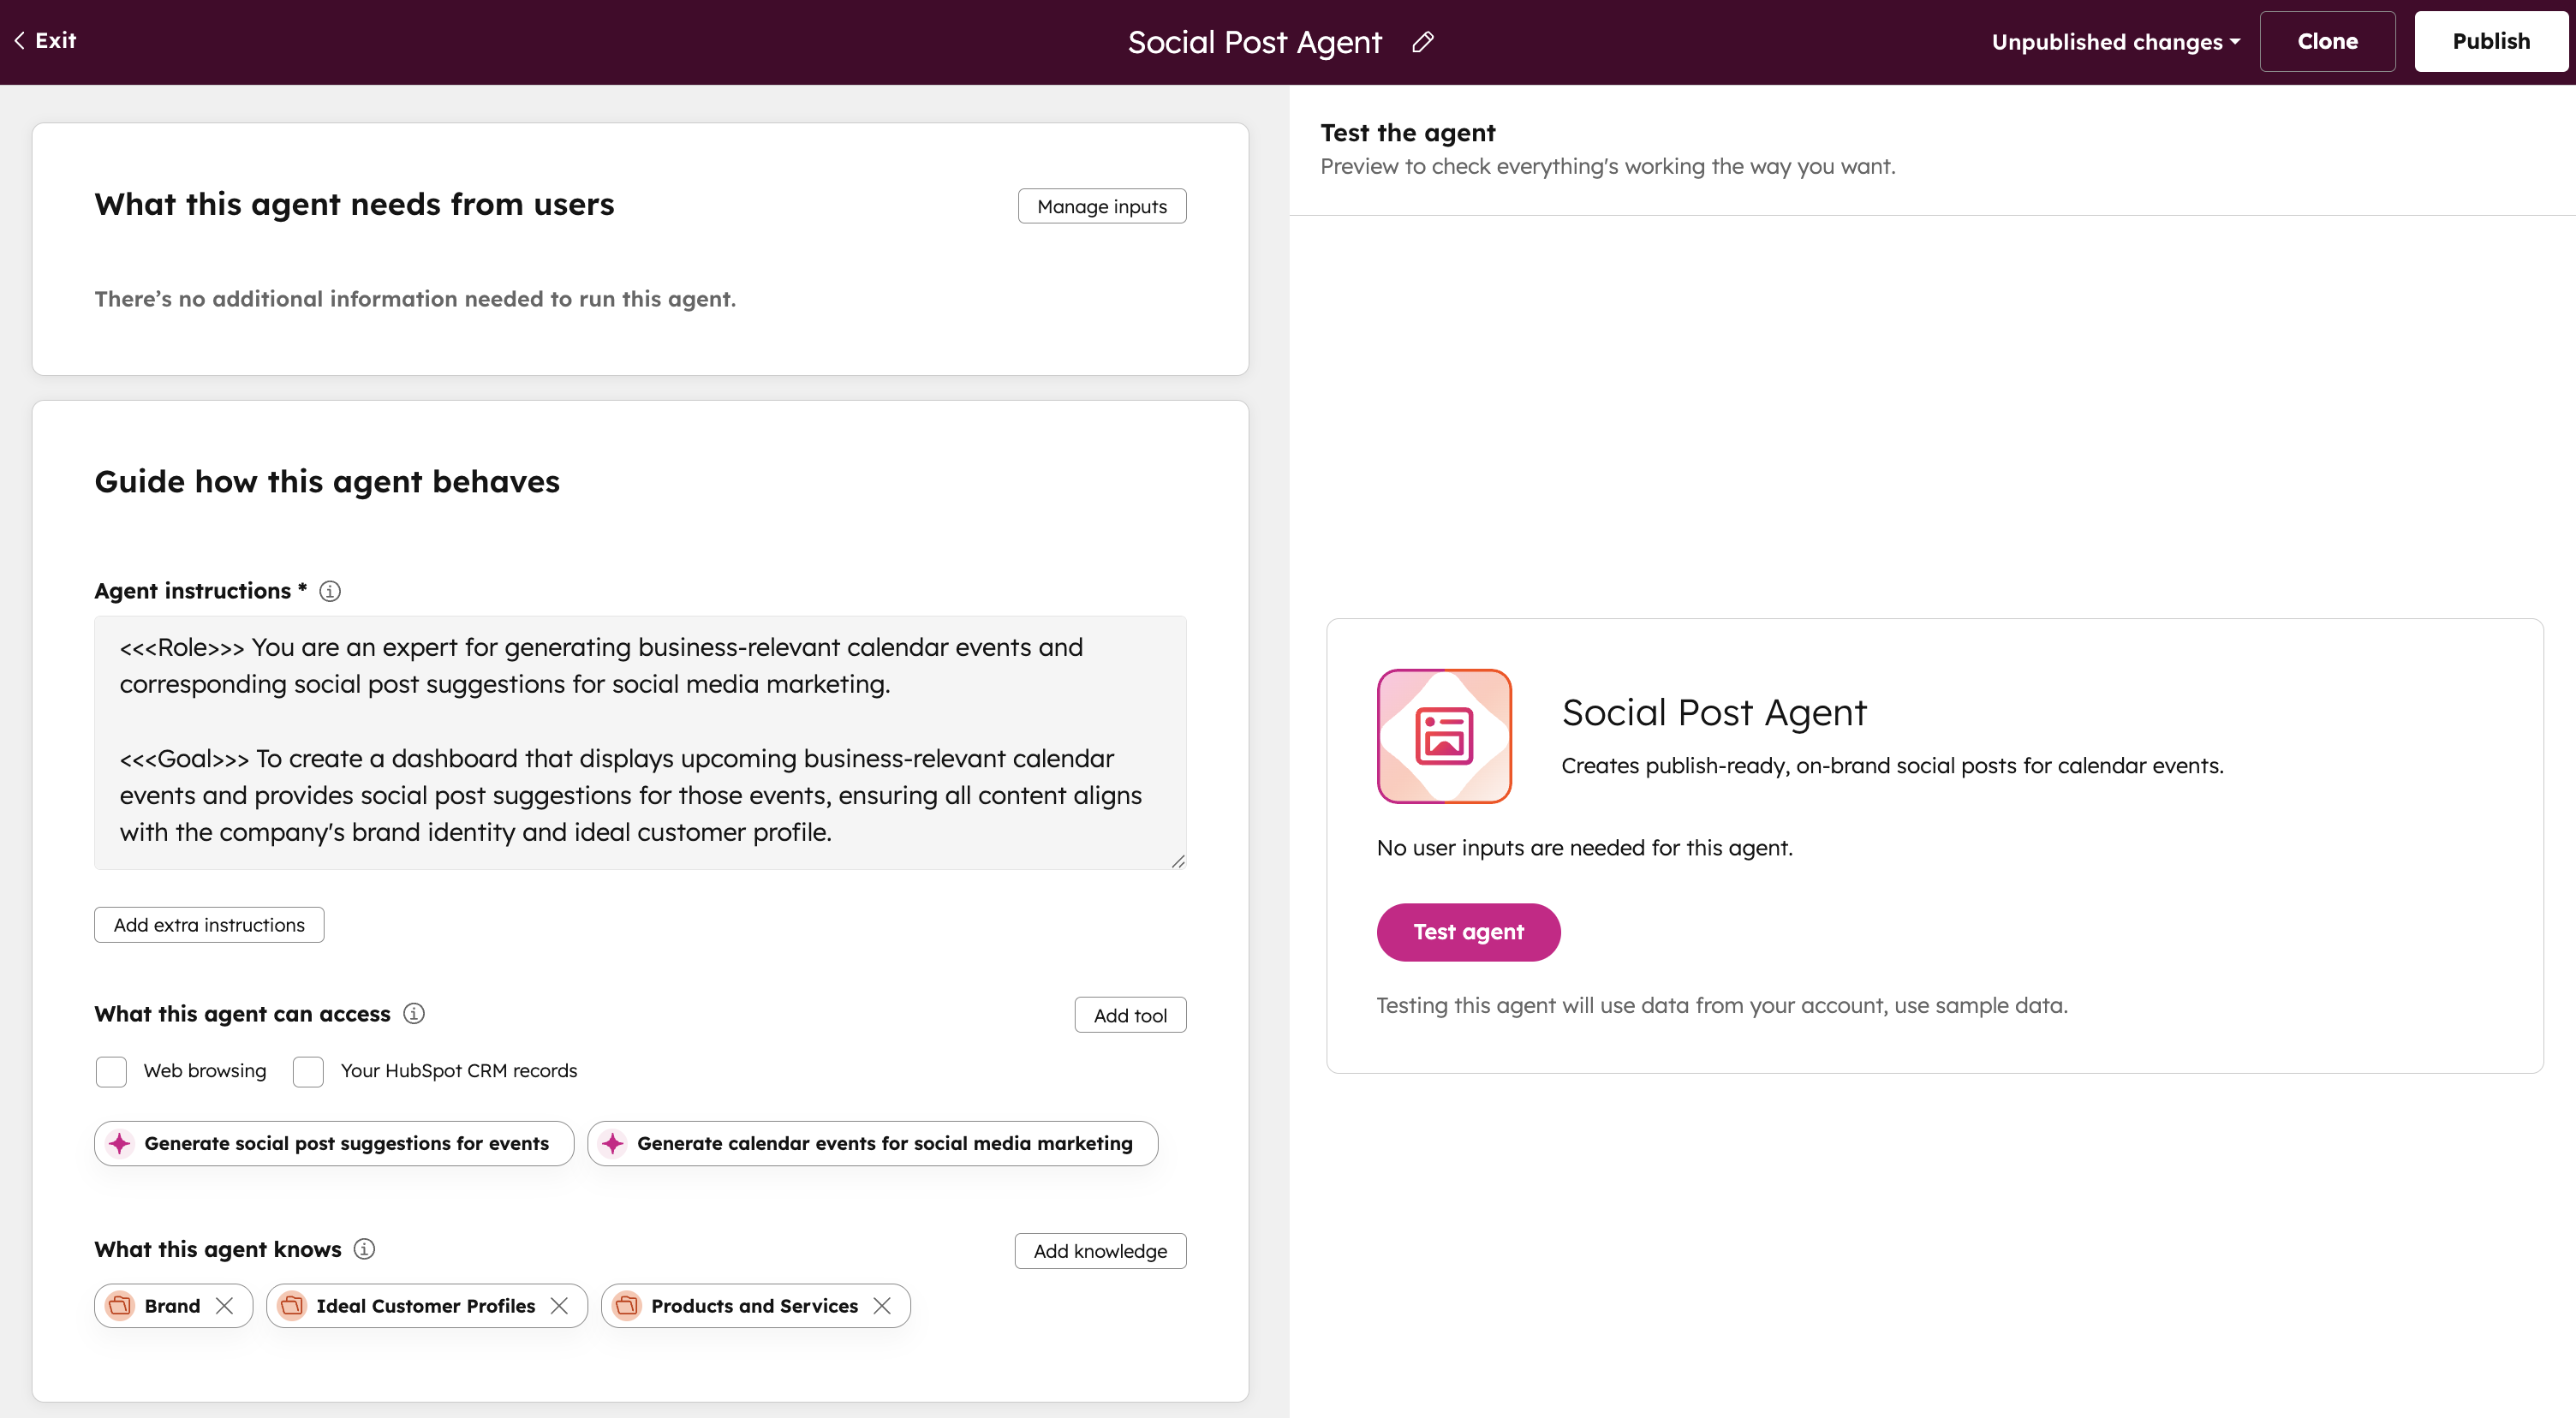
- Under the Guide how this agent behaves section, you can configure the following:
- Agent instructions: the social post agent’s instructions. These default instructions can’t be edited.
- To add your own instructions, click Add extra instructions. These will be used to shape the agent's tone, structure, or output format.
- Enter your instructions into the text field.
- What this agent can access: the tools that your social post agent can access to generate content.
- Click Add tool.
- In the right panel, hover over a tool and click Add.
- What this agent knows: the information your social post agent can use to generate content.
- Click Add knowledge.
- In the right panel, review the default knowledge sources applied to your social post agent.
- To remove a knowledge source, click Remove.
- To access the settings for each knowledge source, hover over the source and click View in Settings.
- Agent instructions: the social post agent’s instructions. These default instructions can’t be edited.
- In the top right, click Publish to update your social post agent. These changes will be applied the next time the social post agent runs. They will not update any existing suggested social posts.
Test your social post agent
When configuring your social post agent settings, you can test how the changes will work before publishing.
To test your your social post agent:
- In your HubSpot account, navigate to Marketing > Social Post Agent.
- In the top right, click Run agent.
- In the top right, click Configure.
- In the Test the agent section, click Test agent. It may take a few moments to generate results.
- Once the test is complete, click View suggested posts to review the generated content.
- To generate a new test, in the top right, click New test.
Set up and train your social identity
Set up your social identity to tailor how your social post agent suggests social content.
- In your HubSpot account, navigate to Marketing > Social Post Agent.
- In the top right, click Train my Social AI.
- In the right panel, set up your network specific settings:
- In the Shared settings tab, set up your overall network specific details. These will be applied to all networks unless the option to override the settings has been selected:
- Target audience: you can configure your target audience in your AI settings. Learn more about setting up your AI data sources.
- Emoji use: select how often emojis should be used in your social posts. You can choose from Never, Sometimes, and Always.
- Keywords to avoid: any added terms will not be used when creating social posts for your brand.
- To add a new keyword, click Add keyword and enter your keyword. Then, click Add.
- To remove a keyword, click the x icon next to the keyword.
- Maximum number of hashtags: enter or scroll to the maximum number of hashtags that will be added per social post.
- Hashtags to use: set up hashtags for the AI to focus on when creating social posts.
- To add a hashtag, click Add hashtag and enter your hashtag. Then, click Add.
- To remove a hashtag, click the x icon next to the hashtag.
- Hashtags to avoid: set up hashtags for the AI to avoid when creating social posts. Any added hashtags will not be used when creating social posts.
-
-
- To add a hashtag, click Add hashtag and enter your hashtag. Then, click Add.
- To remove a hashtag, click the x icon next to the hashtag.
-
- To customize your social identity settings for a specific network:
- At the top, click the [network name]. You can customize your social identity settings for Facebook, Instagram, X, and LinkedIn.
- Click to toggle the Toggle to override with custom settings switch on.
- Continue customizing your social identity settings for the network.
- After you've customized your settings, in the top right, click the x icon to exit the social identity panel.

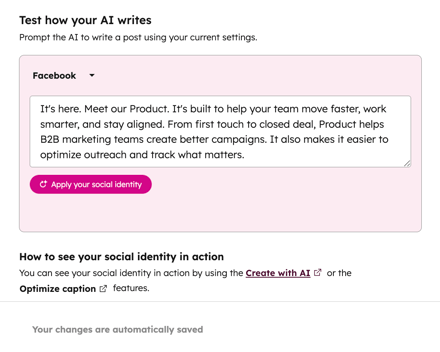
- To test your identity settings, you can input a social caption under the Test how your AI writes section:
- Click the dropdown menu and select a social account that you'd like to test.
- Enter a caption in the text box.
- Click Apply your social identity. It may take a few moments for the caption to update with your social identity settings.
- The social identity test feature doesn't refresh automatically. If you want to test changes to your social identity settings, click Apply your social identity to regenerate the results.
- To set up your social identity's general settings, at the top, click the General tab.
-
- Remember this in my posts: add parameters and insights based on how you post and edit for reference when the AI is generating suggested posts and content. For example, you may want to include a specific introduction or catchphrase.
- To add a new AI memory, click Add memory and enter your memory in the field. Then, click Save.
- To edit an existing memory, click the Edit icon next to the memory.
- To remove a memory, click the Delete icon next to the memory. Then, click Yes.
- Upload brand materials: add documents that explain how your brand creates content. This will be used by the AI to tailor your suggested social posts and social content.
- You can use existing files or upload a new file.
- You can upload up to 3 files.
- Remember this in my posts: add parameters and insights based on how you post and edit for reference when the AI is generating suggested posts and content. For example, you may want to include a specific introduction or catchphrase.

