- Knowledge Base
- Content
- Website & Landing Pages
- Insert and manage anchor links
Insert and manage anchor links
Last updated: August 6, 2025
Available with any of the following subscriptions, except where noted:
By creating an anchor on a specific part of a page, blog post, or knowledge base article, you can add a link to that section of your content. You can then insert anchor links within the same piece of content to let visitors navigate to that section without scrolling. You can also add links on other pages that send visitors directly to that section of your page.
Please note: it's not recommended to use anchor links in emails, as they aren't supported by some email clients.
Create an anchor
-
Navigate to your content:
- Website Pages: In your HubSpot account, navigate to Content > Website Pages.
- Landing Pages: In your HubSpot account, navigate to Content > Landing Pages.
- Blog: In your HubSpot account, navigate to Content > Blog.
- Knowledge Base: In your HubSpot account, navigate to Service > Knowledge Base.
- Click the name of your content.
- Click the rich text module where you want to insert an anchor.
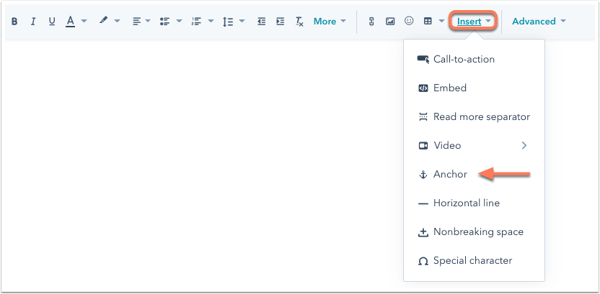
- In the rich text toolbar, click the Insert dropdown menu and select Anchor.

- In the pop-up box, enter a name for your anchor. It must begin with a letter and contain only letters, numbers, hyphens, underscores, colons and periods. You can separate multiple words in an anchor with hyphens. Then, click Insert.
- The anchor will appear as a blue line with an anchor anchor symbol. To reposition, click the anchor and drag it to a new location within your content.

Insert an anchor link
Once you've created an anchor, you can insert an anchor link to send visitors to that section of the page without scrolling. You can also add links on other pages that send visitors directly to that section of your page.
-
Navigate to your content:
- Website Pages: In your HubSpot account, navigate to Content > Website Pages.
- Landing Pages: In your HubSpot account, navigate to Content > Landing Pages.
- Blog: In your HubSpot account, navigate to Content > Blog.
- Knowledge Base: In your HubSpot account, navigate to Service > Knowledge Base.
- Click the name of your content.
- In the content editor, highlight the text you want to hyperlink.
- In the rich text toolbar, click the linkd link icon.
- If the anchor you're linking to is on the same page as your link:
- In the pop-up box, click the Link to dropdown menu and select Anchor on this page.
- Click the Anchor dropdown menu and select the anchor.
- Click Insert.
- If the anchor you're linking to is on a different page as the link:
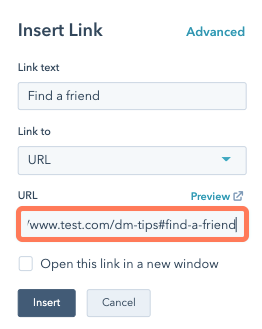
- In the pop-up box, click the Link to dropdown menu and select URL.
- Enter the full URL of the page followed by the # hashtag symbol, followed by the name of the anchor.
- Click Insert.
- If the anchor you're linking to is on the same page as your link:

-
To take your changes live, click Publish or Update in the top right.
Add an anchor link to a button
Once you've created an anchor, you can add an anchor link to a button module in a drag and drop area. Clicking that button will send visitors to that section of the page without scrolling. You can also link to an anchor on a different page.
Please note: anchor links added to CTAs must have the Track clicks through the browser option selected.
-
Navigate to your content:
- Website Pages: In your HubSpot account, navigate to Content > Website Pages.
- Landing Pages: In your HubSpot account, navigate to Content > Landing Pages.
- Blog: In your HubSpot account, navigate to Content > Blog.
- Click the name of your content.
- In the content editor, click the add Add icon in the left sidebar.
- Click to expand the Forms and Buttons section, then click the Button module and drag it into position on the page.
- In the Button text field, enter the text that will appear on the button.
- In the URL field, enter the # hashtag symbol, followed by the name of the anchor. If you want to link to an anchor on an external page, you can enter the full URL, then the # hashtag symbol, followed by the name of the anchor.
- On the Styles tab, edit the button's styling.
- To take your changes live, click Publish or Update in the top right.