上次更新时间: 2026年7月9日
可与以下任何订阅一起使用,除非另有说明:
-
 营销 Hub
Professional, Enterprise
营销 Hub
Professional, Enterprise
-
 销售 Hub
Professional, Enterprise
销售 Hub
Professional, Enterprise
-
 Service Hub
Professional, Enterprise
Service Hub
Professional, Enterprise
-
 Data Hub
Professional, Enterprise
Data Hub
Professional, Enterprise
-
 内容 Hub
Professional, Enterprise
内容 Hub
Professional, Enterprise
-
 Revenue Hub
Professional, Enterprise
Revenue Hub
Professional, Enterprise
-
 某些功能需要 HubSpot 点数
利用 HubSpot 的报告和数据工具,更深入地了解您的电商客户。学习如何创建和使用数据集、自定义属性 及模块,从而更好地理解客户行为、对受众进行细分、追踪购买历史,并优化您的销售和营销策略。
本文将通过分步指南,指导您配置数据集和 自定义报告,从而设置忠诚度评分、分析购买模式并监控发货流程。借助这些工具,您可以对联系人进行细分、实现营销个性化,并生成可操作的报告。
开始之前
在设置用例之前,请在“交易”对象上创建一个包含以下阶段的电子商务销售漏斗:
- 结账待处理
- 结账放弃
- 结账完成
- 已发货
- 已取消
需要订阅 创建数据集需要Data HubEnterprise订阅。
需要权限 创建或编辑数据集需要超级管理员权限,或Data Studio 的编辑权限。
需要权限 同步数据集需要超级管理员权限,或Data Studio 的同步权限。
某些功能需要 HubSpot 点数 同步和导出数据集需要HubSpot 积分。
客户忠诚度评分
利用数据集计算客户忠诚度评分,并进一步筛选该评分以将客户划分为不同等级(例如,将最忠诚的客户归入第 1 级)。通过利用评分和等级来构建报告和细分群体,您可以根据客户情况量身定制销售和营销策略。
示例中的忠诚度评分计算方法如下:
- 如果联系人拥有一笔在过去 60 天内已成交的交易,则赋予 5 分的评分。
- 如果联系人的总收入超过 100 美元,则赋予 10 分。
- 如果联系人的平均页面浏览量大于 3,则赋予 10 分。
- 如果该联系人的网站访问次数大于 8 次,则赋予 5 分。
分级公式的计算方式如下:
- 忠诚度评分在 15 分及以上的联系人被归类为第 1 级。
- 忠诚度评分在 9 到 14 之间的联系人被归类为第 2 级。
- 忠诚度评分低于 9 的联系人被归类为第 3 级。
请根据您的具体用例调整相关数值。
使用数据集设置忠诚度和分层评分
要使用数据集设置忠诚度和分级评分:
- 在你的 HubSpot 帐户中,单击更多,然后导航到数据管理 > Data Studio。如果你的帐户中未显示更多,请直接导航到数据管理 > Data Studio。
- 在右上角,点击“创建数据集”。如果要将此字段添加到现有数据集中,请在顶部点击“数据集”选项卡。然后,点击一个现有数据集。
- 选择“联系人”作为主对象,然后点击“继续”。
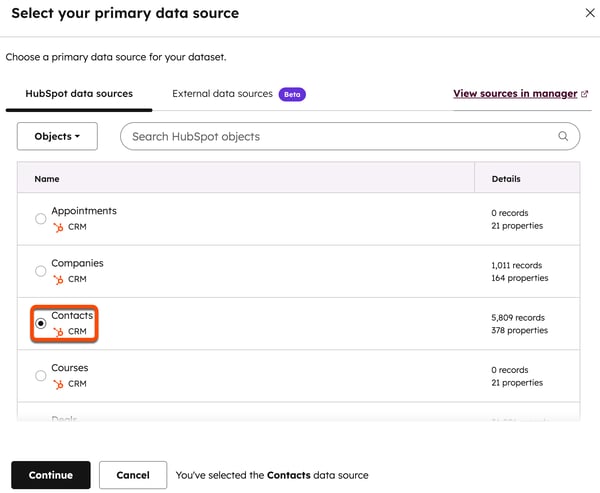
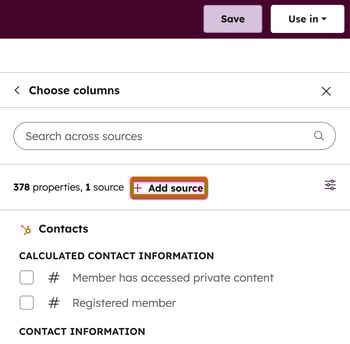
- 在右侧面板中,点击“+ 添加来源”。
- 选择“交易”,然后点击“继续”。
- 在右侧面板中点击“列”,然后点击“+ 创建新列”。
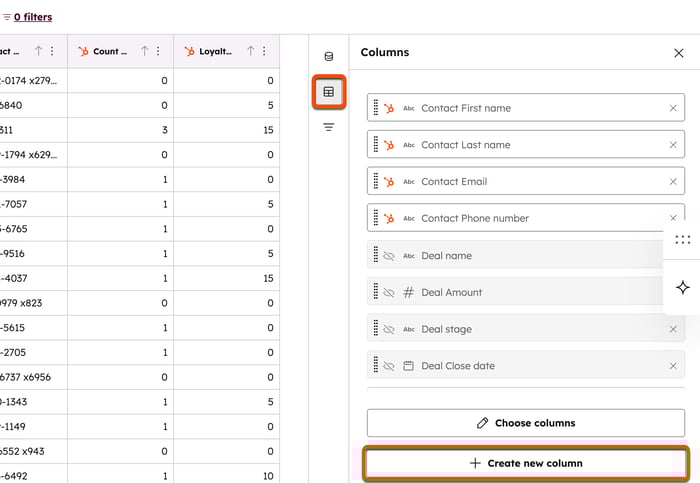
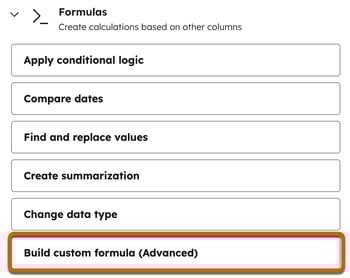
- 点击“公式”以折叠“公式”菜单,然后点击“构建自定义公式(高级)”。
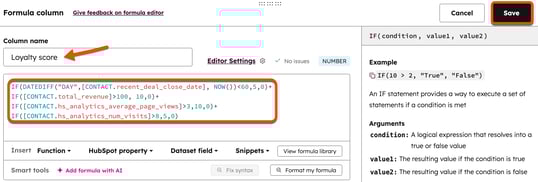
- 在底部,“列名”字段中,输入“忠诚度评分”。
- 在编辑框中,输入以下内容:
IF(DATEDIFF("DAY",[CONTACT.recent_deal_close_date], NOW())<60,5,0)+IF([CONTACT.total_revenue]>100, 10,0)+
IF([CONTACT.hs_analytics_average_page_views]>3,10,0)+
IF([CONTACT.hs_analytics_num_visits]>8,5,0) - 在公式窗口的右上角,单击“保存”。
- 点击“+ 创建新列”。
- 单击“公式”以折叠“公式”菜单,然后单击“构建自定义公式(高级)”。
- 在底部,“列名”字段中,输入“忠诚度等级”。
- 在编辑框中输入以下内容:
IF(
 [Loyalty score] >= 15,
 "Tier 1",
IF([Loyalty score] >= 9, "Tier 2", "Tier 3")) - 在公式窗口的右上角,单击“保存”。
- 在右上角,单击“保存”以保存数据集。
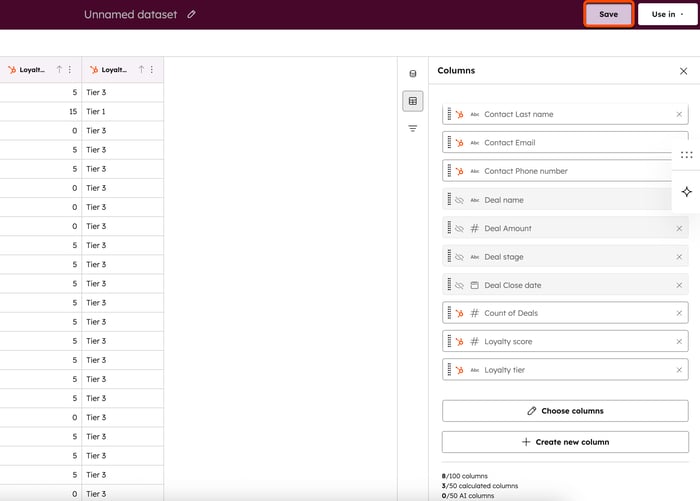
- 输入名称和描述,然后点击“保存”。
- 要使用该数据集,请在右上角点击“在 中使用”,然后选择一个选项。
购买历史
使用自定义属性及数据集来生成联系人购买历史报告。报告内容包括:
- 按购物篮规模划分的平均订单总额。
- 自上次购买以来的天数。
- 重复购买者与单次购买者的对比。
- 按原始来源划分的平均购买金额。
按购物篮规模划分的平均订单总额
利用平均订单总额,通过向上销售或交叉销售的机会,寻找提高平均订单价值的方法。
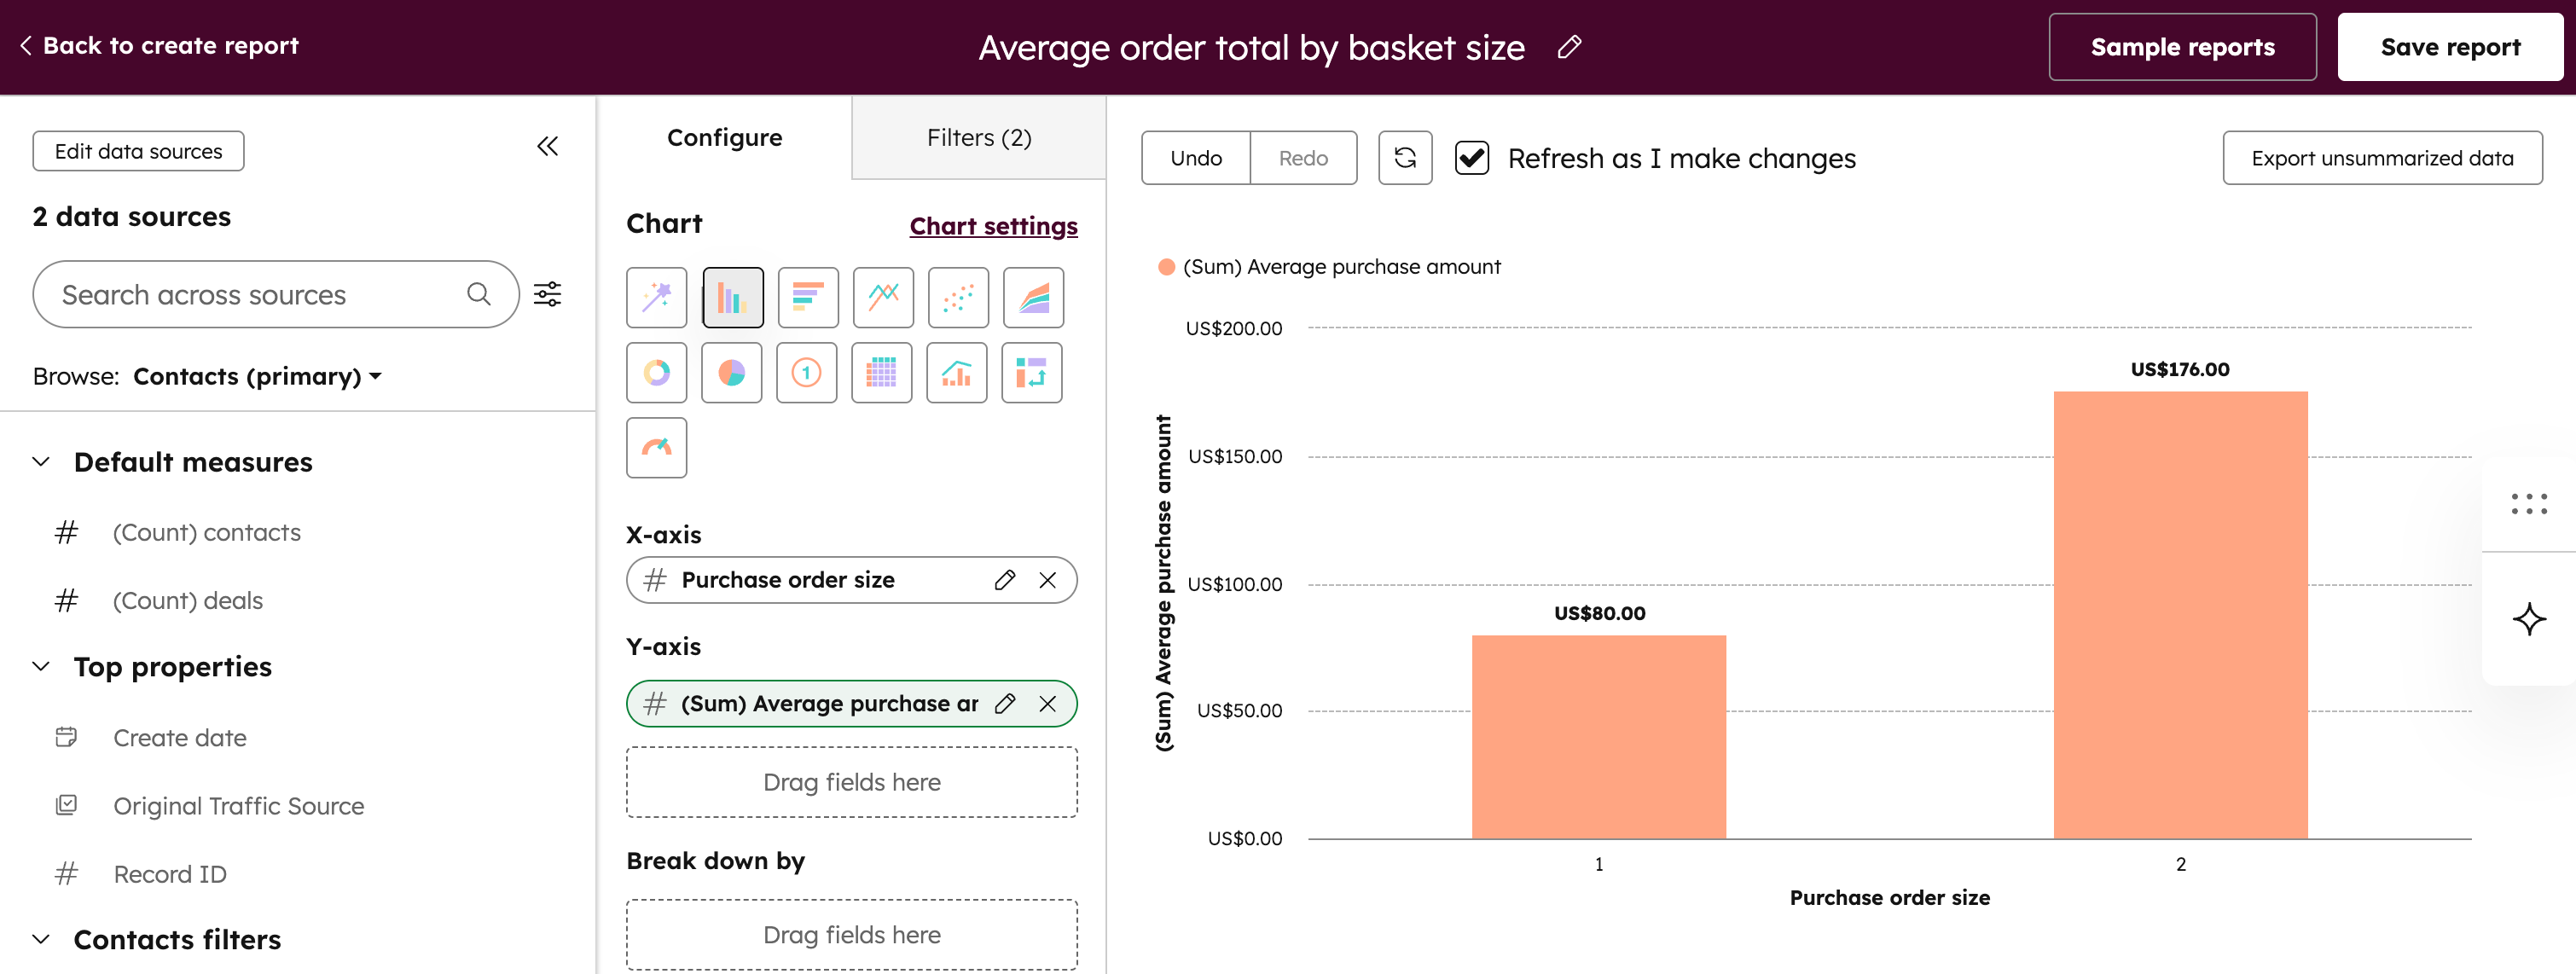
在此示例中,创建两个自定义属性来计算平均购买金额和购买商品数量。然后,创建一个报告,根据联系人的订单规模(购买商品数量)查看其平均购买金额。
- 为“平均购买金额”创建一个汇总属性,其属性如下:
- 对象类型: 联系人
- 字段类型: 汇总
- 汇总类型: 平均值
- 数字格式: 货币
- 关联记录类型: 交易
- 关联记录属性: 金额
- 为采购订单数量创建一个汇总属性,具有以下属性:
- 对象类型: 交易
- 字段类型: 汇总
- 汇总类型: 计数
- 数字格式: 格式化或未格式化的数字
- 关联记录类型: 明细项
- 关联记录属性: 数量
- 创建一个具有以下属性的自定义报表:
- 主要数据源: 联系人
- 附加数据源: 商机
- Y轴属性: 平均购买金额
- X轴属性: 订单规模
自上次购买以来的天数
使用数据集根据联系人上次购买以来的天数对其进行细分。您可以在细分、电子邮件营销及其他营销渠道中利用这些数据,以持续与曾向您购买过的客户保持互动。
- 在你的 HubSpot 帐户中,单击更多,然后导航到数据管理 > Data Studio。如果你的帐户中未显示更多,请直接导航到数据管理 > Data Studio。
- 在右上角,点击“创建数据集”。如果要将此字段添加到现有数据集中,请在顶部点击“数据集”选项卡,然后点击一个现有数据集。
- 选择“联系人”作为主对象,然后点击“继续”。
- 在右侧面板中,点击“+ 添加数据源”。
- 选择“商机”,然后点击“继续”。
- 在右侧面板中点击“列”,然后点击“+ 创建新列”。
- 点击“公式”以折叠“公式”菜单,然后点击“构建自定义公式(高级)”。
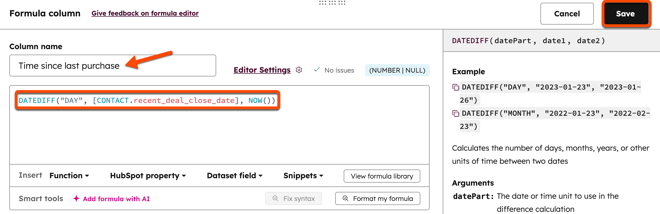
- 在底部,“列名”字段中,输入“自上次购买以来的时间”。
- 在编辑框中输入以下内容:
DATEDIFF("DAY", [CONTACT.recent_deal_close_date], NOW()) - 在公式窗口的右上角,点击“保存”。
- 在右上角,单击“保存”以保存数据集。
- 输入名称和描述,然后点击“保存”。
- 要使用该数据集,请在右上角点击 中的“使用”,然后选择一个选项。
重复购买者
利用数据集根据联系人的购买次数对他们进行细分。您可以在细分、电子邮件营销及其他营销渠道中使用这些数据,以针对性地促进客户重复购买。
- 在你的 HubSpot 帐户中,单击更多,然后导航到数据管理 > Data Studio。如果你的帐户中未显示更多,请直接导航到数据管理 > Data Studio。
- 在右上角,点击“创建数据集”。如果要将此字段添加到现有数据集中,请在顶部点击“数据集”选项卡。然后,点击一个现有数据集。
- 选择“联系人”作为主对象,然后点击“继续”。
- 在右侧面板中,点击“+ 添加数据源”。
- 选择“交易”,然后点击“继续”。
- 在右侧面板中点击“列”,然后点击“+ 创建新列”。
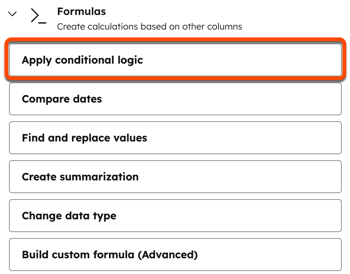
- 点击“公式”以折叠“公式”菜单,然后点击“应用条件逻辑”。
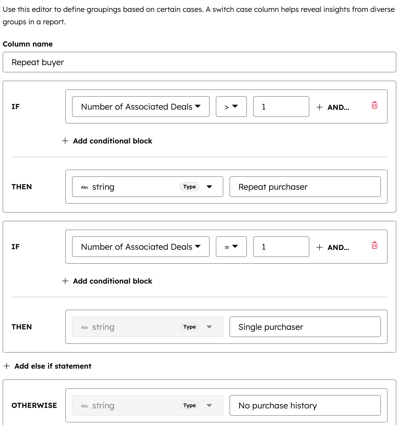
- 在底部“列名”字段中,输入“回头客”。
- 在“IF:”旁边:
- 点击“选择属性或列”下拉菜单,然后选择“关联交易数量”。
- 点击“=”下拉菜单,选择“>”( 大于)。
- 在“输入值”字段中,输入1。
- 在“THEN”旁边:
- 将“类型”字段保留为“字符串”。
- 在“输入值”字段中,输入“重复购买者”。
- 在“IF THEN”语句下方,点击“+ 添加 else if 语句”。
- 在“IF”旁边:
- 点击“选择属性或列”下拉菜单,并选择“关联交易数量”。
- 点击“=”下拉菜单,选择“=”(等于)。
- 在“输入值”字段中,输入1。
- 在“THEN”旁边:
- 将“类型”字段保留为“字符串”。
- 在“输入值”字段中,输入“单一购买者”。
- 在“OTHERWISE”旁边:
- 将“类型”字段保留为“字符串”。
- 在“输入值”字段中,输入“无购买记录”。
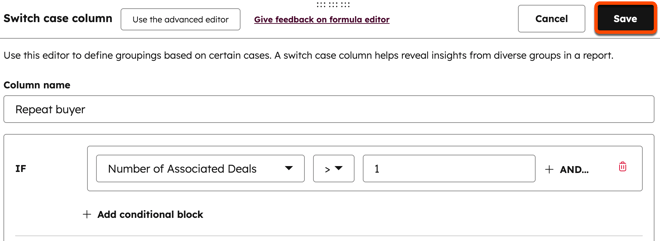
- 在公式窗口的右上角,单击“保存”。
- 在右上角,单击“保存”以保存数据集。
- 输入名称和描述,然后单击“保存”。
- 要使用该数据集,请在右上角单击 中使用”,然后选择一个选项。
按原始来源划分的平均订单金额
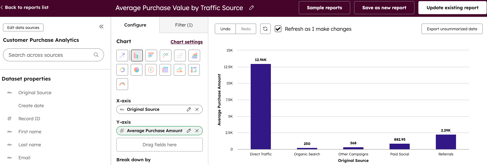
利用“按原始来源划分的平均购买金额”计算结果,分析各渠道(例如:直接流量、推荐流量、付费社交媒体)的购买金额。
在此示例中,请创建一个自定义属性来计算平均订单金额。然后创建一份报告,以查看按原始来源划分的联系人平均订单金额。
请注意:如果您之前已为“按购物篮规模计算平均订单总额”用例设置了平均购买金额的自定义属性,则可将该属性用于此用例,无需另行创建自定义属性。
- 为平均购买金额创建一个汇总属性,其属性如下:
- 对象类型: 联系人
- 字段类型: 汇总
- 汇总类型: 平均值
- 数字格式: 货币
- 关联记录类型: 交易
- 关联记录属性: 金额
- 创建一个具有以下属性的自定义报表:
- 主数据源: 联系人
- 附加数据源: 商机
- Y轴属性: 平均购买金额
- X轴属性: 原始流量来源(交易属性)
运输与物流
使用数据集来生成关于发货时长以及有多少订单发货逾期的情况报告。
发货时长与逾期发货
在此示例中,请设置一个自定义属性,并在工作流中使用该属性来记录结账完成的时间和日期。创建一个数据集字段来计算完成发货所需的时间,并创建另一个字段来计算发货逾期的情况。随后,这些字段即可用于生成报告。
- 设置您的销售漏斗。
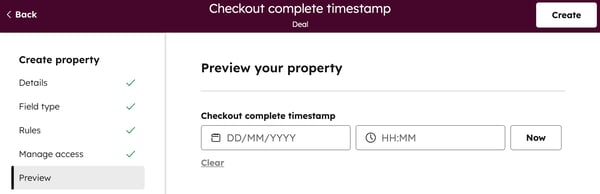
- 创建一个具有以下属性的自定义属性:
- 标签: 结账完成时间戳
- 对象类型: 交易
- 字段类型: 日期和时间选择器(仅显示日期和时间),且允许任何日期。
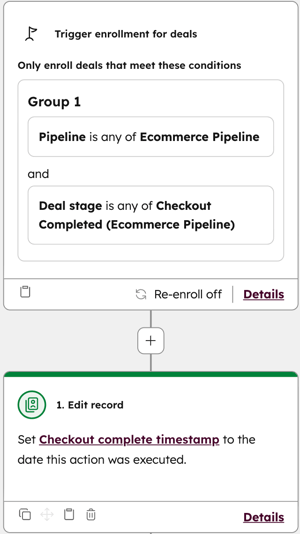
- 创建一个具有以下触发器和操作的工作流:
- 触发器:商机位于电子商务流程中,且处于“结账完成”阶段。
- 操作:将“结账”记录的时间戳属性设置为结账完成的日期。
- 在你的 HubSpot 帐户中,单击更多,然后导航到数据管理 > Data Studio。如果你的帐户中未显示更多,请直接导航到数据管理 > Data Studio。
- 在右上角,点击“创建数据集”。如果要将此字段添加到现有数据集中,请在顶部点击“数据集”选项卡,然后点击一个现有数据集。
- 选择“联系人”作为主对象,然后点击“继续”。
- 在右侧面板中,点击“+ 添加数据源”。
- 选择“商机”,然后点击“继续”。
- 在右侧面板中点击“列”,然后点击 ”选择列。
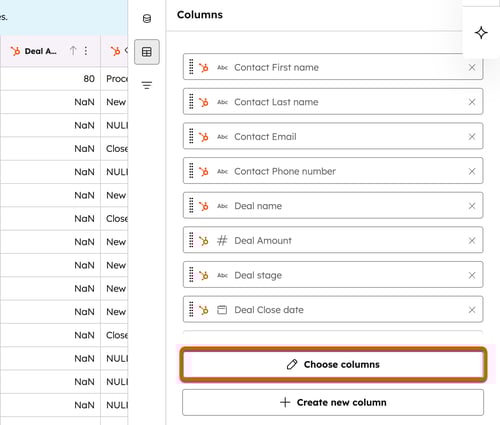
- 在右侧面板中,点击“商机”以折叠商机属性,并勾选 “记录 ID”和“地区”复选框。
- 点击“公式”以折叠“公式”菜单,然后点击“构建自定义公式(高级)”。
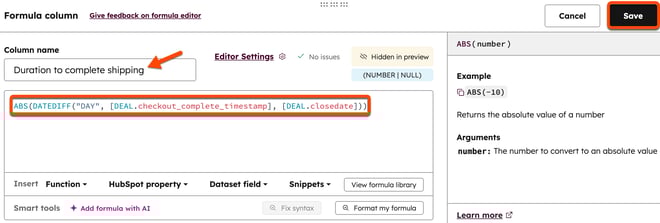
- 在底部,“列名”字段中,输入“完成发货所需时间”。
- 在编辑框中输入以下内容:
ABS(DATEDIFF("DAY", [DEAL.checkout_complete_timestamp], [DEAL. closedate])) - 在公式窗口的右上角,点击“保存”。
- 在右侧面板中点击“列”,然后点击“+ 创建新列”。
- 单击“公式”以折叠“公式”菜单,然后单击“应用条件逻辑”。
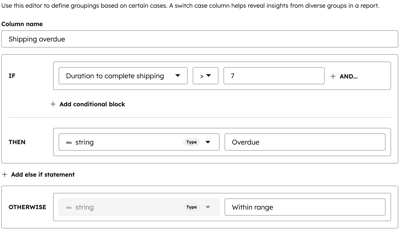
- 在底部,“列名”字段中,输入“发货逾期”。
- 在“IF:”旁边:
- 点击“选择属性或列”下拉菜单,选择“发货所需时长”。
- 点击“=”下拉菜单,选择“>”( 大于)。
- 在“输入值”字段中,输入7。
- 在“THEN”旁边:
- 将“类型”字段保留为“字符串”。
- 在“输入值”字段中,输入“逾期”。
- 在“OTHERWISE”旁边:
- 将“类型”字段保留为“字符串”。
- 在“输入值”字段中,输入“在范围内”。
- 在公式窗口的右上角,单击“保存”。
- 在右上角,单击“保存”以保存数据集。
- 输入名称和描述,然后单击“保存”。
- 要使用该数据集,请在右上角点击 中的“使用”,然后选择一个选项。
- 然后,您可以创建一个具有以下属性的自定义报告:
- 逾期发货率报告:
- 主要数据源:您创建的数据集
- 逾期发货率报告:
-
-
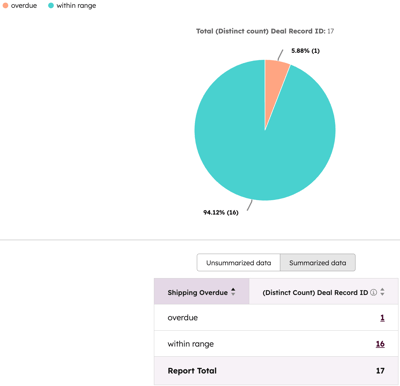
- 图表类型: 饼图
- 数值: 交易记录ID(唯一计数)
- 按以下维度细分: 发货逾期
- 按地区划分的逾期发货报告:
- 主要数据源:您创建的数据集
- 图表类型: 饼图
- 数值: 逾期发货
- 按以下条件细分: 交易区域
- 完成发货的平均时长:
- 主要数据来源: 您创建的数据集
- 图表类型: 竖条形图
- Y轴: 完成发货所需时间(平均值)
- 按以下维度细分: 交易区域
-
按受众或产品划分的产品毛利明细
利用数据集按产品受众或产品名称对产品进行细分,以便您了解哪些受众或产品带来了最佳回报。
- 在你的 HubSpot 帐户中,单击更多,然后导航到数据管理 > Data Studio。如果你的帐户中未显示更多,请直接导航到数据管理 > Data Studio。
- 在右上角,点击“创建数据集”。如果要将此字段添加到现有数据集中,请在顶部点击“数据集”选项卡,然后点击一个现有数据集。
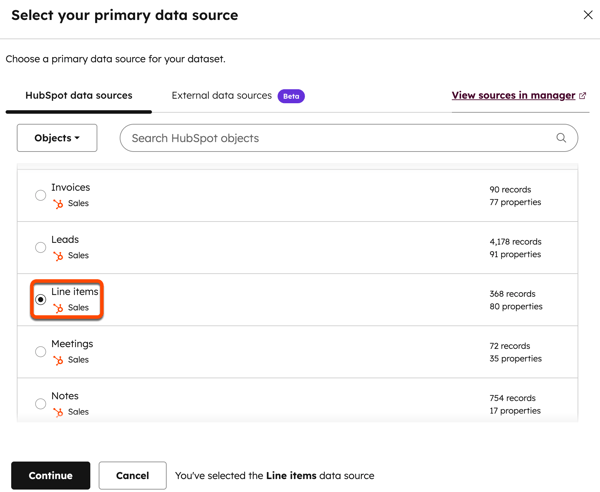
- 选择“明细行”作为 主对象,然后点击“继续”。
- 在右侧面板中,点击“+ 添加数据源”。
- 选择“交易”,然后点击“继续”。
- 在右侧面板中,点击“+ 添加数据源”。
- 选择“联系人”,然后点击“继续”。
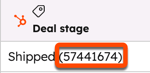
- 在“交易阶段”列中,记下“已发货”阶段的 ID 编号。
- 在右侧面板中点击“列”,然后点击“+ 创建新列”。
- 点击“公式”以折叠“公式”菜单,然后点击“构建自定义公式(高级)”。
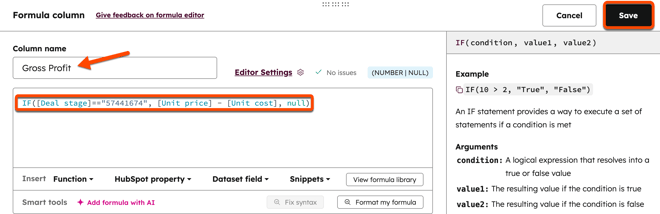
- 在底部,“列名”字段中,输入“毛利”。
- 在编辑框中输入以下内容:
IF([Deal stage]=="Shipped ID number (e.g., 57441674)", [Unit price] - [Unit cost], null) - 在公式窗口的右上角,点击“保存”。
- 在右上角,点击“保存”以保存数据集。
- 输入名称和描述,然后点击“保存”。
- 要使用该数据集,请在右上角点击“在 中使用”,然后选择一个选项。
客户旅程与行为
按产品类型划分的页面浏览量
需要订阅 使用自定义事件需要企业版订阅。
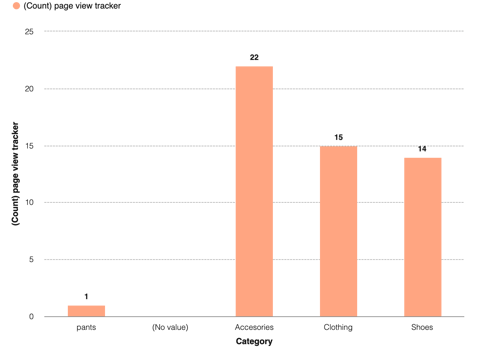
使用自定义事件跟踪产品浏览情况,并通过自定义属性对其进行分类。创建报告以分析哪种产品类型获得的浏览量最多。
- 创建一个自定义事件来跟踪产品的浏览量。对于此用例,建议通过API 或使用JavaScript 创建事件。如果您在设置自定义事件时需要帮助,请考虑寻求HubSpot 解决方案合作伙伴的协助。
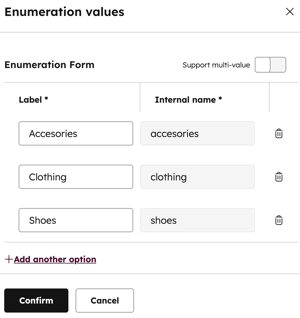
- 在创建自定义事件时,请为您的产品类型创建一个自定义枚举属性。
- 为您的自定义事件创建一个自定义报告。在报告中,将产品类型绘制在 x 轴上,将自定义事件绘制在 y 轴上。
客户购买旅程
需要订阅 创建基于联系人的客户旅程报告需要Marketing Hub 或 Service Hub Enterprise订阅。
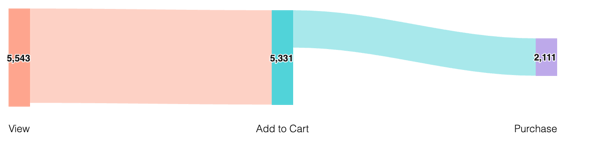
使用自定义事件来追踪客户旅程中的触点,包括查看产品、加入购物车、放弃购物车和购买。将这些自定义事件添加到客户旅程报告中,以追踪各事件之间的转化情况。
请注意:如果您之前已为“按购物篮规模计算平均订单总额”用例设置了平均购买金额的自定义属性,则可将该属性用于此用例,无需另行创建。
- 创建以下三个自定义事件。对于此用例,建议通过API 创建事件,或使用JavaScript。如果您在设置自定义事件时需要帮助,请考虑寻求HubSpot 解决方案合作伙伴的协助。
- 产品视图
- 购物车状态
- 结账页面跟踪器
- 将自定义事件作为阶段添加到客户旅程报告中。
发送购物车放弃提醒邮件
需要订阅 需订阅Marketing Hub Professional或Enterprise套餐,才能在营销邮件中使用相关模块。
通过发送个性化的购物车放弃提醒邮件(),保持客户参与度。在此示例中,请在工作流中使用“结账放弃”管道阶段,向购物车中留有未结账商品的买家发送邮件。
- 设置您的销售漏斗
- 在“设计管理器”中创建一个模块。将以下自定义模块语法添加到该模块中(根据需要更新标题和字体样式):
{#{{ module.deal.id }}#} {# Get the Contact associated to the Deal #} {% set associated_contact = crm_associations({{ module.deal.id }}, "HUBSPOT_DEFINED", 3, "orderBy=-createdate") %} {# Get the Line_Items associated to the Deal #} {% set associated_line_items = crm_associations({{ module.deal.id }}, "HUBSPOT_DEFINED", 19, "orderBy=-createdate") %} <h2 style="font-family:verdana; margin-top:20px; color:#ff6347; margin-left:10px; margin-right:10dp; text-align: center;"> Hello {{ associated_contact.results[0].firstname }}, Thank you for Visiting our Store! </h2> <p style="margin-left:10px; margin-right:10dp; text-align: center;"> We noticed that you haven't completed your order. Here is a little reminder of what you have in your current shopping cart. Feel free to complete your purchase by clicking on the button below. </p> {# Grab the product of each line item and display the info #} {% for item in associated_line_items.results %} {% set product = crm_object("product", item.hs_product_id, "name,price,hs_url", false) %} <div style="text-align:center"> <img style="width: 40%" src={{ product.hs_url }} /> <p> {{ product.name }} </p> <h4 style="font-family:verdana;"> ${{ product.price }} </h4> </div> {% endfor %} - 创建一封营销邮件并添加该模块。
- 创建一个具有以下触发器和操作的工作流:
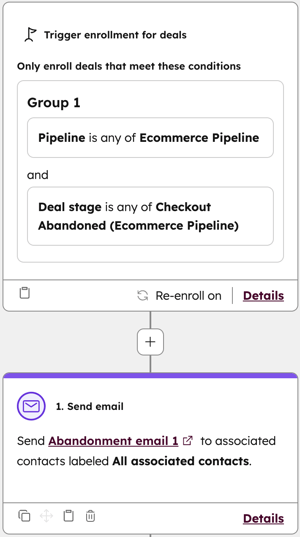
- 触发条件:交易处于电商流程中,且处于“购物车放弃”阶段。开启重新注册功能。
- 操作:发送电子邮件。