- Knowledge Base
- Content
- Blog
- Edit blog listing pages
Edit blog listing pages
Last updated: October 17, 2025
Available with any of the following subscriptions, except where noted:
A blog listing page is a page that displays all a blog's posts. In HubSpot, some blog listing pages can be edited with drag and drop tools in the content editor, while others require HTML + HubL editing in the design manager (Marketing Hub Professional or Enterprise or Content Hub Professional or Enterprise only).
Please note: you can only delete a drag and drop listing page by deleting its associated blog.
Create and edit drag and drop listing pages
In the content editor, you can create a blog listing page that displays all your blog's posts. Only listing pages that use themes or have drag and drop areas support adding or moving modules in the content editor.
Opt an existing blog listing page into editing in the content editor
Newly created blogs will automatically support editing in the content editor for their blog listing pages. For older blogs, you can opt into this editing experience in blog settings:
- In your HubSpot account, click the settings settings icon in the top navigation bar.
- In the left sidebar menu, navigate to Content > Blog.
- Click the Current view dropdown menu and select a blog.
- Click the Templates tab.
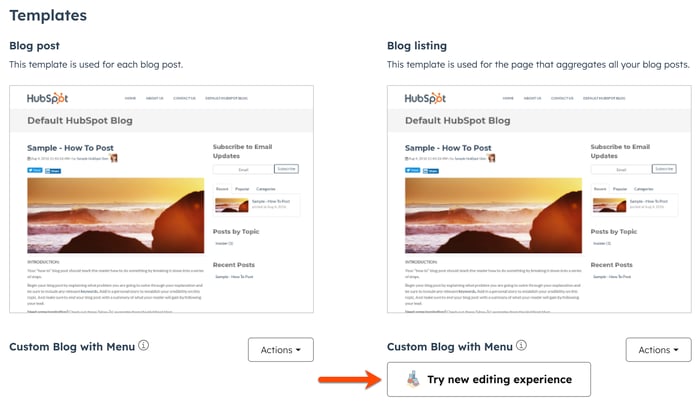
- In the Templates section, click Try new editing experience.

- In the dialog box, click Continue.
- In the content editor, use the drag and drop editing tools to edit the blog listing page.
- When finished, click Update in the top right, then click Update in the dialog box.
Edit blog listing page in the content editor
Blog listing pages that are opted into editing in the content editor can be accessed from the Blog posts page.
- In your HubSpot account, navigate to Content > Blog.
- In the top left, click the Configure dropdown menu and select Blog listing pages.

- To filter by blog, click the Blog dropdown menu and select the checkbox next to each blog you want to include in your filter.
- To create a new blog listing page, click Create in the top right. In the dialog box, click the Select a blog dropdown menu and select a blog, then click Create listing page.
Please note: each blog can only have one blog listing page. If a blog already has a blog listing page, you will not be able to create a new one for that blog.
- To edit an existing blog listing page, click the name of a listing page. To access multi-language blog listing pages, click the downCarat down arrow next to the primary blog listing page.
- In the content editor, use the drag and drop editing tools to edit the blog listing page.
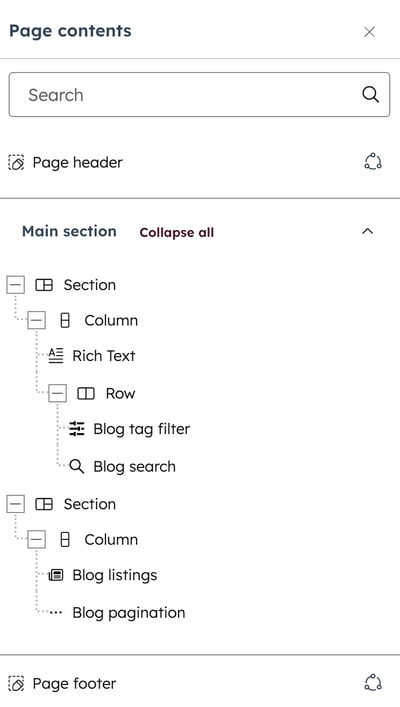
- The modules that appear will vary depending on your template. Some common modules include:
- Blog tag filter: filter your blog posts by tag.
-
- Blog pagination: set the text that moves visitors between different pages of your blog.

- To edit the listing page's settings, click Settings in the top right.
- Then edit the listing page's settings in the dialog box:
- To change how the page is named in HubSpot, enter a page name in the Internal page name field. This name will not appear to visitors.
- The public-facing name of the blog will appear in the Page title field. You can change this name in the Page title field in your blog settings.
- The URL of your listing page will appear in the Page URL field. You can change this name in the Blog root URL field in your blog settings.
- In the Meta description field, enter a description of the listing page's content that'll appear in search results below the page title.
- To add a featured image to your listing page for social sharing, click Featured image in the left sidebar menu. Then toggle the Enabled featured image switch on and click Upload to add an image from your browser or Browse images to add an image from the files tool.
- To add additional code to the listing page's head or footer HTML, click Advanced in the left sidebar menu. In the Head HTML or Footer HTML field, enter your code snippet.
- When finished, click Publish or Update in the top right.
Change listing page templates
- In your HubSpot account, navigate to Content > Blog.
- In the top left, click the Configure dropdown menu and select Blog listing pages.

- Click the name of a listing page. To access multi-language blog listing pages, click the downCarat down arrow next to the primary blog listing page.
- In the content editor, click Settings in the top right.
- In the left sidebar menu, click Template.
- In the Template section, click Use different template.
- On the Choose a template page, click a template card. To change the theme, click the Theme dropdown menu and select Change theme then click a template card.
- On the template preview screen, click Select template in the top right.
- In the content editor, make any changes to the template.
- When finished, click Publish or Update in the top right.
Edit coded blog listing page templates
You can create coded blog listing page templates that use HTML/HubL markup. Some listing page templates will also support editing modules in the layout editor, while others will be entirely coded.
A Marketing Hub Professional or Enterprise or Content Hub Professional or Enterprise subscription is required to edit coded blog listing page templates.
- In your HubSpot account, click the settings settings icon in the top navigation bar.
- In the left sidebar menu, navigate to Content > Blog.
- Click the Current view dropdown menu and select a blog.
- Click the Templates tab.
- In the Blog Listing Page section, click the Actions dropdown menu and select Edit.
- In the layout editor of the design manager, click a module and edit its options in the inspector.
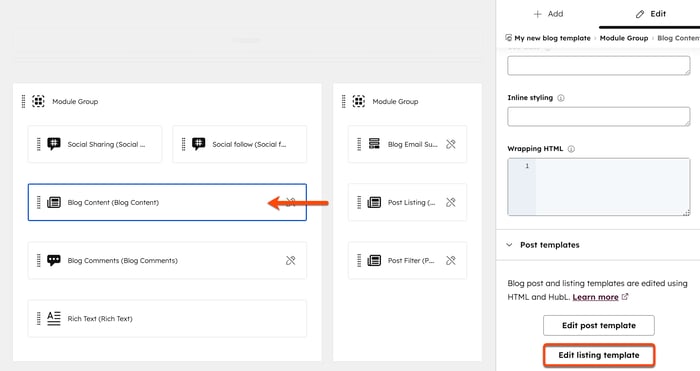
- To edit the blog content module for the listing template, click the Blog content module, then click Edit listing template in the right column.

- In the module editor, customize your listing template. Learn more about using HubL to edit a blog listing template in our developer documentation.
- When finished, click Publish changes in the top right to take your changes live.