Last updated: September 15, 2025
Available with any of the following subscriptions, except where noted:
-
 Marketing Hub
Professional, Enterprise
Marketing Hub
Professional, Enterprise
- Legacy Marketing Hub Basic
You can use the classic email editor to edit emails created using a coded template. You can also convert an email created using the classic editor into a drag and drop email template.
If you aren't using a specific coded template, it's recommended to use the drag and drop email editor.
Create a new email
- In your HubSpot account, navigate to Marketing > Email.
- In the upper right, click Create email.
- If you have a Marketing Hub Enterprise account and you have the Business Units add-on, click the Business Unit dropdown menu and select a business unit. This will associate the email with the business unit and allow you to design your email with your brand kit's default colors in the color picker.
- Select an email type:
- Regular: a one-off personalized email that you can send to a segment of your contacts.
- Automated: a personalized email that you can configure to send to certain contacts when they meet the enrollment criteria for a workflow.
- Blog/RSS: an email that will be sent out to your blog or RSS subscribers automatically when you publish new content to your blog or RSS feed.
- Click the Custom tab.
- Hover over a template and click Choose template.
Edit email layout and content
- Click an element to customize its content.
- Text elements can be edited inline and styled with the rich text toolbar. You can insert emojis into your text field by clicking the emoji icon
A/B test your email
- In the top left of the editor, click Run a test.
- In the dialog box, enter a name for the variation B email, then click OK.
- After creating both versions of your A/B test email, you can switch between the two at any time. In the upper left of the content editor, click the Variation A or Variation B tab.
- Once you've finished editing your A and B email variations, click the Settings tab. In the A/B test section, you can configure your testing options:
- A/B distribution: use the slider to decide what percentage of contacts will receive Variation A and Variation B. You can also set the slider to send Variation A to 50% and Variation B to 50%. This will send one email variation to half of the contacts, and the other email to the other half of contacts. This lets you analyze the statistics of the two emails after the send to see which variation was more successful.
- Winning metric: if you've opted to send variations A and B to a smaller group, then send the winning version to the remaining recipients, click the Winning metric dropdown menu to select the metric that determines how the winning variation will be chosen: Open rate, Click rate, or Click through rate.
- Test duration: use the slider to set a time period to gather data before choosing a winner and sending the winning variation. Your A/B test can run for up to 100 hours. If the results of the test are inconclusive after the test duration, Variation A will be sent to the remaining recipients.
Please note: you can run a full-split (50/50) A/B test using any sample size. All other sample splits require at least 1,000 recipients, excluding any contacts that previously hard bounced or unsubscribed.

Preview or test your email
Before you send or schedule your email, you can preview what it will look like to your recipients on different device types. You can also send a test email to yourself or another user in your account.- In the upper right, click Preview then click Inbox preview.
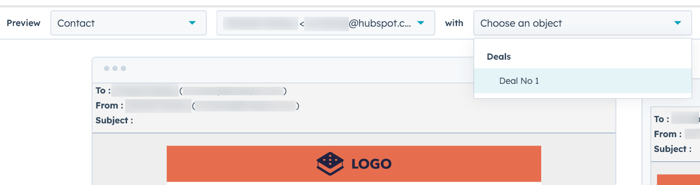
- The Devices tab will show how your email will render on a desktop or mobile device. By default, your email will render with default values for personalization. Click the Preview dropdown menu to preview your email with specific record values to test how your email will appear.
- Click the Clients tab and select the checkbox(es) for any email client you want to test, then click Test my email now. At the bottom of your clients list, you can see the results of earlier client tests for the email.
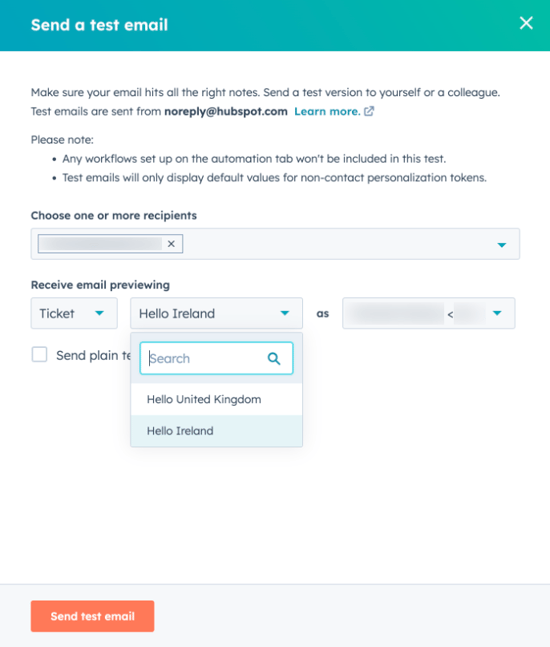
- You can also send a test email to verify that the contents appear as expected in a recipient's inbox:
- In the upper right, click Preview, then click Send test email.
- In the right pane, click the Choose one or more recipients dropdown menu to select recipient(s) for your test email.
- (Optional) Click the Receive email previewing dropdown menus to preview the email as it will appear with specific personalization options.
- You can also select the Send plain text version checkbox to send the plain text version of your email that excludes any styling.
- Click Send test email.
- To convert your email into an automated email to use in workflows, click the Actions dropdown menu and select Convert to automated email.
Send or schedule your email
At the top of the screen, click the Send to tab to choose your email recipients and finalize your sending options:
- To configure your email recipients:
- Click the Send to dropdown menu and select the segment and individual contacts to add them to the recipients.
- Click the Don't send to dropdown menu and select the segments and individual contacts to exclude them from the recipients
Please note: if you want to send your email to contacts from the same company, you can create a segment, then set the segment criteria to segment based on the Company name property.
-
- Click the Don't send to unengaged contacts checkbox to exclude contacts with low engagement. This feature is best used after you've already sent a few email campaigns from HubSpot, so there is data to identify your unengaged contacts.
- You can preview how many contacts will receive your email under Estimated recipients, based on the segments and individual contacts you selected.
- If you've chosen a segment to send to, the estimated recipients will still include any contacts from the segment who've unsubscribed or never subscribed to your marketing emails. Although these contacts are included in the estimate, they will not receive your email if they aren't subscribed to the subscription type you selected in the Settings tab.
- As you add recipients, you can review how many quarantined, bounced, unengaged, or non-marketing contacts will be automatically excluded from receiving your email. Contacts with invalid or missing email addresses will also be excluded.
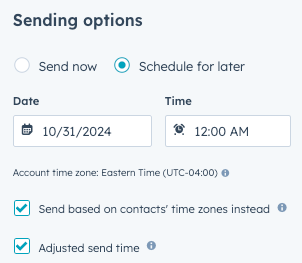
- In the right sidebar, choose when you want to send your email by selecting a sending option:
- Send now: your email will be sent immediately.
- Schedule for later: send your email at a specific date and time:
- Click the Date and Time dropdown menus to schedule your email. By default, emails are sent based on your HubSpot account's time zone. To manually configure the optimal sending time based on a specific time zone of your recipients, you can use a time zone converter.
-
If you want to send your email to a contact based on their time zone instead of your HubSpot account's time zone, select the Send based on contacts' time zone instead checkbox. If a contact doesn't have the IP time zone property populated on their record, the send time will default to your account's time zone.
- If exact timing isn't critical, select the Adjusted send time checkbox, which will still ensure that the email is sent within 5 minutes of your scheduled send time. Selecting this option is beneficial for smoother email delivery and optimizes HubSpot's email deliverability when multiple users schedule emails for the same exact time.
- To use the email in a workflow, click the Actions dropdown menu, then select Convert to automated email.
- In the upper right, click Review and send to review warnings for your email. If your email is larger than 102KB, you'll see an alert that Gmail will clip some of your email content for your recipients.
- After you've sent or scheduled your email, you can send it to more recipients if you forgot to include them when you first created the email:
- In your HubSpot account, navigate to Marketing > Email.
- Click the name of the sent or scheduled email that you'd like to send to additional recipients.
- In the upper right, click the Actions dropdown menu, then select Send to More.
- Click the Send to dropdown menu and select the segments and individual contacts to add them to the recipients.
- Click the Don't send to dropdown menu and select the segments and individual contacts to exclude them from the recipients.
- Click the Don't send to unengaged contacts checkbox to exclude contacts with low engagement.
- Click Send.
Convert a classic email into a drag and drop email template
If you created or drafted a marketing email using the classic email editor, you can convert it into a drag and drop email template. This allows you to use the updated drag and drop email editor experience.
Please note: only Drag and drop and default HTML + HubL templates in the design manager can be converted for use in the drag and drop email editor. Custom coded HTML + HubL templates cannot be converted.
To convert a classic email into a drag and drop email template:
- In your HubSpot account, navigate to Marketing > Email.
- Click the name of the draft email you'd like to turn into a drag and drop template.
- In the left sidebar, click the Template design icon.
- Click the Actions dropdown menu and select Convert to drag and drop.
- In the dialog box, click Convert to drag and drop.
Please note:
- If the classic email you're converting includes custom modules, you may notice a few discrepancies in the resulting drag and drop email template. For example, a logo module in a classic email will become an image module, and a main email body module will become a rich text module.
- Any locked modules or global groups in the converted email must be edited on the template level in the design manager.
