- Knowledge Base
- Account & Setup
- Integrations
- Connect HubSpot and Shopify (Data Sync)
Connect HubSpot and Shopify (Data Sync)
Last updated: November 11, 2025
Available with any of the following subscriptions, except where noted:
The HubSpot and Shopify integration bridges the gap between your e-commerce activities and marketing efforts. Learn how to connect Shopify, analyze data, and set up an e-commerce dashboard.
Before you get started
Permissions required You must be a Super Admin or have App Marketplace permissions in your HubSpot account to install the integration.
- You need at least a Data Hub Starter subscription to create any custom field mappings.
- By installing the Shopify (Data Sync) integration, the HubSpot tracking code will be added to your Shopify store automatically.
Connect the app
- In your HubSpot account, click the Marketplace icon marketplace in the top navigation bar, then select HubSpot Marketplace.
- Search for Shopify, and select it in the results.
- Click Install.
- Enter your Store's Shopify URL and click Install app.
- If you are already logged into your Shopify account, the app will automatically connect. If not, in the pop-up box, enter your Shopify login credentials.
Once your first store is connected, you can connect additional Shopify stores from the Shopify app page:
- In the upper right, click Account actions, then select Manage accounts.
- Click Connect another account, then click Next.
- Enter the store's Shopify URL, then click Connect to Shopify.
Configure your sync settings
To turn on data sync:
- In your HubSpot account, click the settings settings icon in the top navigation bar. In the left sidebar menu, navigate to Integrations > Connected Apps.
- Click Shopify.
- Navigate to the CRM syncs tab.
- Click Set up your sync.
- On the Choose an object to sync page, click the object you want to sync between HubSpot and Shopify. You can sync the following objects:
| HubSpot | Shopify | |
| Contacts | ⇔ | Customers |
| Companies | ⇔ | Companies |
| Products | ⇔ | Products |
| Orders | ← | Orders |
| Carts | ← | Abandoned Checkouts |
Please note: Shopify meta fields are not supported for sync via the Shopify Data Sync app.
Once the sync is turned on, data will automatically sync between the two systems. After the initial sync is complete, records will sync within 10 minutes of a change.
You can also customize your sync settings. Learn more about what fields map between HubSpot and Shopify.
To turn off data sync:
- In your HubSpot account, click the settings settings icon in the top navigation bar. In the left sidebar menu, navigate to Integrations > Connected Apps.
- Click Shopify.
- Navigate to the CRM syncs tab.
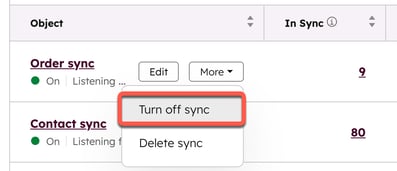
- Hover over the sync you want to turn off, click the More dropdown menu, and select Turn off sync. This will prevent records from syncing between HubSpot and Shopify.

Review duplicate and deletion rules
Each object syncing between HubSpot and Shopify has its own set of deduplication and deletion rules. Review the rules below:
Contacts
- Data sync matches contact records by comparing the contacts’ email addresses. To reduce duplicate records from being created in either app, on the Limit screen, select the Only sync contacts with an email address checkbox.
- When contacts that were created from Shopify are deleted in HubSpot, the corresponding customer records won't be deleted in Shopify.
- When customer records are deleted in Shopify, the corresponding contact records won't be deleted in HubSpot.
Companies
- Data sync matches company records based on either the company name or domain name. Syncing only companies with either a name or domain prevents duplicate records from being created.
- When company records are deleted in HubSpot, the corresponding record will not be deleted in Shopify.
Products
- Data sync matches products based on the product name.
Please note: data sync uses normalization when matching records. Therefore, any capitalization, special characters, and punctuation in the product name in Shopify will be stripped when matching it to a product in HubSpot.
- When a product is removed from a Shopify cart, the corresponding line item is removed from the order record in HubSpot. However, even if the product is deleted in Shopify, the corresponding product in HubSpot will not be deleted.
- Shopify product variants can't sync to HubSpot.
Orders
- When you sync orders from Shopify, each order is linked to a product and customer. The order record in HubSpot will be linked to a cart and contact record.
- If a Shopify order has a customer who wasn't created with an email address, it'll be synced to HubSpot as an order without a contact.
- Order sync doesn't automatically identify or merge duplicate records.When you turn on order sync, any records that meet your filter criteria will sync at once. If you’ve already imported records into either app, they may sync again and create a new, duplicate record.
- Shopify orders can't be changed in your HubSpot account as they are synced one-way from Shopify to HubSpot.
Carts
Please note:
Following an an update to the Shopify API:-
- The following fields have been removed from cart sync from April 1, 2025:
- Cart tags.
- Cart token.
- Landing site.
- Referring site.
- Total weight.
- Shipping cost.
- Buyer accepts marketing.
- The following fields have been added to cart sync from April 1, 2025:
- Discount codes list (default field mapping).
- Billing province code (available for custom field mapping).
- Note (available for custom field mapping).
- Custom field mappings added to cart sync before April 1, 2025, will need to be manually reconfigured after this date.
- The following fields have been removed from cart sync from April 1, 2025:
- Cart sync doesn't automatically identify or merge duplicate records.
- When you turn on cart sync, any records that meet your filter criteria will sync immediately. If you’ve already imported records into either app, they may sync again and create a new, duplicate record.
Create an e-commerce dashboard
E-commerce reports will be added to your HubSpot account after connecting your Shopify store. You can create a dashboard of these reports to track customer orders and engagement.
To create an e-commerce dashboard:
- In your HubSpot account, click the settings settings icon in the top navigation bar. In the left sidebar menu, navigate to Integrations > Connected Apps.
- Click Shopify.
- Click the Feature Discovery tab.
- On the Create an Ecommerce dashboard card, click Go to dashboards. You'll be brought to the dashboard creator.
- Select Ecommerce.
- In the right panel, review which reports are included in the dashboard and select those you want to remove.
- Click Next.
- Enter a dashboard name and set the user access to this dashboard.
- Click Create dashboard.
View Shopify data on contact records
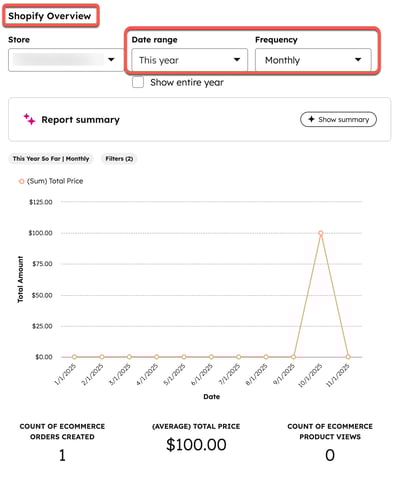
You can view Shopify's key metrics directly on contact records in HubSpot. This includes total orders, average order value, product views, as well as a sales graph and an AI-generated summary. The card updates in real time and will display the most current data directly from Shopify.
If you connected the Shopify integration before Nov. 1, 2025, the Shopify Overview CRM card will automatically appear in the middle panel of contact records.
If you're connecting Shopify to HubSpot after Nov. 1, 2025, you must add the Shopify Overview card to your contact records.
Permissions required Users must have Customize record page layout permissions or Super Admin permissions to customize a record.
To add the Shopify Overview card to your contact records:
- In your HubSpot account, click the settings settings icon in the top navigation bar. In the left sidebar menu, navigate to Integrations > Connected Apps.
- Click Shopify.
- Click the Feature Discovery tab.
- On the Get a Shopify overview report in your contact records card, click Learn more, then click Add Shopify overview card.
- You'll be brought to your Default view editor.
- Hover over the middle column, then click Add card.
- Click the Card library tab.
- Search for the Shopify Overview card and click Add card.

- Click the X to close the panel.
- In the upper right, click Save and exit to save your changes and leave the editor.
To customize the data shown in the Shopify Overview card:
- In the upper left of the card, click the Store dropdown menu and select a Shopify store.
- In the upper right of the card, click the Date Range and Frequency dropdown menus to filter the data shown in the graph and KPIs.

Use HubSpot marketing tools in Shopify
You can use tools such as forms and chatflows directly from Shopify. To access them:
- Log in to your Shopify account.
- Install HubSpot from the Shopify app store.
- Once installed, access HubSpot from the left hand menu of your Shopify account.
- Create a chatflow, manage forms, or access your contacts from Shopify.
Next steps
After connecting HubSpot and Shopify (Data Sync), review the following articles: