
Last updated: April 26, 2024
Available with any of the following subscriptions, except where noted:
|
|
If you have Add and edit users permissions in your HubSpot account, you can create new users and customize their permissions.
Learn how to remove users from the account.
Before you get started
To add HubSpot users and assign paid seats, you must do the following:
- Set up your HubSpot account.
- Purchase paid seats.
Create users
- In your HubSpot account, click the settings icon in the top navigation bar.
- In the left sidebar menu, navigate to Users & Teams.
- In the upper right, click Create user.
Please note: accounts created on or after March 5, 2024, that use the seats-based pricing model can follow a new process to import users from a CSV file. If your account was created before March 5, 2024, and has not migrated to the seats-based pricing model, continue with the CSV file import process below.
- You can add users in a few different ways:
- Email address: enter the email addresses into the Add email address(es) field. If you add multiple users at the same time, you should separate email addresses with a comma or space.
- CSV file: import users from a CSV file. In Excel, add an Email column with the email addresses of your users, and save the file in a CSV format. Click A CSV file, then drag and drop your .csv file, or click choose file to browse files on your computer.
Please note: only 100 users can be added in a single CSV import. If you are importing more than 100 users, you will need to do multiple imports.
-
- Integrations: if you have NetSuite, Microsoft Dynamics 365, Pipedrive, Zoho, or Salesforce integrated with HubSpot, you can import users from these integrations.
- Click the integration.
- By default, all the users will be selected for import. Clear the checkboxes next to any users you do not want to import.
- Integrations: if you have NetSuite, Microsoft Dynamics 365, Pipedrive, Zoho, or Salesforce integrated with HubSpot, you can import users from these integrations.
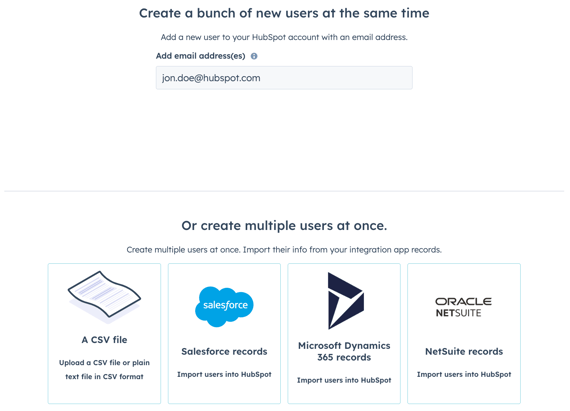
- Click Next.
Set up user access levels
You can assign seats and permissions to users to give or limit access in your HubSpot account. If you've added multiple users, the permissions will be set for all selected users.
Please note: on March 5, 2024, HubSpot introduced a seats-based pricing model to all new Hubs and subscription tiers. Accounts created prior to March 5, 2024 will not see the Assign a seat section during the user setup process. Begin the user setup process at the Choose how to set access section.
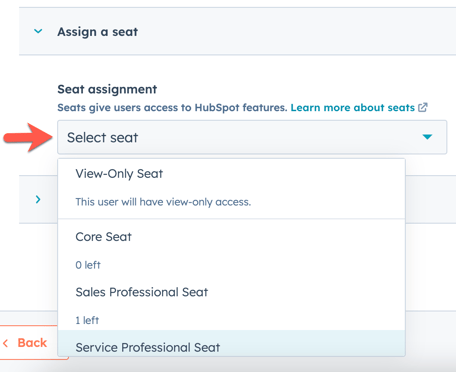
- Click Assign a seat to expand the section. Click the Seat assignment dropdown menu to select the correct seat type for the user.
-
A seat is the manner and level of access your users have to your subscription services. HubSpot offers different types of seats based on which subscription services you purchase. The following are brief descriptions of each seat type:
- Core Seat: provides your user with access to the features and tools in the subscription services you purchased.
- Sales Hub Seat: provides your user with access to Sales Hub, and access to use features for Sales Hub Professional and Sales Hub Enterprise.
- Service Hub Seat: provides your user with access to Service Hub and access to use advanced features for Professional and Enterprise subscription editions.
- View-Only Seat: allows your user to view your subscription services without making any changes to your account.
- Partner Seat: gives eligible HubSpot Solutions Partner employees access to all features in a client's account.
- To understand the full scope of what each seat includes, learn more in HubSpot's Products & Services catalog.
-
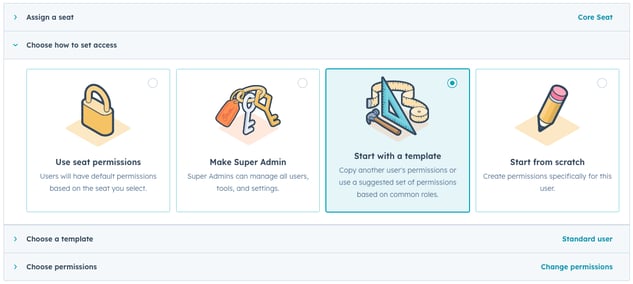
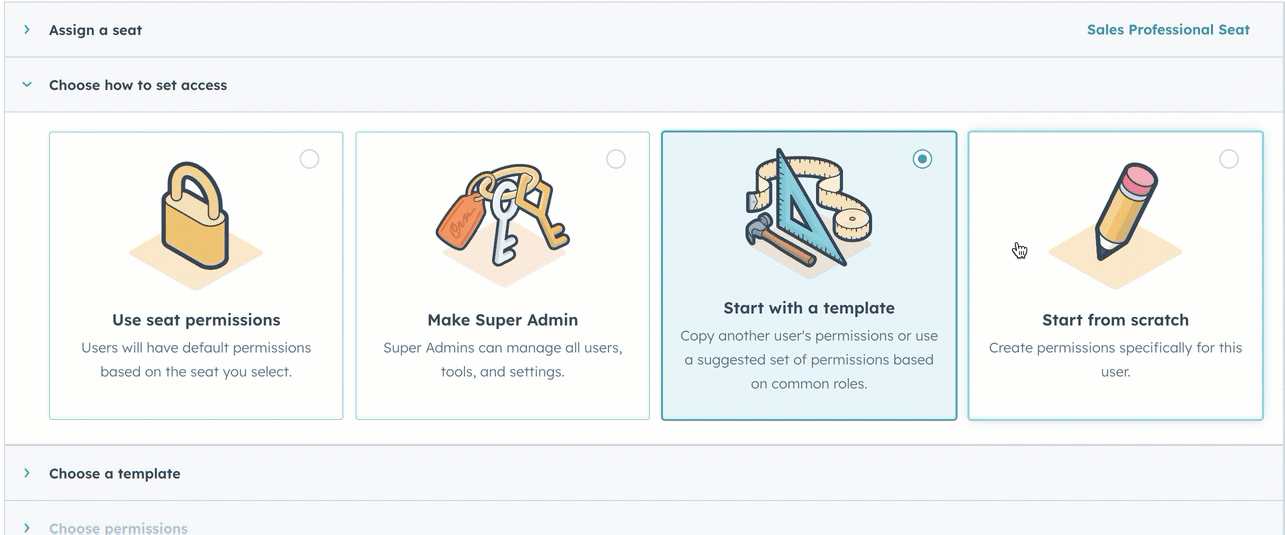
- Click Choose how to set access to expand the section. Select one of the following permission setup options:
Please note: Accounts created prior to March 5, 2024, will not see the Use seat permissions or Make Super Admin options.
-
- Use seat permissions: users will have default permissions based on the seat you selected.
- Make Super Admin: users can manage all users, tools, and settings.
- Start with a template: users can be assigned a template based on the user's job function. Click Choose a template to expand the section. Click the Choose a user or role-based template dropdown menu to select a template.
- Start from scratch: users can start from scratch to fully customize user access levels.
- Click Choose permissions to expand the section. Toggle the permissions on and off as needed. Learn more about what each permission gives access to in HubSpot's user permissions guide.
Please note: To assign Sales or Service seats for accounts created prior to March 5, 2024, click the Sales or Service tab, then toggle the Sales Access or Service Access switches on.
- Click Next.
Review user access
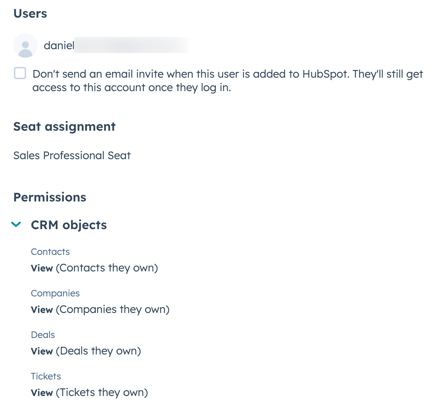
Review user access and seat assignment to complete the user setup process.- If the user has already set up a HubSpot password for another account, you can skip sending the welcome email by selecting the Don't send an email invite when this user is added to HubSpot checkbox.
- Review the Seat assignment and Permissions sections to ensure the permissions look correct. Return to previous sections if further modifications are required.
- Click Create user.
Customize users
After setting up your user, the Customize users page will appear to help you continue customizing your user:
- Send invite link: To copy the unique invite link for the user, click Send an invite link to expand the section, then click Copy invite link . You can share this link across any messaging channel.
- Add users to teams: To add users to a team, click Add your users to a team to expand the section, then click the dropdown menus to add users to main teams and extra teams.
- Assign users to presets (Professional and Enterprise only): To set up users with presets, click Set up users with presets to expand the section, then click the Presets dropdown menu.
- Save permission sets (Enterprise only): If you made changes to the existing permission set or started from scratch, you can save these permissions to assign new and existing users the same access. Click Save these permissions into a reusable permission set to expand the section, then click Save as a custom Permission Set.
The new user will be sent the welcome email where they can set their password and log in. If the new user doesn't receive a welcome email within five minutes, consult the troubleshooting steps below.
Once a user has been added to an account and they have setup their password, they’re eligible to receive notifications. The user can manage their notifications by logging in. After the user logs in, they can also set up their profile.
Troubleshoot a bounced email invite
If you invite a teammate to HubSpot but they can't find the invite email in their inbox, there might be an issue with the email address you entered, or you may need to reach out to your IT team to confirm that emails from HubSpot aren't being blocked.
Try the following troubleshooting steps if the user you invited did not receive the invite email:
- Ask the user to check their Junk or SPAM folder.
- Confirm that you spelled the email address correctly. If the address was entered correctly, ensure that the address has been created and is active.
- Check with your IT team to determine whether a firewall may be active that might be preventing HubSpot emails from being delivered. Learn more about how to set up allowlisting for HubSpot email and IP addresses.
- If the initial delivery attempt for an invitation email fails to be delivered, HubSpot will block the corresponding email address, and you will need to contact HubSpot Support to get help with manually unbouncing the address.
If the invite email was delivered but the user still cannot locate it in their inbox after following the steps above, you can give them account access by sending a reset password email. The new user can also do this directly from the login screen.
