Last updated: December 3, 2025
Available with any of the following subscriptions, except where noted:
-
 Seats required for certain features
-
Additional subscriptions required for certain features
Access the HubSpot sales tools directly in your inbox when composing emails with the HubSpot Sales Outlook desktop add-in installed.
If you're using the Office 365 add-in, learn how to use sales tools with the HubSpot Sales Office 365 add-in.
Please note: due to the significant changes introduced by Microsoft as part of the new Outlook for Windows, HubSpot will no longer actively develop or improve the HubSpot Sales Outlook desktop add-in. While the HubSpot Sales Outlook desktop add-in is still available in the classic Outlook for Windows and will continue to be supported, it's highly recommended that you activate the HubSpot Sales Office 365 add-in instead. If you're using the Outlook desktop add-in, the HubSpot Sales Office 365 add-in will automatically be installed if you switch to the new Outlook for Windows. Learn more in this HubSpot Community post.
Before you get started
- To use your meetings tool in Outlook, you must have a connected calendar.
- To use your sequences tool in Outlook, you must have a connected personal email.
Snippets
To insert snippets in your emails using the Outlook desktop add-in:
- Compose a new email in Outlook and add a recipient.
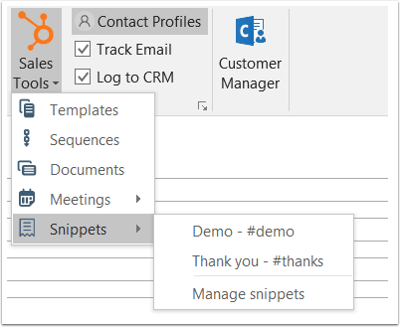
- In the message ribbon, click Sales Tools > Snippets, then select a snippet. Click Manage snippets to go to your snippets dashboard in your HubSpot account.
- Or, right-click in the body of your email and select Snippets, then select the snippet you wish to insert.
Templates
To insert a template using the Outlook desktop add-in:
- Compose a new email and add a recipient.
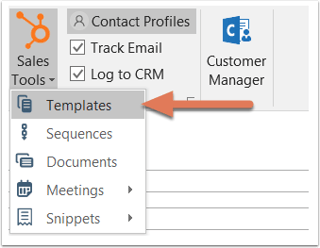
- In the message ribbon, click Sales Tools > Templates.
- At the top of the dialog box, use the search bar to search for a template by name or click the dropdown menu beside the search bar to filter your templates by All, Created by my team, Created by me and Recent.
- The Last used at column is user specific, so it will show the templates that were last sent by the user viewing the modal. You can sort your templates by the Last used at or the Created at column.
- Hover over the template you want to use and click Select.
Documents
To insert a document using the Outlook desktop add-in:
- Compose a new email and add a recipient.
- In the message ribbon, click Sales Tools > Documents.

- In the dialog box, search for a document by name or click the dropdown menu beside the search bar to filter your documents by All, Created by my team, Created by me, and Recent.
- The Last used at column is user specific, so it will show the documents that were last used by the user viewing the modal. You can sort your documents by the Last used at or the Created at column.
- Select the Require an email address from all other viewers checkbox if you want to collect an email address from anyone else besides the original recipient who views the document.
- Hover over the document you want to use and click Select.
- A link to the document will be inserted into your email.
Meetings
To insert a meeting link using the Outlook desktop add-in so a contact can access your scheduling page:
- Compose a new email in Outlook and add a recipient.
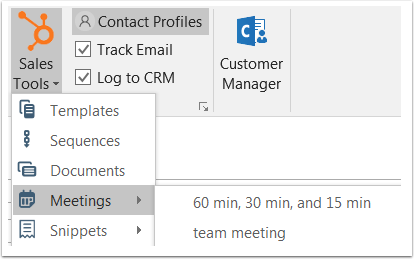
- In the message ribbon, click Sales Tools > Meetings, then select one of your scheduling pages. Click Manage links to go to your meetings dashboard in HubSpot. You can also insert proposed times directly into the email so your contacts can select an available time slot directly from the email.
- Alternatively, you can right-click in the body of your email and select Meetings, then select the scheduling page you wish to insert.
The name of your meeting will appear in your email. It will be hyperlinked, so when a prospect clicks it, they'll be brought to your booking page.
Sequences
Subscription required A Sales Hub or Service Hub Professional or Enterprise subscription is required to enroll contacts into a sequence.
Seats required An assigned Sales or Service Seat is required to enroll contacts into a sequence.
To enroll a contact in a sequence using the Outlook desktop add-in:
- Compose a new email and add a recipient.
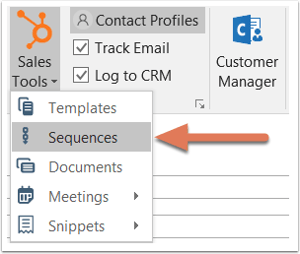
- In the message ribbon, click Sales Tools > Sequences.
- In the dialog box, use the search bar to search for a sequence by name or click the dropdown menu beside the search bar to filter your sequences by All, Created by my team, Created by me, and Recent.
- The Last used at column is user specific, so it will show the sequences that were last sent by the user viewing the modal. You can sort your sequences by the Last used at or the Created at column.
- Hover over the sequence you want to enroll your contact in and click Select.
- In the next dialog box, edit your sequence's content and settings. Click the Start dropdown menu and select the first step of the sequence. Specify the start time of the first email send, then click the Advanced settings dropdown menu to specify when each subsequent email in the sequence should be sent.
- Click Start sequence to enroll the contact.
