- Knowledge Base
- Account & Setup
- Integrations
- Use app objects from your connected apps
Use app objects from your connected apps
Last updated: January 10, 2026
Available with any of the following subscriptions, except where noted:
Some apps on the HubSpot App Marketplace provide support for using objects from a third-party service directly within the various tools in your HubSpot account. These objects include custom schemas with app-specific fields like identifiers and timestamps, making integration data available and actionable throughout your account.
After you connect an app that supports app objects to your HubSpot account, the corresponding app objects will be available to use in your account. Learn more about the supported tools for app objects and how to access them in your account in the sections below.
Please note: if you're a developer who's interested in using app objects in your app, you can learn more in HubSpot's developer documentation.
Supported tools
The following HubSpot tools currently support using app objects:
Some apps may offer support for syncing app object data based on events that occur in your HubSpot account (e.g., changing an app object property, creating a new app object record, or deleting an app object record).
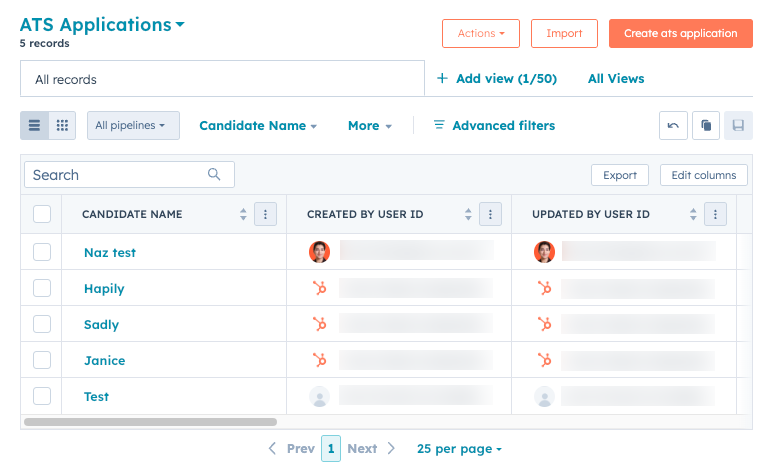
Review records on the app objects index page
You can create new app object records and review any existing records on the index page:
- In your HubSpot account, navigate to CRM > Contacts.
- In the top left, click Contacts, then select [App object name].
- Any existing app object records will appear in the list.
- You can click the name of a record to navigate to the record page.
- To create a new app object record, click Create [App object name] in the top right. Follow the prompts to provide the corresponding details for the new record.

Manage app object settings
To manage app object properties, existing associations and pipelines, or customize the appearance of your app object record:
- In your HubSpot account, click the settings settings icon in the top navigation bar.
- In the left sidebar menu, navigate to Objects > [App object name].
- On the Setup tab, manage the settings for record creation and app object properties:
- Click Manage [App object name] properties to review the default properties for the app object, or create custom properties.
- You can also click Customize the [App object name] form to make changes to the default record creation form used to create a new app object record from the index page.
- Click the Associations tab to review existing associations for the app object. Note that during this phase of the beta, you cannot currently create new associations, configure labels, or set association limits.
- Click the Pipelines tab to create and manage app object pipelines.
- Click the Record customization tab to configure the app object record layout and content:
- To change the default view for all users who aren't on an assigned team:
- Click Default view.
- Create or update the cards or tabs that appear on the record.
- Click Save in the top right to save your progress at any time, or click Save and exit to save your changes and leave the editor.
- To create or edit a team view (Professional and Enterprise only):
- Click Create team view or click the name of an existing team view.
- At the top of the editor, enter a name for the view.
- In the top right, click Assign teams to select the teams who will have access to the view. In the dialog box, select the checkboxes of the teams, then click Done.
- Create or update the cards and tabs displayed on the record.
- Click Save in the top right to save your progress, or click Save and exit to save your changes and leave the editor.
- To change the default view for all users who aren't on an assigned team:
- Click the Preview Customization tab to configure the sidebar preview that appears when previewing an app object record.
- Click the Index Customization tab to configure the index page for existing app objects.
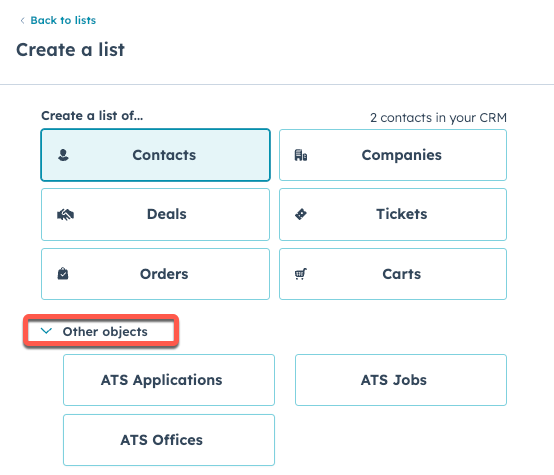
Create a list of app object records
- In your HubSpot account, navigate to CRM > Segments.
- In the top right, click Create list.
- Under Create a list of..., click to expand the Other objects section, then select [App object name].

Continue customizing your list settings by following the instructions in this article.
Create a workflow based on an app object
- In your HubSpot account, navigate to Automation > Workflows.
- In the top right, click Create workflow, then select From scratch.
- In the left panel, click Trigger manually.
- Search for and select [App object name], then click Save and continue.
