建立進階的電子商務報告
上次更新時間: 2025年11月19日
可搭配下列任何訂閱使用,除非另有註明:
-
行銷 Hub Professional, Enterprise
-
銷售 Hub Professional, Enterprise
-
Service Hub Professional, Enterprise
-
Data Hub Professional, Enterprise
-
Content Hub Professional, Enterprise
-
Commerce Hub Professional, Enterprise
-
部分功能需要 HubSpot 點數
透過 HubSpot 的報表與數據工具,深入洞察您的電子商務客戶。學習如何建立並運用資料集、自訂屬性與 模組,以更精準掌握客戶行為、細分受眾群體、追蹤購買歷史,進而優化銷售與行銷策略。
透過本文逐步指引,設定忠誠度評分、分析購買模式並監控物流流程,掌握資料集與 自訂報表的配置技巧。運用這些工具,您能精準區隔聯絡人、實現行銷個人化,並產出具行動價值的報表。
開始前準備事項
在設定應用情境前,請於交易物件建立電子商務銷售漏斗,包含以下階段:
- 結帳待處理
- 結帳放棄
- 結帳完成
- 已出貨
- 取消
需要訂閱 建立資料集需具備Data Hub Enterprise訂閱資格。
需要權限 建立或編輯資料集需具備超級管理員權限,或Data Studio 的編輯權限。
需要權限 需具備超級管理員權限,或Data Studio 的同步權限方可同步資料集。
部分功能需要 HubSpot 點數 需具備HubSpot 信用點數方可同步及匯出資料集。
客戶忠誠度評分
運用資料集計算客戶忠誠度分數,並透過分數篩選將客戶歸入不同層級(例如:最忠誠客戶歸入第一層級)。藉由分數與層級建立報表及分群,您可針對客戶量身打造銷售與行銷策略。
範例中的忠誠度評分計算公式如下:
- 若聯絡人於過去 60 天內有已成交的交易,則給予 5 分。
- 若聯絡人總營收超過 100 美元,則給予 10 分。
- 若聯絡人平均頁面瀏覽量超過三頁,則給予 10 分。
- 若聯絡人造訪您網站的次數超過 8 次,則給予 5 分。
分級公式計算方式如下:
- 忠誠度評分達15分或以上的聯絡人歸類為第一層級。
- 忠誠度評分介於9至14分者歸類為第二層級。
- 忠誠度評分低於9分的聯絡人歸類為第三級。
請根據實際應用需求調整數值。
使用資料集設定忠誠度與分級評分
使用資料集設定忠誠度與分級評分步驟:
- 在你的 HubSpot 帳戶中,瀏覽「資料管理」>「Data Studio」。
- 於右上角點擊建立資料集。若需將此欄位新增至現有資料集,請先點擊頂部的「資料集」標籤頁,再點選現有資料集。
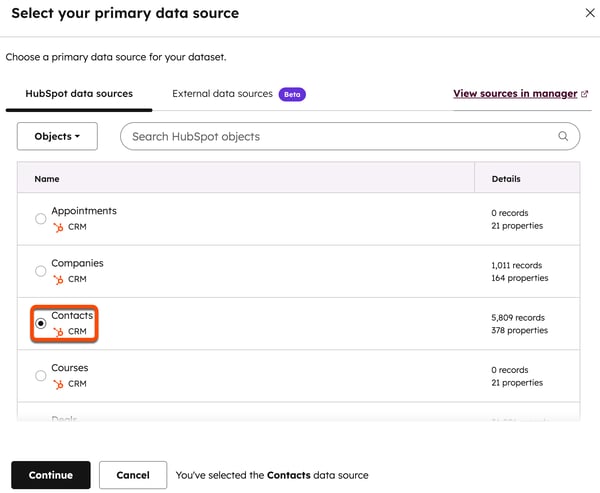
- 選擇「聯絡人」作為主要對象,然後點擊「繼續」。
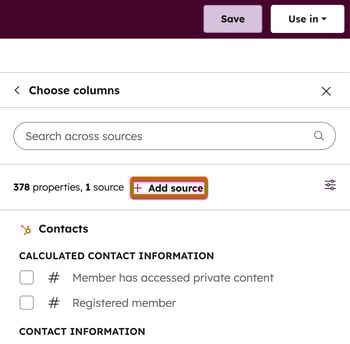
- 在右側面板點擊「+ 新增來源」。
- 選擇「交易」並點擊「繼續」。
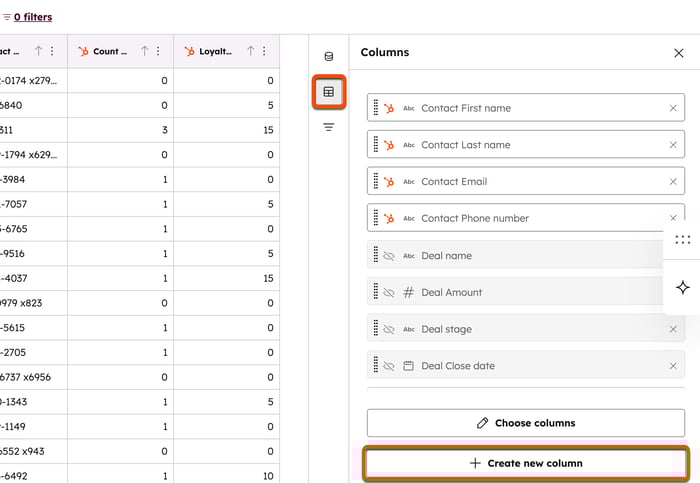
- 點擊右側面板中的「欄位」,然後點擊「+ 新增欄位」。
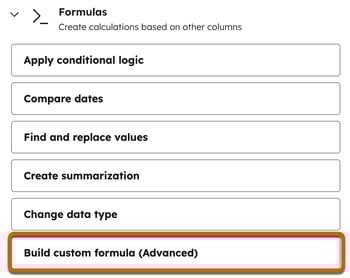
- 點擊「公式」以收合公式選單,接著點擊「建立自訂公式(進階)」。
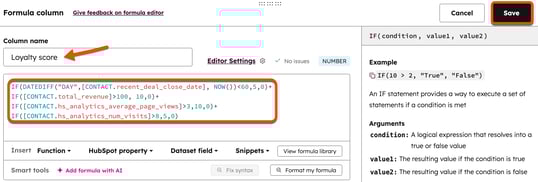
- 在底部欄位「欄位名稱」中輸入「忠誠度評分」。
- 在編輯框中輸入以下內容:
IF(DATEDIFF("DAY",[CONTACT.recent_deal_close_date], NOW())<60,5,0)+IF([CONTACT.total_revenue]>100, 10,0)+
IF([CONTACT.hs_analytics_average_page_views]>3,10,0)+
IF([CONTACT.hs_analytics_num_visits]>8,5,0) - 於公式視窗右上角點擊儲存。
- 點擊「+ 新增欄位」。
- 點擊「公式」以收合公式選單,接著點擊「建立自訂公式(進階)」。
- 在底部欄位「欄位名稱」中輸入「忠誠度等級」。
- 在編輯框中輸入以下內容:
IF(
 [Loyalty score] >= 15,
 "Tier 1",
IF([Loyalty score] >= 9, "Tier 2", "Tier 3")) - 在公式視窗右上角,點擊儲存。
- 點擊右上角的「儲存」以儲存資料集。
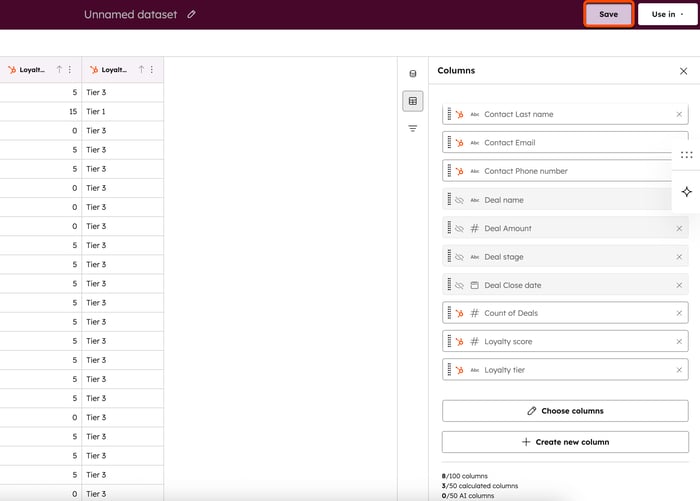
- 輸入名稱與說明後,點擊「儲存」。
- 使用此資料集時,請於右上角點擊「在 downCarat 中使用」,並選擇對應選項。
購買歷史
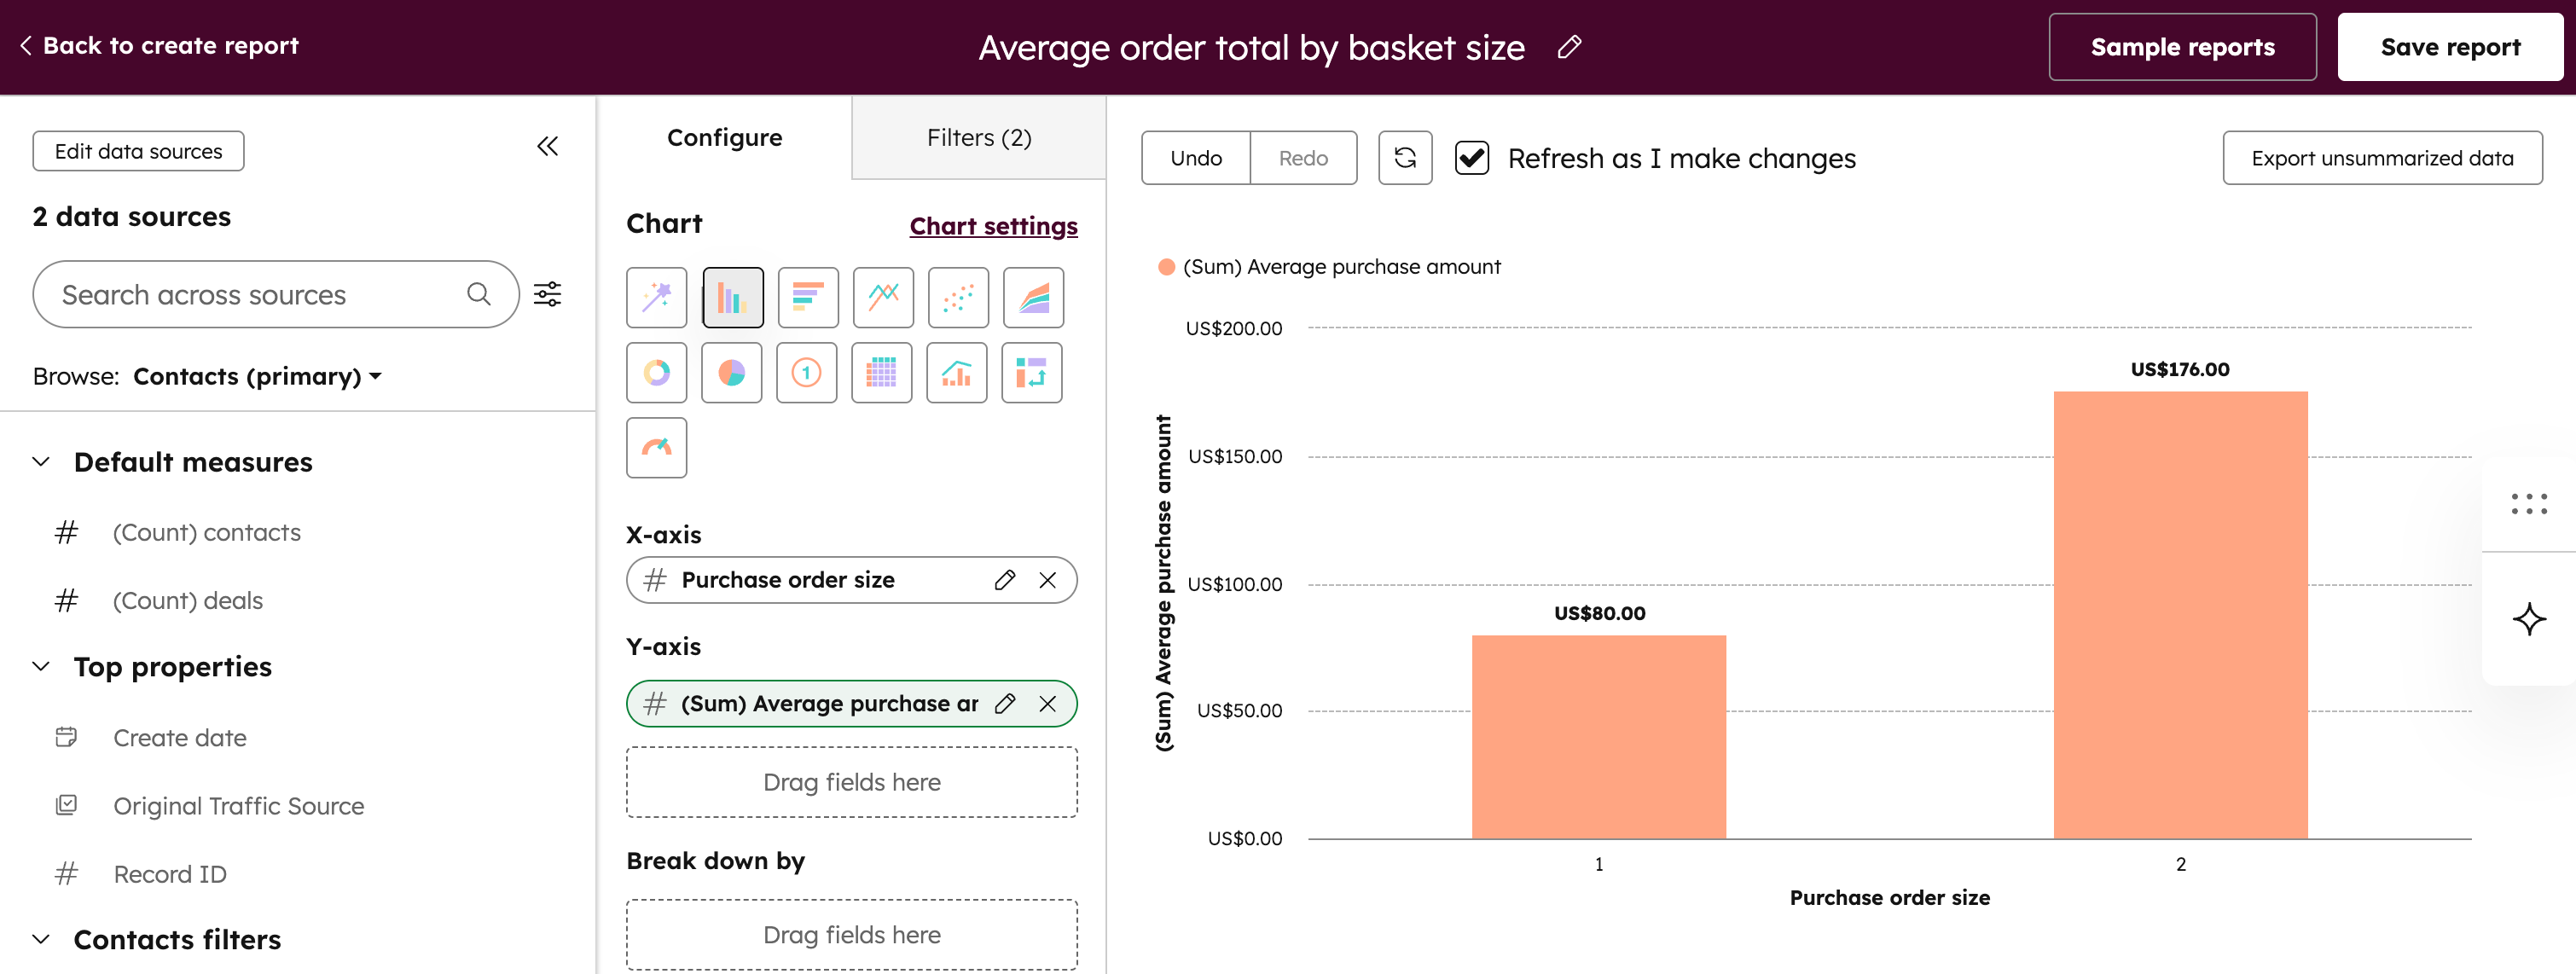
- 按購物籃規模劃分的平均訂單總額。
- 自上次購買起之天數。
- 重複購買者與單次購買者。
- 原始來源的平均購買金額。
按購物車規模劃分的平均訂單總額
運用平均訂單總額分析,透過向上銷售或交叉銷售機會提升平均訂單價值。
本範例中,建立兩個自訂屬性以計算平均購買金額與購買商品數量。接著建立報表,依據訂單規模(購買商品數量)檢視聯絡人的平均購買金額。
- 建立平均購買金額的彙總屬性,包含以下屬性:
- 物件類型: 聯絡人
- 欄位類型: 彙總
- 彙總類型: 平均值
- 數字格式: 貨幣
- 關聯記錄類型: 交易
- 關聯記錄屬性: 金額
- 建立一個用於採購訂單規模的彙總屬性,其屬性如下:
- 物件類型: 交易
- 欄位類型: 彙總
- 彙總類型: 計數
- 數字格式: 格式化或未格式化數字
- 關聯記錄類型: 明細項目
- 關聯記錄屬性: 數量
- 建立具備以下屬性的自訂報表:
- 主要資料來源: 聯絡人
- 附加資料來源: 交易
- Y軸屬性: 平均採購金額
- X軸屬性: 採購訂單規模
自上次購買起之天數
運用資料集依據聯絡人上次購買後經過的天數進行分群。您可在分群、電子郵件行銷及其他行銷管道中運用此數據,持續與曾向您購買的客戶保持互動。
- 在你的 HubSpot 帳戶中,瀏覽「資料管理」>「Data Studio」。
- 在右上角點擊建立資料集。若要將此欄位新增至現有資料集,請點擊頂部的「資料集」標籤頁,然後點選現有資料集。
- 選擇「聯絡人」作為主要對象,然後點擊「繼續」。

- 在右側面板點擊「+ 新增來源」。

- 選擇「交易」並點擊「繼續」。
- 在右側面板點擊「欄位」,再點擊「+ 新增欄位」。

- 點擊「公式」以收合公式選單,接著點擊「建立自訂公式(進階)」。

- 在底部欄位「欄位名稱」中輸入「自上次購買以來之時間」。
- 在編輯框中輸入以下內容:
DATEDIFF("DAY", [CONTACT.recent_deal_close_date], NOW()) - 於公式視窗右上角點擊「儲存」。

- 點擊右上角的「儲存」以儲存資料集。

- 輸入名稱與說明後,點擊「儲存」。
- 若要使用此資料集,請於右上角點擊「在 downCarat 中使用」,並選擇選項。
重複購買者
運用資料集依據購買次數進行聯絡人分群。您可在分群、電子郵件行銷及其他行銷管道中運用此數據,鎖定目標客戶促成重複購買。
- 在你的 HubSpot 帳戶中,瀏覽「資料管理」>「Data Studio」。
- 在右上角點擊建立資料集。若要將此欄位新增至現有資料集,請先點擊頂部的「資料集」標籤頁,再點選現有資料集。
- 選擇「聯絡人」作為主要對象,然後點擊「繼續」。

- 在右側面板點擊「+ 新增來源」。

- 選擇「交易」並點擊「繼續」。
- 在右側面板點擊「欄位」,再點擊「+ 新增欄位」。

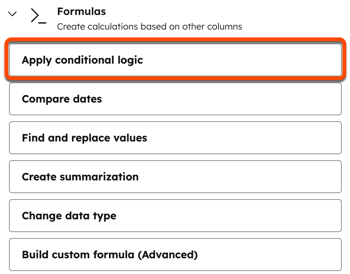
- 點擊「公式」以收合公式選單,接著點擊「套用條件邏輯」。
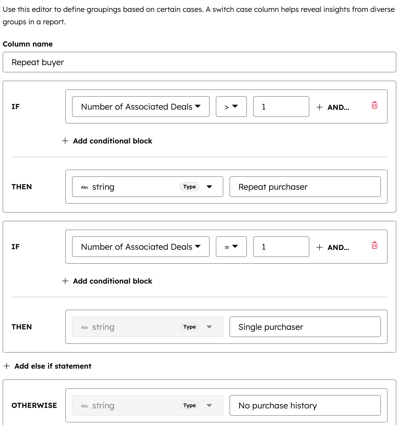
- 在底部欄位「欄位名稱」中輸入「重複購買者」。
- 在IF:
- 點擊「選擇屬性或欄位」下拉選單,選擇「關聯交易數量」。
- 點擊「= 」下拉 選單並選擇「>」( 大於)。
- 在輸入值欄位中輸入1。
- THEN 旁邊:
- 將類型欄位保留為字串。
- 在輸入值欄位中,輸入「重複購買者」。
- 在IF THEN語句下方,點擊+ 新增 else if 語句。
- IF 欄位旁:
- 點擊「選擇屬性或欄位」下拉選單,選取「關聯交易數量」。
- 點擊「= 」下拉選單 並選擇「=( 等於)」。
- 在輸入值欄位中輸入1。
- 在THEN 欄位旁:
- 將「類型」欄位保留為「字串」。
- 在輸入值欄位中,輸入單一購買者。
- 在「否則」欄位旁:
- 將「類型」欄位保留為「字串」。
- 在輸入值欄位中,輸入無購買記錄。
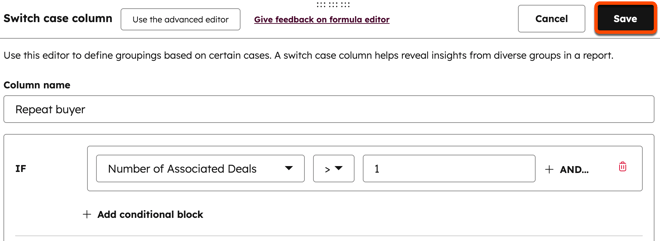
- 於公式視窗右上角點擊「儲存」。
- 於右上角點擊「儲存」以儲存資料集。

- 輸入名稱與說明後,點擊「儲存」。
- 若要使用此資料集,請於右上角點選「在 downCarat 中使用」,並選擇選項。
原始來源平均購買金額
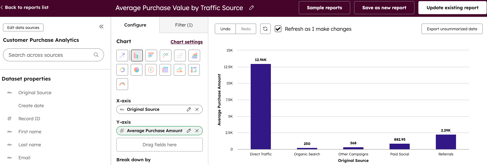
運用原始來源平均消費金額計算,分析各管道(如直接流量、轉介流量、付費社群)的消費金額。
本範例中,請建立自訂屬性以計算平均消費金額,再建立報表檢視聯絡人依原始來源的平均消費金額。
請注意:若您先前已為「購物車規模平均訂單總額」用例設定過平均消費金額的自訂屬性,可直接沿用該屬性,無需另行建立。
- 建立平均購買金額的彙總屬性,其屬性如下:
- 物件類型: 聯絡人
- 欄位類型: 彙總
- 彙總類型: 平均值
- 數字格式: 貨幣
- 關聯記錄類型: 交易
- 關聯記錄屬性: 金額
- 建立具備以下屬性的自訂報表:
- 主要資料來源: 聯絡人
- 附加資料來源: 交易
- Y軸屬性: 平均購買金額
- X軸屬性: 原始流量來源(交易屬性)
運送與物流
運用資料集彙整出貨耗時與逾期出貨訂單數量。
運送時長與逾期運送
本範例中,請建立自訂屬性並於工作流程中使用,以記錄結帳完成的時間與日期。建立資料集欄位計算完成運送所需時間,另建立欄位計算運送逾期狀況。這些欄位可後續應用於報表中。
- 設定您的銷售管道。
- 建立具備以下屬性的自訂屬性:
- 標籤: 結帳完成時間戳記
- 物件類型: 交易
- 欄位類型: 日期與時間選擇器(僅顯示日期與時間),並允許任何日期。

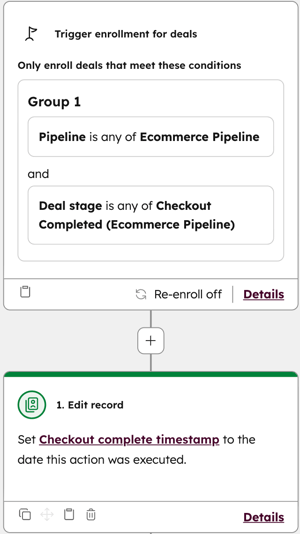
- 建立具備以下觸發條件與動作的工作流程:
- 觸發條件:交易處於電子商務流程中,且處於結帳完成階段。
- 動作:將結帳記錄的時間戳記屬性設定為結帳完成日期。
- 在你的 HubSpot 帳戶中,瀏覽「資料管理」>「Data Studio」。
- 於右上角點擊建立資料集。若需將此欄位新增至現有資料集,請先點擊頂部的「資料集」標籤頁,再點選現有資料集。
- 選擇「聯絡人」作為主要對象並點擊「繼續」。

- 在右側面板點擊「+ 新增來源」。

- 選擇「交易」並點擊「繼續」。
- 在右側面板點擊「欄位」,接著點擊 「選擇欄位」→「 edit 」。
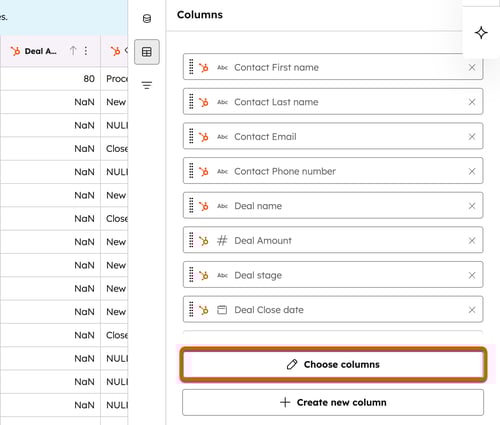
- 在右側面板點擊「交易」以收合交易屬性,勾選「 記錄 ID」與「區域」核取方塊。
- 點擊「公式」以收合公式選單,接著點擊「建立自訂公式(進階)」。

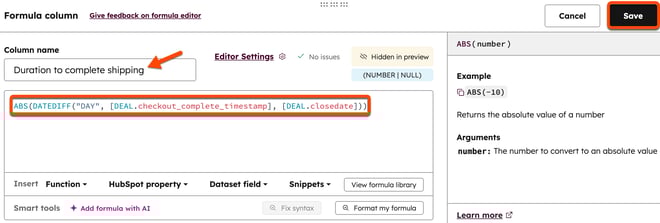
- 在底部欄位「欄位名稱」中輸入「完成運送所需時間」。
- 在編輯框中輸入以下內容:
ABS(DATEDIFF("DAY", [DEAL.checkout_complete_timestamp], [DEAL. closedate])) - 於公式視窗右上角點擊「儲存」。
- 在右側面板點擊「欄位」,然後點擊「+ 新增欄位」。

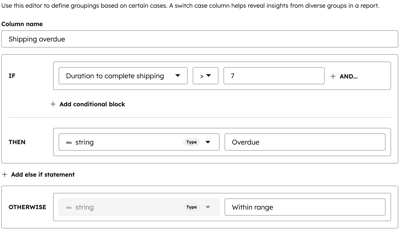
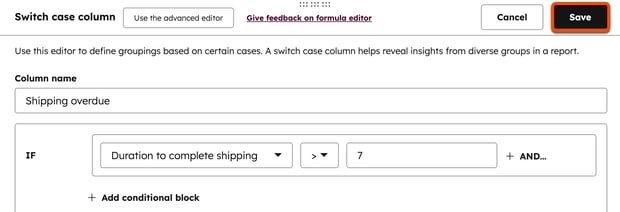
- 點擊「公式」以收合公式選單,接著點擊「套用條件邏輯」。

- 在底部欄位「欄位名稱」中輸入:貨運逾期。
- 在IF:
- 點擊「選擇屬性或欄位」下拉選單,選取「完成運送所需時間」。
- 點擊「= 」下拉選單 並選擇「>」( 大於)。
- 在輸入值欄位中輸入7。
- THEN 欄位旁:
- 保留「類型」欄位為「字串」。
- 在輸入值欄位中輸入逾期。
- 在「否則」欄位旁:
- 將「類型」欄位保留為「字串」。
- 在輸入值欄位中,輸入「在範圍內」。
- 於公式視窗右上角點擊「儲存」。
- 於右上角點擊「儲存」以儲存資料集。

- 輸入名稱與說明後,點擊「儲存」。
- 若要使用此資料集,請於右上角點擊「在 downCarat 中使用」,並選擇選項。
- 接著可建立具備下列屬性的自訂報表:
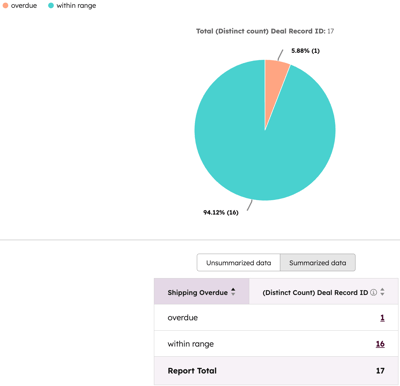
- 逾期出貨率報告:
- 主要資料來源:您所建立的資料集
- 逾期出貨率報告:
-
-
- 圖表類型: 圓餅圖
- 數值: 交易記錄ID(唯一計數)
- 按以下項目細分: 超期運送
- 按區域劃分的延遲出貨報告:
- 主要資料來源:您建立的資料集
- 圖表類型: 圓餅圖
- 數值: 延遲出貨
- 細分依據: 交易區域
- 平均完成運送所需時間:
- 主要數據來源: 您建立的資料集
- 圖表類型: 垂直條形圖
- Y軸: 完成運送所需時間(平均值)
- 細分依據: 交易區域
-
依受眾或產品細分的產品毛利分析
運用資料集按產品受眾或產品名稱進行拆解,從而掌握哪些受眾或產品帶來最佳回報。
- 在你的 HubSpot 帳戶中,瀏覽「資料管理」>「Data Studio」。
- 在右上角點擊建立資料集。若要將此欄位新增至現有資料集,請點擊頂部的「資料集」標籤頁,然後點擊現有資料集。
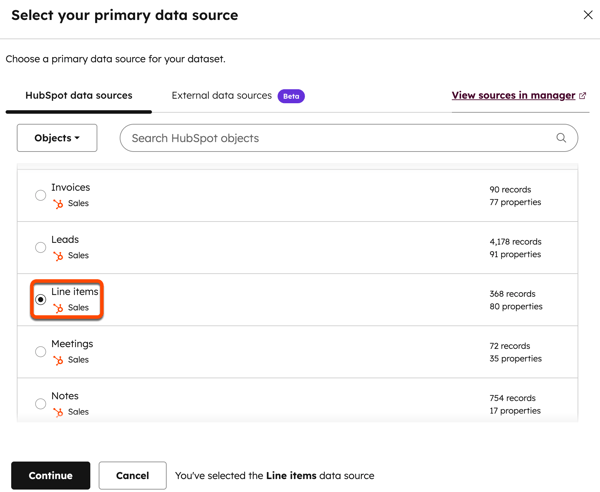
- 選擇「行項目」作為 主要物件,然後點擊「繼續」。
- 在右側面板中,點擊「+ 新增來源」。

- 選擇「交易」並點擊「繼續」。
- 在右側面板中,點擊「+ 新增來源」。
- 選擇聯絡人並點擊繼續。
- 在「交易階段」欄位中,記錄「已出貨」階段的ID編號。

- 在右側面板點擊「欄位」,然後點擊「+ 新增欄位」。

- 點擊「公式」以收合公式選單,接著點擊「建立自訂公式(進階)」。

- 在底部欄位「欄位名稱」中輸入「毛利」。
- 在編輯框中輸入以下內容:
IF([Deal stage]=="Shipped ID number (e.g., 57441674)", [Unit price] - [Unit cost], null) - 於公式視窗右上角點擊「儲存」。

- 點擊右上角的「儲存」以儲存資料集。

- 輸入名稱與說明後,點擊「儲存」。
- 若要使用此資料集,請於右上角點選「在 downCarat 中使用」,並選擇選項。
顧客旅程與行為分析
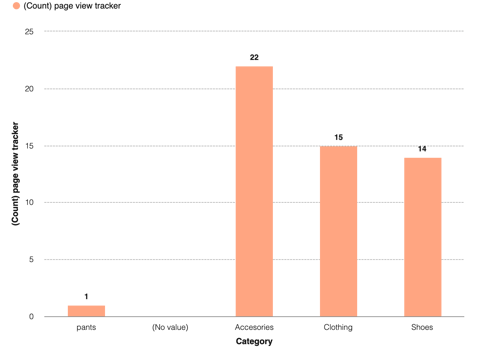
按產品類型劃分的頁面瀏覽量
需要訂閱 使用自訂事件需具備企業版訂閱資格。
運用自訂事件追蹤產品瀏覽次數,並透過自訂屬性進行分類。建立報表分析各產品類別的瀏覽量排名。
- 建立自訂事件以追蹤產品瀏覽次數。此應用情境建議透過API 或JavaScript 建立事件。若需自訂事件設定協助,請考慮採用HubSpot 解決方案合作夥伴服務。
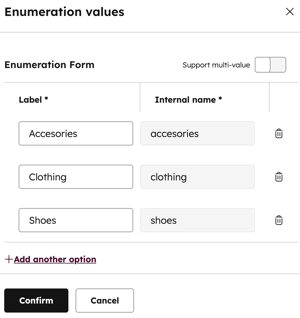
- 建立自訂事件時,請為產品類型建立自訂枚舉屬性。
- 為自訂事件建立專屬報表。在報表中,將產品類型繪製於 x 軸,自訂事件繪製於 y 軸。
顧客購買旅程
需要訂閱 建立基於聯絡人的客戶旅程報告需具備Marketing Hub 或 Service Hub Enterprise訂閱方案。
運用自訂事件追蹤顧客旅程中的接觸點,包含商品瀏覽、加入購物車、購物車放棄及完成購買。將自訂事件加入顧客旅程報告,即可追蹤各事件間的轉換情況。
請注意:若您先前已為「按購物車金額分析平均訂單總額」用例設定平均購買金額自訂屬性,可直接沿用該屬性,無需另行建立。
- 建立以下三種自訂事件。此應用情境建議透過API 或JavaScript 建立事件。若需協助設定自訂事件,請考慮採用HubSpot 解決方案合作夥伴服務。
- 產品瀏覽次數
- 購物車狀態
- 結帳頁面追蹤器
- 將自訂事件作為階段新增至客戶旅程報告。

發送購物車放棄郵件
需要訂閱 使用行銷電子郵件中的模組需具備Marketing Hub Professional或Enterprise訂閱方案。
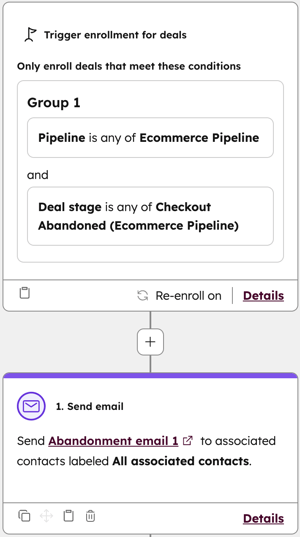
透過發送個人化的購物車放棄提醒電子郵件( )維持客戶參與度。此範例中,請在工作流程中使用「結帳放棄」管道階段,向遺留購物車商品的買家發送郵件。
- 設定您的銷售管道
- 於設計管理器中建立模組。將下列自訂模組語法加入模組(視需求更新標題與字型樣式):
{#{{ module.deal.id }}#} {# Get the Contact associated to the Deal #} {% set associated_contact = crm_associations({{ module.deal.id }}, "HUBSPOT_DEFINED", 3, "orderBy=-createdate") %} {# Get the Line_Items associated to the Deal #} {% set associated_line_items = crm_associations({{ module.deal.id }}, "HUBSPOT_DEFINED", 19, "orderBy=-createdate") %} <h2 style="font-family:verdana; margin-top:20px; color:#ff6347; margin-left:10px; margin-right:10dp; text-align: center;"> Hello {{ associated_contact.results[0].firstname }}, Thank you for Visiting our Store! </h2> <p style="margin-left:10px; margin-right:10dp; text-align: center;"> We noticed that you haven't completed your order. Here is a little reminder of what you have in your current shopping cart. Feel free to complete your purchase by clicking on the button below. </p> {# Grab the product of each line item and display the info #} {% for item in associated_line_items.results %} {% set product = crm_object("product", item.hs_product_id, "name,price,hs_url", false) %} <div style="text-align:center"> <img style="width: 40%" src={{ product.hs_url }} /> <p> {{ product.name }} </p> <h4 style="font-family:verdana;"> ${{ product.price }} </h4> </div> {% endfor %} - 建立行銷電子郵件並加入模組。
- 建立具備以下觸發條件與動作的工作流程:
- 觸發條件:交易處於電商銷售管道中的「購物車放棄」階段。啟用重新註冊功能。
- 動作:發送電子郵件。
