- Knowledge Base
- Marketing
- Files
- Upload files to use in your HubSpot content
Upload files to use in your HubSpot content
Last updated: October 23, 2025
Available with any of the following subscriptions, except where noted:
Upload files to the files tool for use in your HubSpot content. Once uploaded, your images, fonts, audio files, PDFs, and other files will be hosted on HubSpot's content delivery network servers. You can also upload files using the Hubspot mobile app.
After uploading your files, you can organize, edit, and delete the files, or insert them into your content. You can also share files directly by providing a download link to a file.
Please note: by default, files uploaded to the files tool are hosted on a public CDN file URL. HubSpot does not support the management of sensitive information. For more information, please see our Terms of Service.
Before you get started
Before uploading your files, please note the following:
- Before uploading a file, review the file tool's supported file types and sizes.
-
By default, files uploaded to the files tool are hosted on a public file URL. If you don't want your files to be visible to search engines, learn how to customize the visibility of your file URL.
- You can only upload up to 100 files at a time through the files tool. If you want to upload more files to your HubSpot account, you can use the external auth API. Learn more about using the file upload API in HubSpot's developer documentation.
- It is not possible to track views from the files tool. When a visitor accesses a file, whether as a download or a URL, it will not count toward any page view metrics.
Upload files from your computer
To upload a file:- In your HubSpot account, navigate to Content > Files.
-
In the top right, click Upload files.
-
Browse your computer's hard drive for files to upload. Select your files and click Open.
-
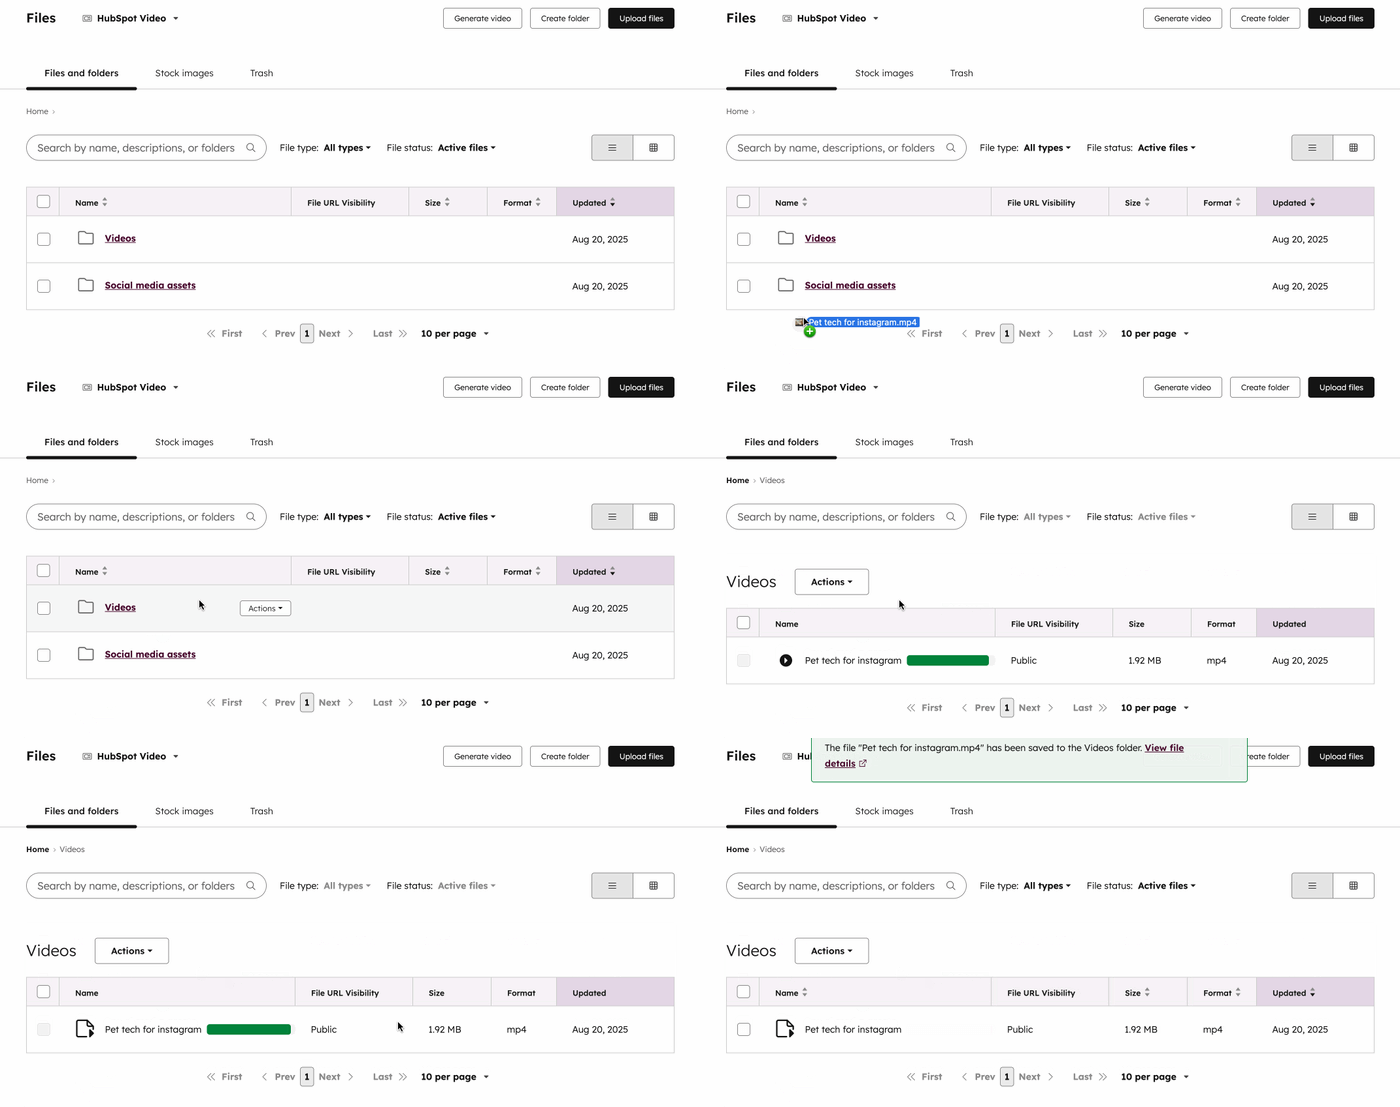
Alternatively, you can also drag and drop files in the open file manager window. You can drag and drop the files directly to a specific folder or the folder you're in.

Upload files from your Google Drive
- In your HubSpot account, navigate to Content > Files.
-
In the top right, click Import from Google Drive.

- In the dialog box, click the dropdown menu and select the Google account that you'd like to use. Alternatively, to add a new account:
- Click the dropdown menu and select Add an account.
- In the dialog box, click Approve and connect Google Drive.
- In the pop-up box, select the account that you'd like to connect, then click continue.
- Then, review the displayed permissions. HubSpot requires all of these permissions in order to retrieve files from your Google Drive. After reviewing the permissions, click Allow. The added account will appear in the dropdown options.

- Click Open Google Drive Picker.
- Select the files that you'd like to add and click Select in the bottom left. The files will be automatically added to the file manager with a File URL Visibility of Public.
Use uploaded files in your content
After you upload your files, you can use them as images, videos, or file download links in your HubSpot content. Learn more about inserting files into your content:- In your HubSpot account, navigate to Content > Files.
- Click the name of a file.
- In the right panel, click General. The File size will be displayed in this section.
- To add videos to your HubSpot content, ensure that the Advanced features switch is toggled on.

Review content and templates where files are used
You can review a list of HubSpot content and templates using images or video files hosted in the file manager. When reviewing your files, please note the following:- Only the locations of video and image files are indexed and displayed. The locations of other types of files, such as PDFs, are not indexed.
- Only published content or templates will be listed in the File details panel.
- If your HubSpot-hosted content or template is not published, it will not appear in this list.
- For example, if an image file is used in an email, the email must be first sent.
- External pages will not be included in this list.
- Images injected via JavaScript will not be included in this list. For example, in certain custom accordion or gallery modules.
- In your HubSpot account, navigate to Content > Files.
- Locate the file you want to review and click the file name.
- In the right panel, click File usage to view a list of HubSpot content and templates using this file.
- Click the content type to expand a list of content using the file.
- Click on a specific email, page, or blog post to open it in the content editor. Or, click on a template to open it in the design manager.
