
Last updated: April 12, 2024
Available with any of the following subscriptions, except where noted:
|
|
To migrate your existing blog content into HubSpot, all you need is the URL of a live post.
The smart copy feature analyzes your blog post template to identify your blog post titles, authors, content, and tags. After your entire blog is scanned, you'll confirm the mappings for these properties, then import your existing posts into a new HubSpot blog.
Before you get started
- When you create your HubSpot account, there will be a new default blog in your account you can use to import your blog posts.
- You'll use a URL from an existing blog post to import all of your existing blog content into your HubSpot blog. To make the import process easier, use a sample blog post with a distinctive title, featured image, and opening paragraph so these elements are easy to recognize when you confirm your blog post mappings.
- The smart copy feature isn't compatible with blog posts that include a hashtag in the URL structure. For example, www.exampleblog.com#tag wouldn't work with this feature.
- The smart copy feature isn't compatible with blogs hosted on these domains: facebook.com, amazon.com, google.com, wikipedia.org, twitter.com,
medium.com, .ikea.com, hubapi.com, themindbodyspiritstore.com, wwe.com - The smart copy feature isn't compatible with the dot-separated date format. For example, a blog post with a publish date of 09.15.2020 wouldn't have that publish date imported.
- Acceptable date formats include, but are not limited to:
- YYYY-MM-DD (2022-03-15)
-
- YYYYMMDD (20220315)
-
- MM/DD/YYYY (03/15/2022)
- DD-MM-YYYY HH:MM:SS (15-03-2022 12:06:32)
- DD Mon YYYY (15 Mar 2022)
- Month DD YYYY HH:MM (March 15 2022 12:06)
Please note: for / separated dates, the locale set in the HTML determines whether a date format is considered valid. For example, for a page using the parameter <html lang="en-GB"> (Great Britain), DD/MM/YYYY would be accepted, but MM/DD/YYYY would not.
- If you're importing a WordPress blog, try the WordPress Connect feature instead.
-
Only 400 blog posts can be included in a single import. You can repeat the import process multiple times for the same scan.
Enter your blog post URL into the smart copy tool
- In your HubSpot account, click the settings icon in the top navigation bar.
- In the left sidebar menu, navigate to Content > Blog.
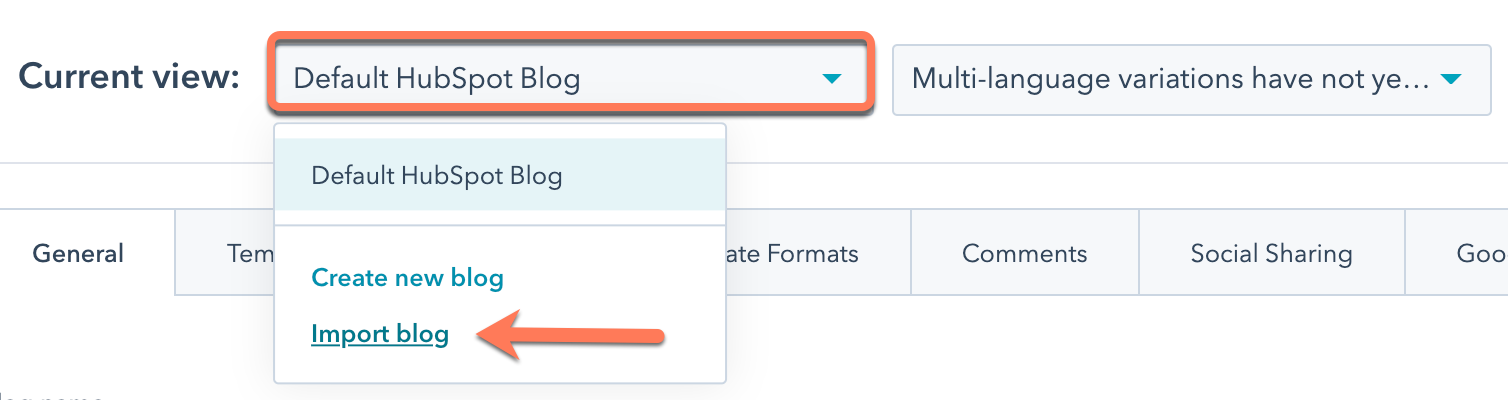
- In the Current view section, click the first dropdown menu and select Import blog.
- On the import overview page, click Import new blog in the top right. If you've already imported a blog, click the Start new import dropdown menu instead and select Blog posts.
- Select the Smart copy option, then click Next.
- In the Blog homepage field, enter the URL of your blog's listing page.
Please note: if some posts aren't imported to HubSpot, repeat this process and leave the Blog homepage field blank. This will allow the blog importer tool to crawl more pages to find all your blog content.
- In the Recent blog post field, enter the URL of one of the blog's recent posts. If there is an issue with the URL, you may see one of these errors.
- Click the Which blog platform are you currently using? dropdown menu and select your blog platform. If you don't know which platform hosts your blog, select I am not sure.
- Click the HubSpot blog dropdown menu and select the blog where the imported posts will be hosted. If you need to create a new blog, click Create new blog instead. Learn more about creating a blog in HubSpot.
- In the lower right, click Copy blog posts.
It will take some time for your blog posts to be scanned and copied into the importer tool. Check back in about an hour to complete the process. You'll also receive an email to confirm the scan is complete.
Review your blog post mappings
After the tool has finished scanning your blog posts, you'll see Scan completed in the Status column. If your blog encountered any errors or hit the limit of 10,800 pages, you'll see details about your import in the Status column. To import more than 10,800 pages with the blog importer tool, import an XML file instead.
To finish the import process, click Review results to confirm the mappings for your blog content. The smart copy tool will suggest any field mappings it can find, based on the content of your live blog post.
For each field, select the correct value from those listed or click Find the [field] with a CSS selector:
- Title: select the title of the blog post. This is a required field.
- Author: select the author of the blog post. This is a required field. If you prefer to not display your blog post authors, you can select Author isn't displayed, use "Admin" instead. You can customize this default value before you import your posts.
- Publish date: select the publish date of the blog post. This is a required field. If you prefer to not display your blog post publish date, you can select Publish date isn't displayed, use [today's date] instead. You can customize this default value before you import your posts.
- Featured image: the tool will identify any images in your blog post body that might be the featured image. Select the featured image for this blog post to tell the smart copy tool where to locate the featured image for the rest of your posts. To avoid importing featured images for your blog posts, select Featured image isn't displayed, don't import it.
- Post body: the tool will display a preview of the post body. If the displayed text isn't correct, click No, see another choice. This field is required.
- Categories/Tags: select the categories or tags applied to this blog post. If you don't want to import the categories or tags of this blog post, select Category/tag isn't displayed, don't import it.
To scan a different blog post as the source for your blog import, select Change URL and enter a new blog post URL. This will restart the field mapping process.
Troubleshoot mappings
If the blog import tool doesn't map parts of your blog post content correctly, you can tell the smart copy feature exactly where to locate the information on the live blog post.
The instructions below document how to find the CSS selector on your blog post in a Chrome browser. For instructions on Safari, Firefox, or any other web browser, see their respective developers documentation.
- Navigate to the URL of the live blog post you submitted during the Import process.
- Right-click your cursor directly on the blog post, then select Inspect element.
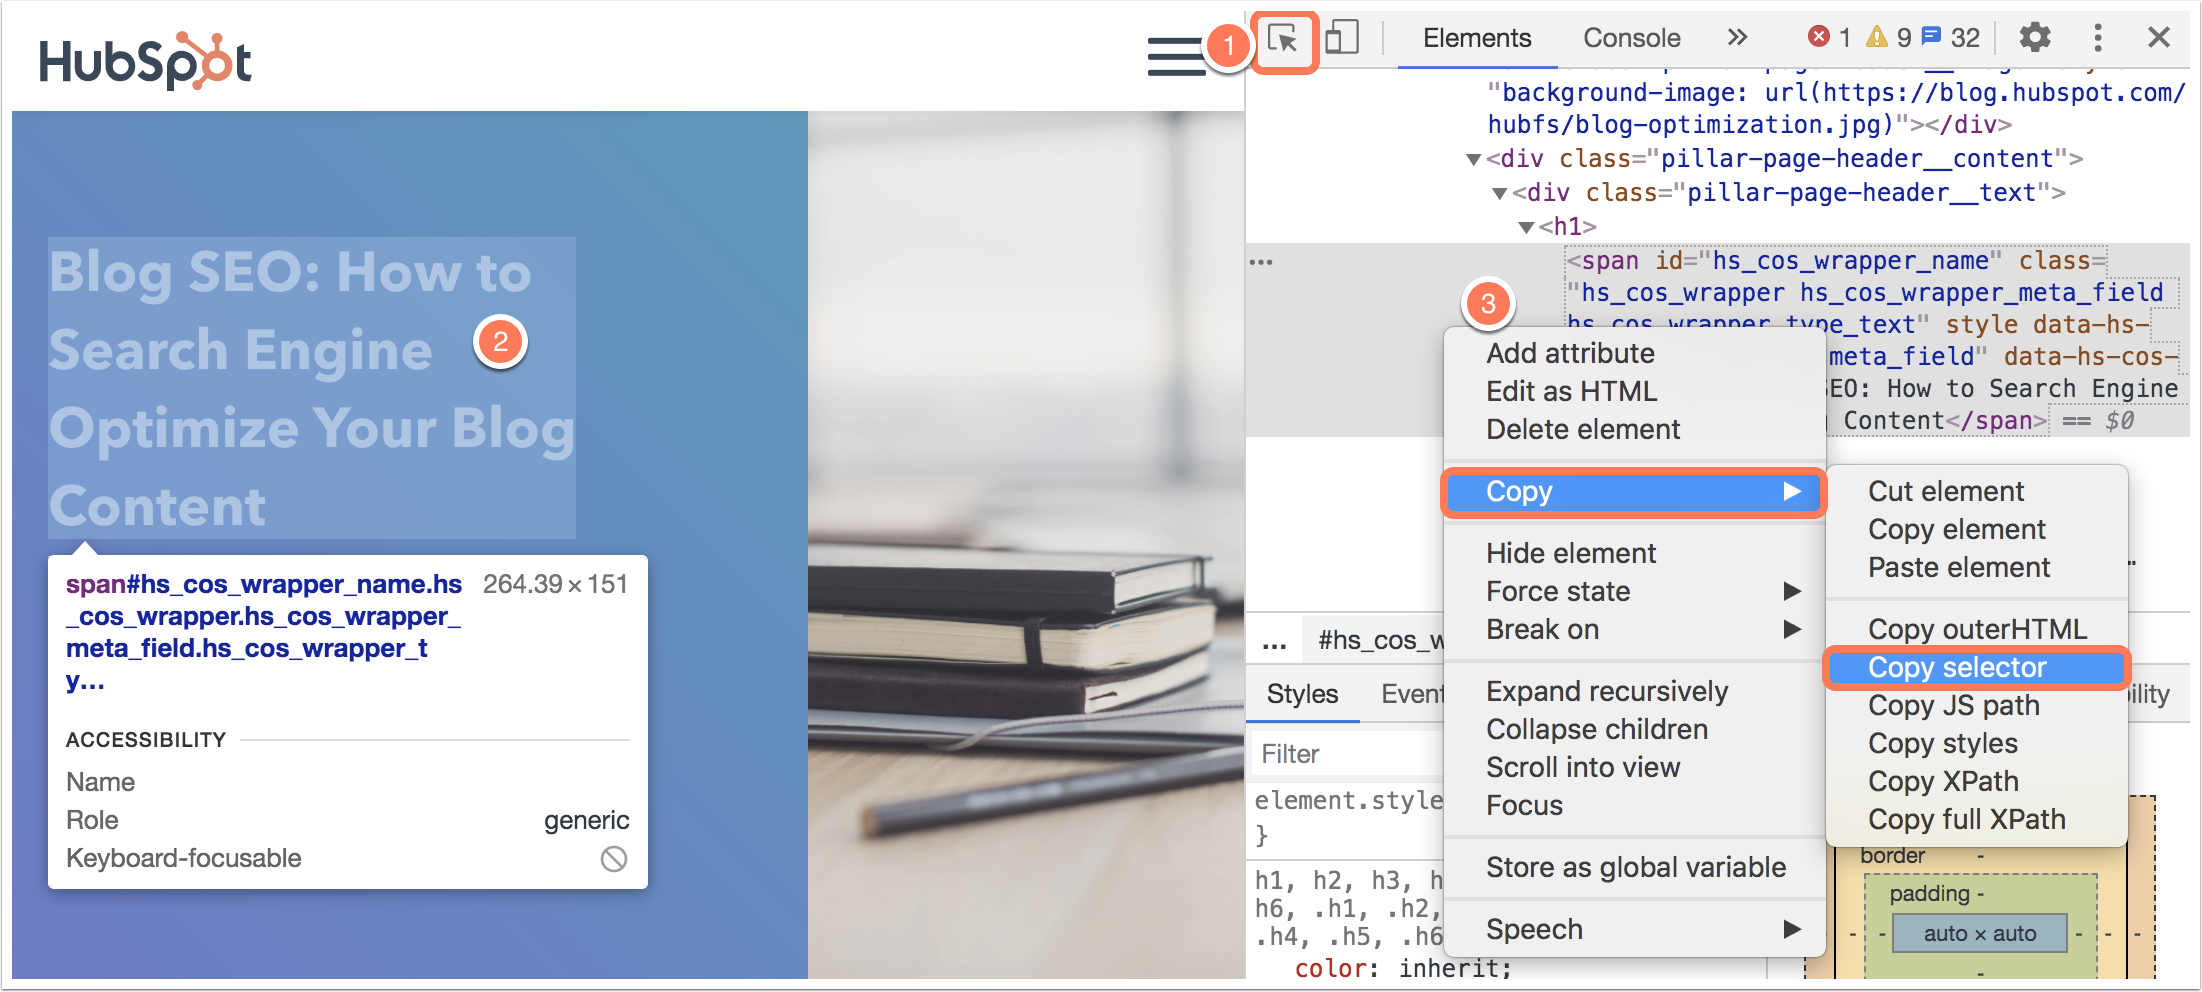
- In the upper left, click the selector arrow to isolate a specific element on the page.
- Click the blog post title, author, publish date, featured image, post body, or categories/tags on the live blog post to inspect this element. You'll see this element highlighted on the live page and within the Elements panel.
- Right click the highlighted element in the inspector, then select Copy > Copy selector. This automatically copies the CSS selector to your clipboard.
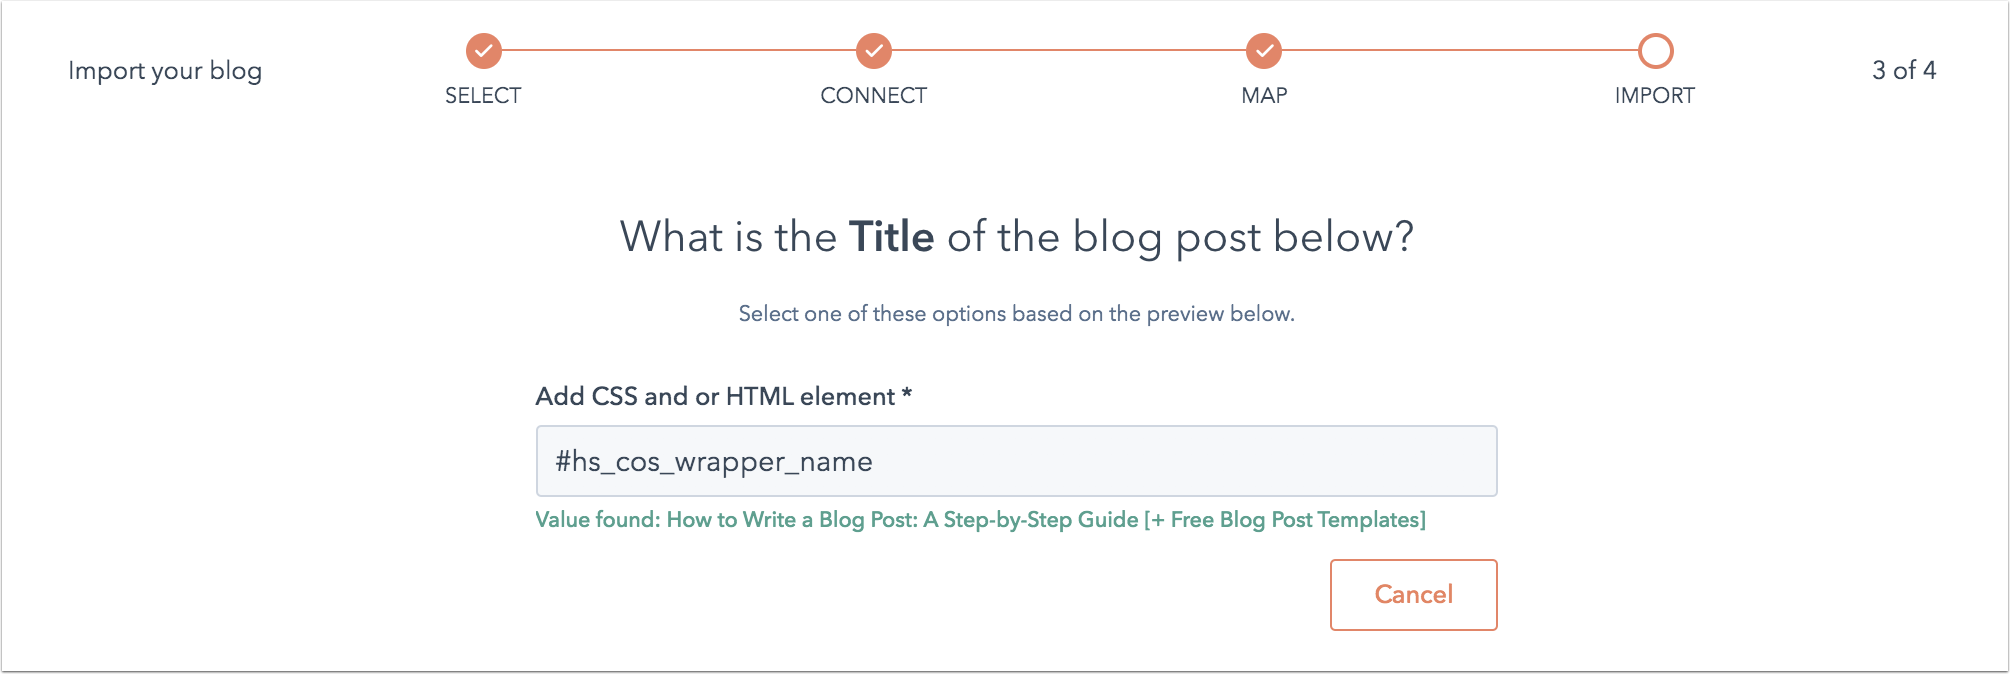
- Within HubSpot, paste this selector in the Add CSS and or HTML element field. Then click Next to continue your mappings.
Learn more about identifying CSS selectors in this Community post with additional details and examples.
Finish your import
After your mappings are completed, your blog import status will change to Preparing posts for import. You can now review and finalize your blog import.
- In your HubSpot account, click the settings icon in the top navigation bar.
- In the left sidebar menu, navigate to Content > Blog.
- In the Current view section, click the first dropdown menu and select Import blog.
- On the import overview screen, click Review results next to the import.
- To customize default values set during the field mapping process, click Change default values at the top of the table.
- Click Preview to see a preview of your blog post content, a listing of the values the importer tool identified for that post.
- All blog posts are selected for import by default. Clear the checkbox next to any blog posts that you want to omit from your import.
- After you've finalized your selection, click Import.
- In the Publishing status dialog box, select whether to import these blog posts as drafts or as live published posts. Then click Save.
Your blog import will update to Import in progress status. Once the import is complete, the status will update to Import completed.
If there are any errors during the import process, the status will update to Import succeeded with some errors. You can review the details by clicking More > View details. If you retry the import process with a new blog post link, any errors from the original import will be reset.
Next steps: set up your blog in HubSpot
After you've imported your blog posts, finish setting up your blog in HubSpot:
- Edit your blog settings to customize your blog title, URL, and social sharing options.
- Configure your blog subscription options to send email notifications to your blog subscribers.
- Set up your company logo and branding in HubSpot.
- Learn how to edit your blog template to control the styles and appearance of your blog.
- Learn how to edit and publish a new blog post in HubSpot.
